
Building a Lab Server to Run ESXi and Hyper-V
in Hardware on Esxi, Hyper-v, Lab
There’s typically not too much that you can do to reduce the size of your master image. You might use application virtualization or layering solutions to reduce the number of master images, but once you work out what needs to go into the core image, that’s going to dictate the size of the image.
In my lab environment, I often want to start a list of virtual machines, but without taxing the system in the process by starting them all at the same time. I could do that manually, but that’s no fun.
Here’s a short function I wrote to sequentially start a list of virtual machines - the script will start a VM and wait for that VM to boot before starting the next VM. You can optionally also wait additional time before starting the next VM to give the first one some time to finish starting it’s services etc.
This version currently supports Hyper-V only. The script does not currently return anything, but has a number of parameters:
Function Start-SequentialVMs {
    <#
        .SYNOPSIS
            Starts a list of VMs.

        .DESCRIPTION
            This function starts a list of VMs sequentially. It will wait until a VM is booted, optionally pause for a number of seconds, before starting the next VM.

        .PARAMETER ComputerName
            Specifies the Hyper-V host to start the VM on.

        .PARAMETER VM
            Specifies a list of VMs to start.

        .PARAMETER Wait
            Specifies a number of seconds to wait after the previous VM has booted successfully. Defaults to 180 seconds.

        .PARAMETER ShowProgress
            Specified whether to show progress as VMs are started.

        .EXAMPLE
            Start-SequentialVMs -ComputerName hyperv1 -VMList "sql1", "pvs1", "xd71" -Wait 20

        .NOTES

        .LINK
    #>
    param(
        [Parameter(Mandatory=$true, Position=0,HelpMessage="Hyper-V host.")]
        [string]$ComputerName = $(throw = "Please specify a remote Hyper-V host to start VMs on."),

        [Parameter(Mandatory=$true, Position=1,HelpMessage="List of VMs to start.")]
        [string[]]$VMList = $(throw = "Please specifiy a list of VMs to start"),

        [Parameter(Mandatory=$false)]
        [int]$Wait = 180,

        [Parameter(Mandatory=$false)]
        [bool]$ShowProgress
    )

    # Connect to Hyper-V host before attempting to start VMs. Stop script if unable to connect
    Write-Verbose "Connecting to VM host."
    Get-VMHost -ComputerName $ComputerName -Verbose $False -ErrorAction Stop

    # Start progress at 0
    $Percent = 0

    # Step through list of provided VMs
    ForEach ( $vm in $VMList ) {

        # Convert current location in list of VMs to a percentage
        $Percent = ($VMList.IndexOf($vm)/$VMList.Count) * 100

        # Show progress if specified on the command line
        If ($ShowProgress -eq $True) { Write-Progress -Activity "Starting VMs." -Status "Starting VM $vm." -PercentComplete $Percent }

        # Get status for current VM
        Remove-Variable currentVM -ErrorAction SilentlyContinue
        Write-Verbose "Getting status for VM $vm..."
        $currentVM = Get-VM -ComputerName $ComputerName -Name $vm -ErrorAction SilentlyContinue

        # If the VM exists, then power it on if it is in an Off state
        If ($currentVM.Length -gt 0) {
            If ($currentVM.State -eq "Off" ) {
                Start-VM -ComputerName $ComputerName -Name $vm -Verbose

                # Wait for VM to boot and report a heartbeat
                Write-Verbose "Waiting for VM heartbeat."
                Do {
                    Start-Sleep -milliseconds 100
                } Until ((Get-VMIntegrationService $currentVM | ?{$_.name -eq "Heartbeat"}).PrimaryStatusDescription -eq "OK")

                # Wait the specified number of seconds before booting the next VM, unless this is the last VM in the list
                If ($Wait -gt 0 -and $VMList.IndexOf($vm) -lt ($VMList.Count-1)) {
                    Write-Verbose "Waiting for $Wait seconds before starting next VM."
                    Start-Sleep -Seconds $Wait
                }
            } Else {
                Write-Verbose "VM $vm already running."
            }
        } Else {
            Write-Error -Message "Unable to find VM $vm on host $ComputerName." -Category ObjectNotFound
        }
     }
     Write-Verbose "Started VMs."

     # Show progress if specified on the command line
     If ($ShowProgress -eq $True) { Write-Progress -Activity "Starting VMs." -Status "Started all VMs." -PercentComplete 100 }
     Start-Sleep -Seconds 1
}
Save the script as Start-SequentialVMs.ps1 and run it or add the function to your PowerShell profile so that the function is available when starting PowerShell. Use Get-Help to see the full syntax and examples from within a PowerShell window.
Booting a virtual machine under Windows Server 2012 R2 Hyper-V may result in the following:
Update: August 8, 2015 - Microsoft have discontinued the Microsoft Download Manager as of March 2015, so the below workload will no longer work. If fact there are no workaround now, you’ll need to rely on your browser’s download manager. See this article for more info: Using Subscriber Downloads
The Deployment Guys have a great article from 2009 that I recommend reading for a overview of customisation methods: Configuring Default User Settings – Full Update for Windows 7 and Windows Server 2008 R2. This article is still applicable today and the process hasn’t changed that much between Windows versions. Here are most of the ways that you could edit the default user profile:
So there are multiple methods (of driving yourself to madness), I’d recommend experimenting with each approach and you’ll most likely implement a combination of approaches to best suit your environment.
Group Policy is great, until it isn’t. Group Policy is pervasive and every Windows admin is familiar with it, but there a two things to consider when using it to manage the default user experience:
I have seen many organisations over-relying on Group Policy and missing the most important component user environment management - change control and ownership. Group Policy becomes a black hole, complete with settings that no one can remember why they were implemented and settings that are no longer relevant. Group Policy Preferences are great for replacing logon scripts, but use Group Policy and GPP sparingly so as not to adversely affect the user experience.
My preferred method for modifying the default user experience is to edit the default user profile directly using a script that is run during Windows deployment. This type of script can also be run on existing machines or used in combination with CopyProfile. A benefit of this approach is that you can modify the default profile with or without a reference image.
To edit the default profile, we’ll use the command line tool REG to mount and make changes to the default user registry hive. Additionally we can make folder and file changes to the default profile and a couple of other command line tools to perform tasks such as pin and unpin shortcuts or change the Windows 7 Libraries. As far as this article is concerned, the default profile is in its default location, usually C:\Users\Default. In a script, you could refer to this location as %SystemDrive%\Users\Default.
To find the profile locations to modify there’s a couple of methods that I rely on:
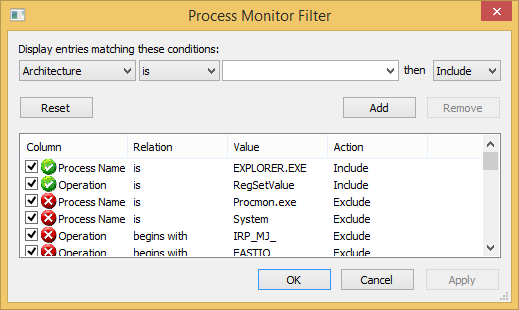
In most cases, someone (or even Microsoft) will have documented a registry value or profile location that is used to store a setting. More obscure or new settings will require detecting the location with Process Monitor. For example, to determine where a setting is stored in the Registry, create a filter in Process Monitor using the process name or process ID, additionally filtering on the operation such as RegSetValue, as shown below:
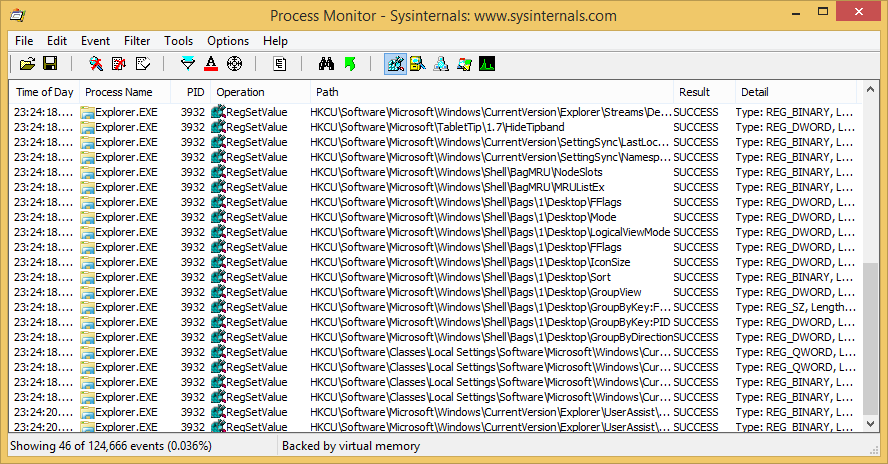
A trace with Process Monitor when making a preference change should result in something like this:
Regshot is also useful for comparing a before and after change to the profile for determining registry value locations.
Additionally Process Explorer can be useful for tracking down a process that might be responsible for writing a setting by viewing the command line used to launch the process. Finding settings can sometimes be a time consuming process, but once found and documented, you’ve got a detailed understanding of the default profile.
To make direct registry edits to the default user profile, the REG command line utility is used to load the default profile registry hive, change a registry value and then unload the hive, saving it back to the default profile. The following lines show a rough example of how this is done:
REG LOAD HKU\DefaultUser %SystemDrive%\Users\Default\NTUSER.DAT
REG ADD HKU\DefaultUser\Software\KeyName /v ValueName /d Data /t REG_SZ /f
REG UNLOAD HKU\DefaultUser
Note that this will need to be run with administrative privileges and in an elevated context, so that you have write access to the default profile.
A common requirement is to modify the the pinned shortcuts on the Taskbar or Start menu. This can be automated using a script, which needs to run a first logon (either as the user, or in the profile copied over the default profile via Sysprep/CopyProfile). Unfortunately I can’t find the original source for this script; however it works quite well and allows you to pin shortcuts to and unpin shortcuts from the Taskbar and Start menu via a command line. The script is available here:
' USAGE:	cscript.exe ExecuteVerbAction.vbs <file path> <verb name>
'		Example: Pin the outlook shortcut to the start menu
'		cscript.exe ExecuteVerbAction.vbs "C:\ProgramData\Microsoft\Windows\Start Menu\Programs\Microsoft Office\Microsoft Office Outlook 2007.lnk" PinToStartMenu
'		Example: Unpin the outlook shortcut from the start menu
'		cscript.exe ExecuteVerbAction.vbs "C:\ProgramData\Microsoft\Windows\Start Menu\Programs\Windows Media Player.lnk" UnpinFromStartMenu
'
' COMMENT:			This script executes defined file-verb
' CHANGELOG:		2010-04-06 - Script Created
'
' Supported VerbActions:
' 	PinToStartMenu (Pin to Start Menu)
' 	UnpinFromStartMenu (Unpin from Start Menu)
' 	PinToTaskbar (Pin to Taskbar)
' 	UnpinFromTaskbar (Unpin from Taskbar)
' PinLocations:
' 	Start Menu, Taskbar
'-------------------------------------------------------------------------------------------------------------------
Dim definedVerbActions, folderItem, filePath, verbAction, returnCode, procOwner
Const DebugEnabled = false
Dim ScriptName : ScriptName = WScript.ScriptName


If (GetProcessOwner(procOwner)) Then DebugInfo("procOwner = " & procOwner)

If Not (ValidateArguments()) Then
	DebugInfo("ValidateArguments(), return = false")
	WScript.Quit(1)
End If

filePath = WScript.Arguments.Item(0)
verbAction = WScript.Arguments.Item(1)
DebugInfo("filePath = " & filePath)
DebugInfo("verbAction = " & verbAction)

'DisplayFolderItemVerbs(filePath)

Set definedVerbActions = GetDefinedVerbActions()
Set folderItem = GetFolderItem(filePath)
If (folderItem Is Nothing) Then
	DebugInfo("GetFolderItem(" & filePath & "), return = null")
	WScript.Quit(0)
End If

returnCode = true
Select Case verbAction
	Case "PinToStartMenu"
		If Not IsPinned(filePath, "Start Menu") Then
			returnCode = ExecuteFolderItemVerbAction(folderItem, definedVerbActions.Item(verbAction))
		End If
	Case "UnpinFromStartMenu"
		If IsPinned(filePath, "Start Menu") Then
			returnCode = ExecuteFolderItemVerbAction(folderItem, definedVerbActions.Item(verbAction))
		End If
	Case "PinToTaskbar"
		If Not IsPinned(filePath, "Taskbar") Then
			returnCode = ExecuteFolderItemVerbAction(folderItem, definedVerbActions.Item(verbAction))
		End If
	Case "UnpinFromTaskbar"
		If IsPinned(filePath, "Taskbar") Then
			returnCode = ExecuteFolderItemVerbAction(folderItem, definedVerbActions.Item(verbAction))
		End If
End Select

If Not returnCode Then
	DebugInfo("ExecuteFolderItemVerbAction() return = " & returnCode)
	WScript.Quit(1)
End If
DebugInfo("ExecuteFolderItemVerbAction() return = " & returnCode)
WScript.Quit(0)

Function ValidateArguments()
	Dim validArguments, filePath, verbAction, oFso
	Dim definedVerbActions, validShortCut, validVerbAction

	validArguments = false
	validShortCut = false
	validVerbAction = false

	Set oFso = CreateObject("Scripting.FileSystemObject")
	Set definedVerbActions = GetDefinedVerbActions()
	DebugInfo("ValidateArguments::WScript.Arguments.Count = " & WScript.Arguments.Count)
	If (WScript.Arguments.Count = 2) Then
		filePath = WScript.Arguments.Item(0)
		verbAction = WScript.Arguments.Item(1)

		If (oFso.FileExists(filePath) And FileIsShortcut(filePath)) Then validShortCut = true
		If definedVerbActions.Exists(verbAction) Then validVerbAction = true

		If (validShortCut And validVerbAction) Then validArguments = true
		If (Not oFso.FileExists(filePath)) Then DebugInfo("ValidateArguments::FilePath = false")
		If (Not oFso.FileExists(filePath)) Then validArguments = true
	End If

	DebugInfo("ValidateArguments::validShortCut = " & validShortCut)
	DebugInfo("ValidateArguments::validVerbAction = " & validVerbAction)

	ValidateArguments = validArguments

	Set definedVerbActions = Nothing
	Set oFso = Nothing
End Function

Function GetFolderItem(ByVal filePath)
	On Error Resume Next
	Dim oFso, shell, folder, folderItem
	Dim folderPath, fileName

	Set oFso = CreateObject("Scripting.FileSystemObject")
	Set shell = CreateObject("Shell.Application")

	Set folderItem = Nothing

	If (oFso.FileExists(filePath)) Then
		folderPath = Mid(filePath, 1, InStrRev(filePath, "\") - 1)
		fileName = Mid(filePath, InStrRev(filePath, "\") + 1)

		Set folder = shell.Namespace(folderPath)
		If Not (folder Is Nothing) Then Set folderItem = folder.ParseName(fileName)
	End If

	Set GetFolderItem = folderItem

	Set shell = Nothing
	Set oFso = Nothing
End Function

Function IsPinned(ByVal filePath, ByVal pinLocation)
	Dim folderItem, itemIsPinned
	'DebugInfo("IsPinned(" & filePath & ", " & pinLocation & ")")
	itemIsPinned = false

	Set folderItem = GetFolderItem(filePath)
	If VerbActionExists(folderItem, "Unpin from " & pinLocation) Then itemIsPinned = true
	DebugInfo("IsPinned::itemIsPinned = " & itemIsPinned)
	IsPinned = itemIsPinned

	Set folderItem = Nothing
End Function

Function VerbActionExists(ByRef folderItem, ByVal verbAction)
	Dim actionExists, verb

	VerbActionExists = False

	If (folderItem Is Nothing) Then Exit Function

	For each verb in folderItem.Verbs()
		If (UCase(verbAction) = UCase(GetVerbAction(verb))) Then
			VerbActionExists = True
			Exit For
		End If
	Next
End Function

Function ExecuteFolderItemVerbAction(ByRef folderItem, ByVal verbAction)
	On Error Resume Next
	Dim verb

	ExecuteFolderItemVerbAction = False

	If (folderItem Is Nothing) Then Exit Function

	If VerbActionExists(folderItem, verbAction) Then
		Set verb = GetVerbForVerbAction(folderItem, verbAction)
		verb.DoIt()
		If Err = 0 Then ExecuteFolderItemVerbAction = True
		DebugInfo("ExecuteFolderItemVerbAction::verb.DoIt(), return = " & Err)
		Err.Clear
		Set verb = Nothing
	End If
End Function

Function GetVerbForVerbAction(ByRef folderItem, ByVal verbAction)
	Dim returnVerb, verb

	Set returnVerb = Nothing

	For each verb in folderItem.Verbs()
		If (UCase(verbAction) = UCase(GetVerbAction(verb))) Then
			Set returnVerb = verb
			Exit For
		End If
	Next

	Set GetVerbForVerbAction = returnVerb
End Function

Function GetVerbAction(ByVal verb)
	Dim verbAction
	verbAction = verb.Name

	If InStr(verb.Name, "&") Then verbAction = replace(verb.Name, "&", "")

	GetVerbAction = verbAction
End Function

Function GetDefinedVerbActions()
	Dim verbActions
	Const CompareMode_CaseInsensitive = 1	'// Text compare mode

	Set verbActions = CreateObject("Scripting.Dictionary")
	verbActions.CompareMode = CompareMode_CaseInsensitive

	verbActions.Add "PinToStartMenu", "Pin to Start Menu"
	verbActions.Add "UnpinFromStartMenu", "Unpin from Start Menu"
	verbActions.Add "PinToTaskbar", "Pin to Taskbar"
	verbActions.Add "UnpinFromTaskbar", "Unpin from Taskbar"

	Set GetDefinedVerbActions = verbActions
End Function

Function FileIsShortcut(ByVal filePath)
	Dim folderItem

	FileIsShortcut = false

	Set folderItem = GetFolderItem(filePath)
	If Not (folderItem Is Nothing) Then FileIsShortcut = folderItem.IsLink

	Set folderItem = Nothing
End Function

Sub DisplayFolderItemVerbs(ByVal filePath)
	Dim folderItem, i

	Set folderItem = GetFolderItem(filePath)
	'WScript.Echo "folderItemVerbs: " & folderItem.Verbs.Count
	For i = 0 To folderItem.Verbs.Count - 1
		'WScript.Echo i & " = " & folderItem.Verbs.Item(i)
	Next
End Sub

Function DebugInfo(ByVal info)
	Const LogTypeSuccess = 0
	Const LogTypeInformation = 4

	info = ScriptName & " -> " & info
	WScript.Echo info

	If DebugEnabled Then DebugInfo = LogMessage(LogTypeInformation, info)
End Function

Function LogMessage(ByVal logType, ByVal msg)
	Dim oWshShell
	Set oWshShell = CreateObject("WScript.Shell")

	LogMessage = oWshShell.LogEvent(logType, msg)

	Set oWshShell = Nothing
End Function

Function GetProcessOwner(ByRef procOwner)
	On Error Resume Next
	Dim wmiQuery, oWMIService, processes, process
	Dim processName, username, domain

	GetProcessOwner = false

	processName = Mid(WScript.FullName, InStrRev(WScript.FullName, "\") + 1)

	Set oWMIService = GetObject("winmgmts:" _
		& "{impersonationLevel=impersonate}!\\.\root\cimv2")

	wmiQuery = "SELECT * FROM Win32_Process WHERE Name = '" & processName & "'"
	Set processes = oWMIService.ExecQuery(wmiQuery)

	For Each process in processes
		If (InStr(process.CommandLine, WScript.ScriptName) <> 0) Then
			If (process.GetOwner(username, domain) = 0) Then
				procOwner = domain & "\" & username
				GetProcessOwner = true
			End If
			Exit For
		End If
	Next

	On Error GoTo 0

	Set processes = Nothing
	Set oWMIService = Nothing
End Function
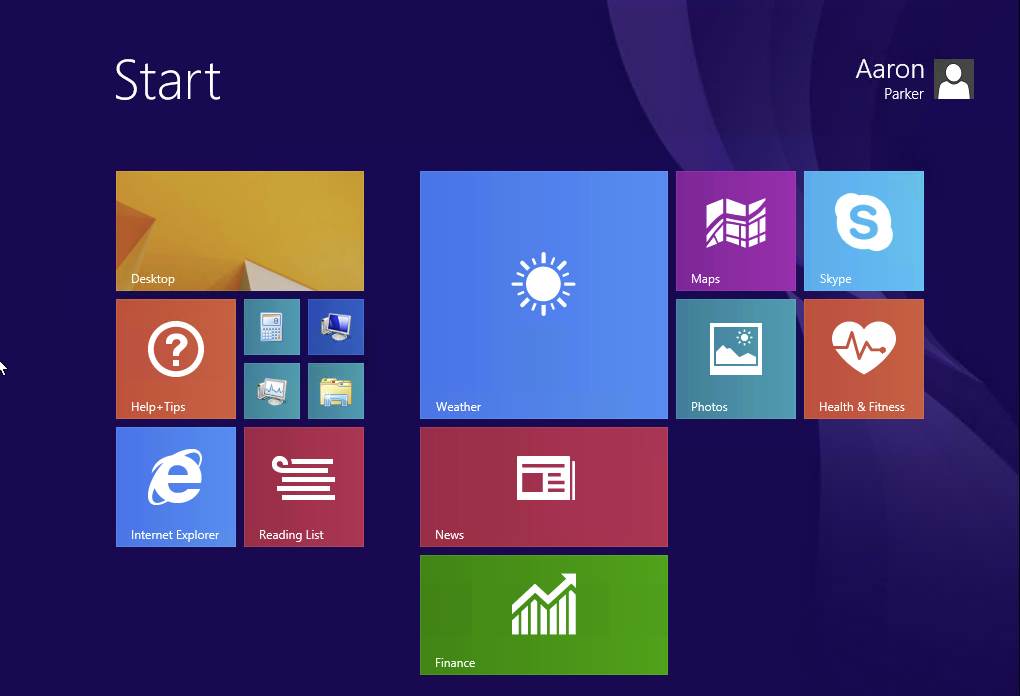
Note that Windows 8 and above, do not expose a programmatic method to pin and unpin shortcuts to the Start screen. If you’re looking to customise the Start screen, refer to this existing article: Customizing the Windows 8.1 Start Screen? Don’t follow Microsoft’s guidance.
By default, the Libraries introduced in Windows 7, include the public folder locations. Removing these or adding locations requires editing the Libraries; however they’re stored in XML files and are created at first logon. To modify the libraries, you can use a command line tool ShLib.exe. Like pinning and unpinning shortcuts, this tool also needs to be run at first logon (and won’t work via CopyProfile). This article, Administratively Create and Modify Windows 7 Libraries, covers the use of ShLib.exe quite well.
Once you’ve created your script to make changes to the default registry, modify the default profile folder locations, pin and unpin shortcuts and make changes to the Libraries, you’ll need to implement the changes on the target PCs via script. Using an automation solution such as the Microsoft Deployment Toolkit (or an ESD like System Center Configuration Manager) the script can be run during a deployment task sequence. In the case of MDT, the script will be run after Windows unattended setup has completed in the local Administrator context. This way the script will have full elevation and write access to the default profile. An ESD solution will typically run the script via the local SYSTEM account. If you need to make changes to existing PCs, you’ll need a method to do so, such as an advertisement in Configuration Manager. If you take this approach, you can combine a script that makes direct changes to the default profile with the CopyProfile approach. That allows you to modify the profile for deployments from an unmodified OS as well as a custom image, keeping consistency across deployment types.
Included here, along with some notation, are some example scripts for modifying the Windows 7 and Windows 8.1 default profiles. These example scripts include creation of a script at runtime that will run during first logon of any new profile. This is implemented as a batch file to keep things as simple as possible. Users will see a Command Prompt window as the script runs (but only once). The command lines includes in the script could be implemented with a UEM solution such as AppSense Environment Manager or even Group Policy to improve the user experience.
Here’s a sample script that will modify the default profile on a Windows 7 PC (x86 and x64). At a high level, the script will perform the following steps:
@ECHO OFF
REM Load the default profile hive
SET HKEY=HKU\Default
REG LOAD %HKEY% %SystemDrive%\Users\Default\NTUSER.DAT

REM Sound and end-application
REG ADD "%HKEY%\Control Panel\Sound" /v Beep /t REG_SZ /d NO /f
REG ADD "%HKEY%\Control Panel\Sound" /v ExtendedSounds /t REG_SZ /d NO /f
REG ADD "%HKEY%\Control Panel\Desktop" /v HungAppTimeout /t REG_SZ /d 5000 /f
REG ADD "%HKEY%\Control Panel\Desktop" /v AutoEndTasks /t REG_SZ /d 1 /f
REG ADD "%HKEY%\Control Panel\Desktop" /v WaitToKillAppTimeout /t REG_SZ /d 4000 /f

REM Command Prompt settings
REG ADD "%HKEY%\Console" /v QuickEdit /t REG_DWORD /d 1 /f
REG ADD "%HKEY%\Software\Microsoft\Command Processor" /v CompletionChar /t REG_DWORD /d 9 /f
REG ADD "%HKEY%\Software\Microsoft\Command Processor" /v PathCompletionChar /t REG_DWORD /d 9 /f
REG ADD "%HKEY%\Software\Microsoft\Windows NT\CurrentVersion\Network\Persistent Connections" /v SaveConnections /d "no" /t REG_SZ /f

REM Language bar - only apply if using single regional settings
REM REG ADD "%HKEY%\Software\Microsoft\CTF\LangBar" /v ShowStatus /t REG_DWORD /d 3 /f
REM REG ADD "%HKEY%\Software\Microsoft\CTF\LangBar" /v Label /t REG_DWORD /d 1 /f
REM REG ADD "%HKEY%\Software\Microsoft\CTF\LangBar" /v ExtraIconsOnMinimized /t REG_DWORD /d 0 /f

REM Windows Explorer and Start Menu
REG ADD "%HKEY%\Software\Microsoft\Windows\CurrentVersion\Explorer\Advanced" /v SeparateProcess /t REG_DWORD /d 1 /f
REG ADD "%HKEY%\Software\Microsoft\Windows\CurrentVersion\Explorer\Advanced" /v ServerAdminUI /t REG_DWORD /d 0 /f
REG ADD "%HKEY%\Software\Microsoft\Windows\CurrentVersion\Explorer\Advanced" /v Start_AdminToolsRoot /t REG_DWORD /d 0 /f
REG ADD "%HKEY%\Software\Microsoft\Windows\CurrentVersion\Explorer\Advanced" /v Start_PowerButtonAction /t REG_DWORD /d 2 /f
REG ADD "%HKEY%\Software\Microsoft\Windows\CurrentVersion\Explorer\Advanced" /v Start_ShowDownloads /t REG_DWORD /d 1 /f
REG ADD "%HKEY%\Software\Microsoft\Windows\CurrentVersion\Explorer\Advanced" /v Start_ShowMyGames /t REG_DWORD /d 0 /f
REG ADD "%HKEY%\Software\Microsoft\Windows\CurrentVersion\Explorer\Advanced" /v Start_ShowMyMusic /t REG_DWORD /d 0 /f
REG ADD "%HKEY%\Software\Microsoft\Windows\CurrentVersion\Explorer\Advanced" /v StartMenuAdminTools /t REG_DWORD /d 0 /f
REG ADD "%HKEY%\Software\Microsoft\Windows\CurrentVersion\Explorer\Advanced" /v StartMenuFavorites /t REG_DWORD /d 1 /f
REG ADD "%HKEY%\Software\Microsoft\Windows\CurrentVersion\Explorer\Advanced" /v TaskbarSizeMove /t REG_DWORD /d 0 /f
REG ADD "%HKEY%\Software\Microsoft\Windows\CurrentVersion\Explorer\AutoComplete" /v "Append Completion" /t REG_SZ /d YES /f
REG ADD "%HKEY%\AppEvents\Schemes\Apps\Explorer\Navigating\.Current" /ve /t REG_EXPAND_SZ /d "" /f

REM Set IE as default browser, prevent prompting user
REG ADD "%HKEY%\Software\Clients\StartmenuInternet" /ve /d "IEXPLORE.EXE" /f
REG ADD "%HKEY%\Software\Microsoft\Windows\CurrentVersion\Explorer\FileExts\.mht\UserChoice" /v Progid /d "IE.AssocFile.MHT" /f
REG ADD "%HKEY%\Software\Microsoft\Windows\CurrentVersion\Explorer\FileExts\.html\UserChoice" /v Progid /d "IE.AssocFile.HTM" /f
REG ADD "%HKEY%\Software\Microsoft\Windows\CurrentVersion\Explorer\FileExts\.htm\UserChoice" /v Progid /d "IE.AssocFile.HTM" /f
REG ADD "%HKEY%\Software\Microsoft\Windows\CurrentVersion\Explorer\FileExts\.url\UserChoice" /v Progid /d "IE.AssocFile.URL" /f
REG ADD "%HKEY%\Software\Microsoft\Windows\CurrentVersion\Explorer\FileExts\.mhtml\UserChoice" /v Progid /d "IE.AssocFile.MHT" /f
REG ADD "%HKEY%\Software\Microsoft\Windows\CurrentVersion\Explorer\FileExts\.xht\UserChoice" /v Progid /d "IE.AssocFile.XHT" /f
REG ADD "%HKEY%\Software\Microsoft\Windows\CurrentVersion\Explorer\FileExts\.svg\UserChoice" /v Progid /d "IE.AssocFile.SVG" /f
REG ADD "%HKEY%\Software\Microsoft\Windows\CurrentVersion\Explorer\FileExts\.partial\UserChoice" /v Progid /d "IE.AssocFile.PARTIAL" /f
REG ADD "%HKEY%\Software\Microsoft\Windows\CurrentVersion\Explorer\FileExts\.website\UserChoice" /v Progid /d "IE.AssocFile.WEBSITE" /f
REG ADD "%HKEY%\Software\Microsoft\Windows\CurrentVersion\Explorer\FileExts\.xhtml\UserChoice" /v Progid /d "IE.AssocFile.XHT" /f
REG ADD "%HKEY%\Software\Microsoft\Windows\Shell\Associations\UrlAssociations\https\UserChoice" /v Progid /d "IE.HTTPS" /f
REG ADD "%HKEY%\Software\Microsoft\Windows\Shell\Associations\UrlAssociations\ftp\UserChoice" /v Progid /d "IE.FTP" /f
REG ADD "%HKEY%\Software\Microsoft\Windows\Shell\Associations\UrlAssociations\http\UserChoice" /v Progid /d "IE.HTTP" /f
REG ADD "%HKEY%\Software\Microsoft\Windows\Shell\Associations\MIMEAssociations\message/rfc822\UserChoice" /v Progid /d "IE.message/rfc822" /f
REG ADD "%HKEY%\Software\Microsoft\Windows\Shell\Associations\MIMEAssociations\text/html\UserChoice" /v Progid /d "IE.text/html" /f

REM Additional Internet Explorer options
REG ADD "%HKEY%\Software\Microsoft\Internet Explorer\TabbedBrowsing" /v PopupsUseNewWindow /t REG_DWORD /d 0 /f
REG ADD "%HKEY%\Software\Microsoft\Internet Explorer\PhishingFilter" /v Enabled /t REG_DWORD /d 1 /f
REG ADD "%HKEY%\Software\Microsoft\Internet Explorer\Main" /v "Enable AutoImageResize" /t REG_SZ /d YES /f
REG ADD "%HKEY%\Software\Microsoft\Internet Explorer\PhishingFilter" /v Enabled /t REG_DWORD /d 2 /f
REM REG ADD "%HKEY%\Software\Microsoft\Windows\CurrentVersion\Internet Settings\ZoneMap\Domains\domain.local" /v * /t REG_DWORD /d 1 /f
REM REG ADD "%HKEY%\Software\Microsoft\Internet Explorer\New Windows\Allow" /v *.domain.local /t REG_BINARY /d 0000 /f

REM Windows Media Player
REG ADD "%HKEY%\Software\Microsoft\MediaPlayer\Setup\UserOptions" /v DesktopShortcut /d No /t REG_SZ /f
REG ADD "%HKEY%\Software\Microsoft\MediaPlayer\Setup\UserOptions" /v QuickLaunchShortcut /d 0 /t REG_DWORD /f
REG ADD "%HKEY%\Software\Microsoft\MediaPlayer\Preferences" /v AcceptedPrivacyStatement /d 1 /t REG_DWORD /f
REG ADD "%HKEY%\Software\Microsoft\MediaPlayer\Preferences" /v FirstRun /d 0 /t REG_DWORD /f
REG ADD "%HKEY%\Software\Microsoft\MediaPlayer\Preferences" /v DisableMRU /d 1 /t REG_DWORD /f
REG ADD "%HKEY%\Software\Microsoft\MediaPlayer\Preferences" /v AutoCopyCD /d 0 /t REG_DWORD /f

REM Help and Support
REG ADD "%HKEY%\Software\Microsoft\Assistance\Client\1.0\Settings" /v OnlineAssist /d 1 /t REG_DWORD /f
REG ADD "%HKEY%\Software\Microsoft\Assistance\Client\1.0\Settings" /v IsConnected /d 1 /t REG_DWORD /f

REM Remove localisation - Themes, Feeds, Favourites
REG DELETE "%HKEY%\Software\Microsoft\Windows\CurrentVersion\RunOnce" /v mctadmin /f

REM Snipping Tool
REG ADD "%HKEY%\Software\Microsoft\Windows\TabletPC\Snipping Tool" /v ShowCaptureStroke /d 0 /t REG_DWORD /f

REM Unload the default profile hive
REG UNLOAD %HKEY%

REM Setup Taskbar unpin items on first login
IF NOT EXIST "%ProgramFiles%\Scripts" MD "%ProgramFiles%\Scripts"
COPY /Y ExecuteVerbAction.VBS "%ProgramFiles%\Scripts\ExecuteVerbAction.VBS"
COPY /Y ShLib.exe "%ProgramFiles%\Scripts\ShLib.exe"

MD "%SystemDrive%\Users\Default\AppData\Roaming\Microsoft\Windows\Start Menu\Programs\Startup"
ECHO @ECHO OFF > "%SystemDrive%\Users\Default\AppData\Roaming\Microsoft\Windows\Start Menu\Programs\Startup\PinnedItemsLibraries.cmd"
ECHO cscript.exe "%ProgramFiles%\Scripts\ExecuteVerbAction.vbs" "%ProgramData%\Microsoft\Windows\Start Menu\Programs\Windows Media Player.lnk" UnpinFromTaskbar >> "%SystemDrive%\Users\Default\AppData\Roaming\Microsoft\Windows\Start Menu\Programs\Startup\PinnedItemsLibraries.cmd"
ECHO "%ProgramFiles%\Scripts\shlib" remove "%%APPDATA%%\Microsoft\Windows\Libraries\Documents.library-ms" %PUBLIC%\Documents >> "%SystemDrive%\Users\Default\AppData\Roaming\Microsoft\Windows\Start Menu\Programs\Startup\PinnedItemsLibraries.cmd"
ECHO "%ProgramFiles%\Scripts\shlib" remove "%%APPDATA%%\Microsoft\Windows\Libraries\Music.library-ms" %PUBLIC%\Music >> "%SystemDrive%\Users\Default\AppData\Roaming\Microsoft\Windows\Start Menu\Programs\Startup\PinnedItemsLibraries.cmd"
ECHO "%ProgramFiles%\Scripts\shlib" remove "%%APPDATA%%\Microsoft\Windows\Libraries\Pictures.library-ms" %PUBLIC%\Pictures >> "%SystemDrive%\Users\Default\AppData\Roaming\Microsoft\Windows\Start Menu\Programs\Startup\PinnedItemsLibraries.cmd"
ECHO "%ProgramFiles%\Scripts\shlib" remove "%%APPDATA%%\Microsoft\Windows\Libraries\Videos.library-ms" %PUBLIC%\Videos >> "%SystemDrive%\Users\Default\AppData\Roaming\Microsoft\Windows\Start Menu\Programs\Startup\PinnedItemsLibraries.cmd"
ECHO DEL /Q "%%APPDATA%%\Microsoft\Windows\Start Menu\Programs\Startup\PinnedItemsLibraries.cmd" >> "%SystemDrive%\Users\Default\AppData\Roaming\Microsoft\Windows\Start Menu\Programs\Startup\PinnedItemsLibraries.cmd"
If you use this in a production environment, please test and confirm each setting to ensure you understand what the script will implement.
Here’s a sample script that will modify the default profile on a Windows 8.1 PC (x86 and x64). At a high level, the script will perform the following steps:
@ECHO OFF
REM Load the default profile hive
SET HKEY=HKU\Default
REG LOAD %HKEY% %SystemDrive%\Users\Default\NTUSER.DAT

REM Sound and end-application
REG ADD "%HKEY%\Control Panel\Sound" /v Beep /t REG_SZ /d NO /f
REG ADD "%HKEY%\Control Panel\Sound" /v ExtendedSounds /t REG_SZ /d NO /f
REG ADD "%HKEY%\Control Panel\Desktop" /v HungAppTimeout /t REG_SZ /d 5000 /f
REG ADD "%HKEY%\Control Panel\Desktop" /v AutoEndTasks /t REG_SZ /d 1 /f
REG ADD "%HKEY%\Control Panel\Desktop" /v WaitToKillAppTimeout /t REG_SZ /d 4000 /f

REM Command Prompt settings
REG ADD "%HKEY%\Console" /v QuickEdit /t REG_DWORD /d 1 /f
REG ADD "%HKEY%\Software\Microsoft\Windows NT\CurrentVersion\Network\Persistent Connections" /v SaveConnections /d "no" /t REG_SZ /f

REM Language bar - only apply if using single regional settings
REM REG ADD "%HKEY%\Software\Microsoft\CTF\LangBar" /v ShowStatus /t REG_DWORD /d 3 /f
REM REG ADD "%HKEY%\Software\Microsoft\CTF\LangBar" /v Label /t REG_DWORD /d 1 /f
REM REG ADD "%HKEY%\Software\Microsoft\CTF\LangBar" /v ExtraIconsOnMinimized /t REG_DWORD /d 0 /f

REM Windows Explorer
REG ADD "%HKEY%\Software\Microsoft\Windows\CurrentVersion\Explorer\Advanced" /v SeparateProcess /t REG_DWORD /d 1 /f
REG ADD "%HKEY%\Software\Microsoft\Windows\CurrentVersion\Explorer\Advanced" /v TaskbarSizeMove /t REG_DWORD /d 0 /f
REG ADD "%HKEY%\Software\Microsoft\Windows\CurrentVersion\Explorer\AutoComplete" /v "Append Completion" /t REG_SZ /d YES /f
REG ADD "%HKEY%\AppEvents\Schemes\Apps\Explorer\Navigating\.Current" /ve /t REG_EXPAND_SZ /d "" /f

REM Windows 8 navigation settings
REG ADD "%HKEY%\Software\Microsoft\Windows\CurrentVersion\Explorer\StartPage" /v OpenAtLogon /t REG_DWORD /d 0 /f
REG ADD "%HKEY%\Software\Microsoft\Windows\CurrentVersion\Explorer\StartPage" /v DesktopFirst /t REG_DWORD /d 0 /f
REG ADD "%HKEY%\Software\Microsoft\Windows\CurrentVersion\Explorer\StartPage" /v MakeAllAppsDefault /t REG_DWORD /d 0 /f
REG ADD "%HKEY%\Software\Microsoft\Windows\CurrentVersion\Explorer\StartPage" /v MonitorOverride /t REG_DWORD /d 0 /f

REM Set IE as default browser, prevent prompting user
REM REG ADD "%HKEY%\Software\Clients\StartmenuInternet" /ve /d "IEXPLORE.EXE" /f
REM REG ADD "%HKEY%\Software\Microsoft\Windows\CurrentVersion\Explorer\FileExts\.mht\UserChoice" /v Progid /d "IE.AssocFile.MHT" /f
REM REG ADD "%HKEY%\Software\Microsoft\Windows\CurrentVersion\Explorer\FileExts\.html\UserChoice" /v Progid /d "IE.AssocFile.HTM" /f
REM REG ADD "%HKEY%\Software\Microsoft\Windows\CurrentVersion\Explorer\FileExts\.htm\UserChoice" /v Progid /d "IE.AssocFile.HTM" /f
REM REG ADD "%HKEY%\Software\Microsoft\Windows\CurrentVersion\Explorer\FileExts\.url\UserChoice" /v Progid /d "IE.AssocFile.URL" /f
REM REG ADD "%HKEY%\Software\Microsoft\Windows\CurrentVersion\Explorer\FileExts\.mhtml\UserChoice" /v Progid /d "IE.AssocFile.MHT" /f
REM REG ADD "%HKEY%\Software\Microsoft\Windows\CurrentVersion\Explorer\FileExts\.xht\UserChoice" /v Progid /d "IE.AssocFile.XHT" /f
REM REG ADD "%HKEY%\Software\Microsoft\Windows\CurrentVersion\Explorer\FileExts\.svg\UserChoice" /v Progid /d "IE.AssocFile.SVG" /f
REM REG ADD "%HKEY%\Software\Microsoft\Windows\CurrentVersion\Explorer\FileExts\.partial\UserChoice" /v Progid /d "IE.AssocFile.PARTIAL" /f
REM REG ADD "%HKEY%\Software\Microsoft\Windows\CurrentVersion\Explorer\FileExts\.website\UserChoice" /v Progid /d "IE.AssocFile.WEBSITE" /f
REM REG ADD "%HKEY%\Software\Microsoft\Windows\CurrentVersion\Explorer\FileExts\.xhtml\UserChoice" /v Progid /d "IE.AssocFile.XHT" /f
REM REG ADD "%HKEY%\Software\Microsoft\Windows\Shell\Associations\UrlAssociations\https\UserChoice" /v Progid /d "IE.HTTPS" /f
REM REG ADD "%HKEY%\Software\Microsoft\Windows\Shell\Associations\UrlAssociations\ftp\UserChoice" /v Progid /d "IE.FTP" /f
REM REG ADD "%HKEY%\Software\Microsoft\Windows\Shell\Associations\UrlAssociations\http\UserChoice" /v Progid /d "IE.HTTP" /f
REM REG ADD "%HKEY%\Software\Microsoft\Windows\Shell\Associations\MIMEAssociations\message\rfc822\UserChoice" /v Progid /d "IE.message/rfc822" /f
REM REG ADD "%HKEY%\Software\Microsoft\Windows\Shell\Associations\MIMEAssociations\text\html\UserChoice" /v Progid /d "IE.text/html" /f

REM Additional Internet Explorer options
REM REG ADD "%HKEY%\Software\Microsoft\Internet Explorer\TabbedBrowsing" /v PopupsUseNewWindow /t REG_DWORD /d 0 /f
REM REG ADD "%HKEY%\Software\Microsoft\Internet Explorer\PhishingFilter" /v Enabled /t REG_DWORD /d 1 /f
REM REG ADD "%HKEY%\Software\Microsoft\Internet Explorer\Main" /v "Enable AutoImageResize" /t REG_SZ /d YES /f
REM REG ADD "%HKEY%\Software\Microsoft\Internet Explorer\PhishingFilter" /v Enabled /t REG_DWORD /d 2 /f
REM REG ADD "%HKEY%\Software\Microsoft\Windows\CurrentVersion\Internet Settings\ZoneMap\Domains\domain.local" /v * /t REG_DWORD /d 1 /f
REM REG ADD "%HKEY%\Software\Microsoft\Internet Explorer\New Windows\Allow" /v *.domain.local /t REG_BINARY /d 0000 /f

REM Windows Media Player
REG ADD "%HKEY%\Software\Microsoft\MediaPlayer\Setup\UserOptions" /v DesktopShortcut /d No /t REG_SZ /f
REG ADD "%HKEY%\Software\Microsoft\MediaPlayer\Setup\UserOptions" /v QuickLaunchShortcut /d 0 /t REG_DWORD /f
REG ADD "%HKEY%\Software\Microsoft\MediaPlayer\Preferences" /v AcceptedPrivacyStatement /d 1 /t REG_DWORD /f
REG ADD "%HKEY%\Software\Microsoft\MediaPlayer\Preferences" /v FirstRun /d 0 /t REG_DWORD /f
REG ADD "%HKEY%\Software\Microsoft\MediaPlayer\Preferences" /v DisableMRU /d 1 /t REG_DWORD /f
REG ADD "%HKEY%\Software\Microsoft\MediaPlayer\Preferences" /v AutoCopyCD /d 0 /t REG_DWORD /f

REM Unload the default profile hive
REG UNLOAD %HKEY%

REM Configure the default Start Screen
IF NOT EXIST %SystemDrive%\Users\Default\AppData\Local\Microsoft\Windows MD %SystemDrive%\Users\Default\AppData\Local\Microsoft\Windows
POWERSHELL -NonInteractive -Command Import-StartLayout -LayoutPath .\CustomStartScreenLayout.bin -MountPath %SystemDrive%\

REM Setup Taskbar unpin items on first login
IF NOT EXIST "%ProgramFiles%\Scripts" MD "%ProgramFiles%\Scripts"
COPY /Y ExecuteVerbAction.VBS "%ProgramFiles%\Scripts\ExecuteVerbAction.VBS"
COPY /Y ShLib.exe "%ProgramFiles%\Scripts\ShLib.exe"

MD "%SystemDrive%\Users\Default\AppData\Roaming\Microsoft\Windows\Start Menu\Programs\Startup"
ECHO @ECHO OFF > "%SystemDrive%\Users\Default\AppData\Roaming\Microsoft\Windows\Start Menu\Programs\Startup\PinnedItemsLibraries.cmd"
REM ECHO cscript.exe "%ProgramFiles%\Scripts\ExecuteVerbAction.vbs" "%ProgramData%\Microsoft\Windows\Start Menu\Programs\Windows Media Player.lnk" UnpinFromTaskbar >> "%SystemDrive%\Users\Default\AppData\Roaming\Microsoft\Windows\Start Menu\Programs\Startup\PinnedItemsLibraries.cmd"
ECHO "%ProgramFiles%\Scripts\shlib" remove "%%APPDATA%%\Microsoft\Windows\Libraries\Documents.library-ms" %PUBLIC%\Documents >> "%SystemDrive%\Users\Default\AppData\Roaming\Microsoft\Windows\Start Menu\Programs\Startup\PinnedItemsLibraries.cmd"
ECHO "%ProgramFiles%\Scripts\shlib" remove "%%APPDATA%%\Microsoft\Windows\Libraries\Music.library-ms" %PUBLIC%\Music >> "%SystemDrive%\Users\Default\AppData\Roaming\Microsoft\Windows\Start Menu\Programs\Startup\PinnedItemsLibraries.cmd"
ECHO "%ProgramFiles%\Scripts\shlib" remove "%%APPDATA%%\Microsoft\Windows\Libraries\Pictures.library-ms" %PUBLIC%\Pictures >> "%SystemDrive%\Users\Default\AppData\Roaming\Microsoft\Windows\Start Menu\Programs\Startup\PinnedItemsLibraries.cmd"
ECHO "%ProgramFiles%\Scripts\shlib" remove "%%APPDATA%%\Microsoft\Windows\Libraries\Videos.library-ms" %PUBLIC%\Videos >> "%SystemDrive%\Users\Default\AppData\Roaming\Microsoft\Windows\Start Menu\Programs\Startup\PinnedItemsLibraries.cmd"
ECHO DEL /Q "%%APPDATA%%\Microsoft\Windows\Start Menu\Programs\Startup\PinnedItemsLibraries.cmd" >> "%SystemDrive%\Users\Default\AppData\Roaming\Microsoft\Windows\Start Menu\Programs\Startup\PinnedItemsLibraries.cmd"
If you use this in a production environment, please test and confirm each setting to ensure you understand what the script will implement.
There are numerous ways to edit the default profile, some more complicated and involved than others. It’s my view that the best way to modify the default profile is targeting the required settings, which does mean more work. However, this approach results in a better understanding of the user environment and with any luck a better user experience.
Each new major release of Windows results in less modifications, so your job will be easier. There are a few scripts and tools you’ll need to have in place and I’m confident the approach outlined here will result in happy users (or at least users who aren’t complaining).
In the next article on the same subject, I’ll cover customising the default profile for Remote Desktop Services Session Hosts.
I have too many devices but not one of them runs Android. A good part of my job is testing, presenting and demoing, so it’s handy being able to show the user experiences across different devices. One of everything is perhaps going a bit too far, so I’d prefer to run Android as a VM.
Microsoft announced some interesting new features in Windows Server 2012 R2 at TechEd 2013 and one of those that piqued my interest is Work Folders. I’m not the biggest fan of Redirected Folders and Offline files, but it’s essentially the only enterprise solution Microsoft provides today for taking your data offline. Microsoft needs to provide a completely new method of syncing file data - one that is designed for todays use cases and computing environment.
Citrix provides a nice wizard for installing the XenDesktop 7 VDA and some pretty good documentation on using a command line installation, but the wizard does not expose all of the available options and working out what the wizard is doing in relation to the command line takes a bit of translation. Here’s how to automate a typical VDA deployment.