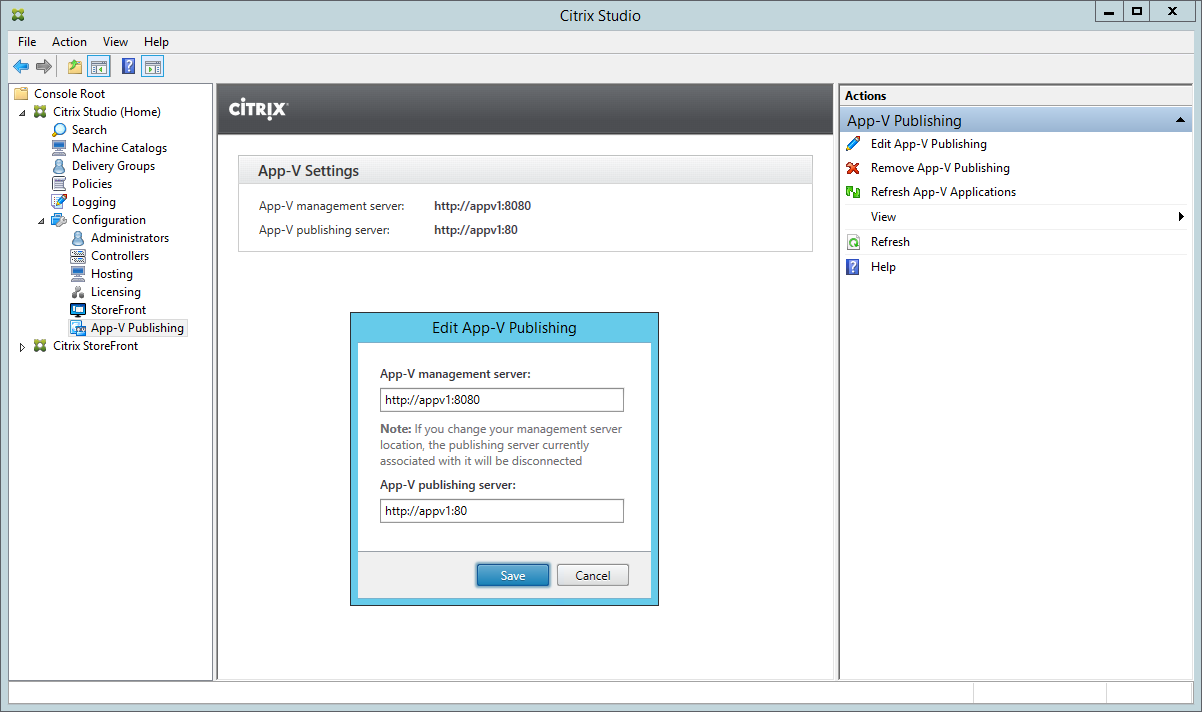
What may not be widely known is that you can add additional App-V publishing configuration to a XenDesktop site beyond what you see in the UI. This allows you to set publishing information per delivery group. Useful for complex XenDesktop sites such as multi-tenant environments.
Creating the App-V publishing information with PowerShell is a multi step process. You’ll need to create the publishing information with New-CtxAppVServer and then apply the configuration with New-BrokerMachineConfiguration.
Applying this in practice however may ultimately require testing the App-V management and publishing servers and ensuring that the configuration does not already exist before adding it.
So to do that, I’ve written a function that will take the App-V Management and Publishing servers as parameters, ensure that they test OK and check that the configuration does not already exist before importing the configuration into the site.
This function is fairly basic and while it does do some error checking, it could probably go a little further to ensure the configuration is applied successfully.
FunctionSet-CtxAppvConfig{<#
.SYNOPSIS
Sets new App-V publishing information in a XenDesktop site.
.DESCRIPTION
This function can be used to set or add App-V publishing information in a XenDesktop or XenApp 7.x site.
.PARAMETER AdminAddress
Specifies a remote XenDesktop controller to apply the configuration against. If omitted, the local host will be used instead.
.PARAMETER AppvMgmtSvr
Specifies a remote XenDesktop controller to apply the configuration against. If omitted, the local host will be used instead.
.PARAMETER AppvPubSvr
Specifies a remote XenDesktop controller to apply the configuration against. If omitted, the local host will be used instead.
.PARAMETER Description
Specifies a remote XenDesktop controller to apply the configuration against. If omitted, the local host will be used instead.
.EXAMPLE
Set-CtxAppvConfig -AdminAddress 'xd71.home.stealthpuppy.com' -AppvMgmtSvr 'http://appv1:8080' -AppvPubSvr 'http://appv1:80' -Description 'Created by PowerShell'
.NOTES.LINK
#>param([Parameter(Mandatory=$false,Position=0,HelpMessage="XenDesktop Controller address.")][string]$AdminAddress='localhost',[Parameter(Mandatory=$true,Position=1,HelpMessage="Microsoft App-V Management Server address.")][string]$AppvMgmtSvr=$(throw="Please specify an App-V Management Server address."),[Parameter(Mandatory=$true,Position=2,HelpMessage="Microsoft App-V Publishing Server address.")][string]$AppvPubSvr=$(throw="Please specify an App-V Publishing Server address."),[Parameter(Mandatory=$true,Position=2,HelpMessage="App-V publishing configuration description.")][string]$Description=$(throw="Specify a description to apply to the App-V publishing information. Specify 'Created by Studio' to set the App-V publishing inforamtion viewed in Citrix Studio."))FunctionAdd-AppvConfig{# Add the AppV Server settings to the new specified settingsWrite-Verbose"Setting App-V Management Server to specified URI."#http://support.citrix.com/proddocs/topic/citrix-appv-admin-v1-xd71/new-ctxappvserver-xd71.html$newAppvConfig=New-CtxAppVServer-ManagementServer$AppvMgmtSvr-PublishingServer$AppvPubSvr# Applying configuration to the siteWrite-Verbose"Saving configuration to the site."#http://support.citrix.com/proddocs/topic/citrix-broker-admin-v2-xd75/new-brokermachineconfiguration-xd75.html$machineConfig=New-BrokerMachineConfiguration-AdminAddress$AdminAddress-ConfigurationSlotUid3-LeafName1-Description"Created by Studio"-Policy$newAppvConfig-Verbose}# Obtain FQDN from Management server URL$urlGroups=[regex]::Match($AppvMgmtSvr,'^(?<protocol>(http|https))://(?<fqdn>([^:]*))((:(?<port>\d+))?)').Groups# Test specified Management Server.Write-Verbose"Testing Management Server."If(Test-CtxAppVServer-AppVManagementServer$urlGroups["fqdn"].Value-ErrorActionSilentlyContinue-ErrorVariable$manError){Write-Verbose"Management Server tested OK."# Test specified Publishing ServerWrite-Verbose"Testing Publishing Server."If(Test-CtxAppVServer-AppVPublishingServer$AppvPubSvr-ErrorActionSilentlyContinue-ErrorVariable$pubError){Write-Verbose"Publishing Server tested OK."# Get any existing AppV configuration from the broker#http://support.citrix.com/proddocs/topic/citrix-broker-admin-v2-xd71/get-brokermachineconfiguration-xd71.htmlIf($Config){Remove-VariableConfig}$Config=Get-BrokerMachineConfiguration-AdminAddress$AdminAddress-NameAppV*-ErrorActionSilentlyContinue$cfgMatch=$FalseIf($Config){ForEach($cfgin$Config){# Grab the AppV configuration details#http://support.citrix.com/proddocs/topic/citrix-appv-admin-v1-xd71/get-ctxappvserver-xd71.html$appvConfig=Get-CtxAppVServer-ByteArray$cfg.Policy# If the existing Management Server matches the specified Management ServerIf(($appvConfig.ManagementServer-eq$AppvMgmtSvr)-and($appvConfig.PublishingServer-eq$AppvPubSvr)){Write-Verbose"Specified config matches existing config."$cfgMatch=$True}}If(!($cfgMatch)){# Add configAdd-AppvConfig}Else{Write-Verbose"App-V configuration already exists."}}Else{# Add configAdd-AppvConfig}}Else{Write-Error"[Aborting] App-V Publishing Server test failed with: $pubError"}}Else{Write-Error"[Aborting] App-V Management Server test failed with: $manError"}}
Please ensure that you test thoroughly before using in a production environment. Comments or feedback on bugs, better ways to do things or additional steps is welcome.
Note - a very big thanks to David Wagner at Citrix (and team) for assisting with working out how to write the App-V publishing information that you see in the Studio UI. This is done by applying the description “Created with Studio” to the publishing configuration (presumably only the first configuration that you apply with that description).
in Applications on Citrix, Horizon, View, Vmware, Xenapp, Xendesktop
Is VMware Horizon View 6 RDS a viable replacement or competitor to Citrix XenApp? A competitor, most certainly. View RDS as a replacement for XenApp deserves further investigation and I recommend no assumptions be made as to the suitability of View RDS, especially if you are a current Citrix customer, or a VMware partner.
I’ve got a very simple setup in my home lab with a couple of machine running either Hyper-V or ESXi. I typically don’t have monitoring solutions running and manage each host directly, rather than part of a cluster or with SCVMM or vCenter. For Hyper-V, I try to manage it remotely via PowerShell as much as I can and so it’s handy to be able to see memory utilisation on the remote host to understand how much capacity I’ve got before powering on a VM. I’ve written a PowerShell function to return various memory stats:
Total RAM available in the host - using Get-VMHost.
Total memory in use by running VMs - by returning the running VMs and finding the current amount of RAM assigned to each VM with Get-VM. This works with dynamic memory.
Available memory to run additional VMs - using Get-Counter to gather the ‘\Memory\Available Bytes’ performance counter
How much memory is used by the system - this is calculated by adding what’s in use by VMs, to the available memory and subtracting the results from the physical RAM in the host. This is a rough calculation, but an interesting metric to view.
The function returns an array that includes each stat. Here’s an example of what the function returns. All values are in gigabytes and multiple hosts can be specified to gather details from.
Here’s the code listing for the Get-HvMem function:
FunctionGet-HvMem{<#
.SYNOPSIS
Return Hyper-V host RAM details.
.DESCRIPTION
This function returns the total available RAM, RAM in use by VMs and the available RAM on a Hyper-V host.
.PARAMETER ComputerName
Specifies one or more Hyper-V hosts to retrieve stats from.
.EXAMPLE
Get-HvRAM -ComputerName hyperv1
.NOTES.LINK
/hyperv-memory-powershell
#>param([Parameter(Mandatory=$true,Position=0,HelpMessage="Hyper-V host.")][string[]]$ComputerName=$(throw="Please specify a remote Hyper-V host to gather memory details from."))# Create an array to return$allStats=@()ForEach($computerin$ComputerName){# Create an array to contain this computer's metrics$a=@()# Get details for Hyper-V host$vmHost=Get-VMHost-ComputerName$computerIf($vmHost){# Get total RAM consumed by running VMs.$total=0Get-VM-ComputerName$computer|Where-Object{$_.State-eq"Running"}|Select-ObjectName,MemoryAssigned|ForEach-Object{$total=$total+$_.MemoryAssigned}#Get available RAM via performance counters$Bytes=Get-Counter-ComputerName$computer-Counter"\Memory\Available Bytes"# Convert values to GB$availGB=($Bytes[0].CounterSamples.CookedValue/1GB)$hostGB=($vmhost.MemoryCapacity/1GB)$vmInUse=($total/1GB)# Construct an array of properties to return$item=New-ObjectPSObject# Add host name$item|Add-Member-typeNoteProperty-Name'Name'-Value$vmHost.Name# Host RAM in GB$item|Add-Member-typeNoteProperty-Name'HostRAMGB'-Value$hostGB# In use RAM in GB$item|Add-Member-typeNoteProperty-Name'VMInUseGB'-Value$vmInUse# System used in GB$item|Add-Member-typeNoteProperty-Name'SystemUsedGB'-Value($hostGB-($vmInUse+$availGB))# Available RAM in GB$item|Add-Member-typeNoteProperty-Name'AvailableGB'-Value$availGB$a+=$item}# Add the current machine details to the array to return$allStats+=$a}Return$allStats}
Comments or feedback on bugs, better ways to do things or additional steps is welcome.
Like the last article, I’ve taken the PowerShell generated by Citrix Studio, banged my head against the wall a few times, and improved it to create the code presented in this article.
Linking the Code to the UI
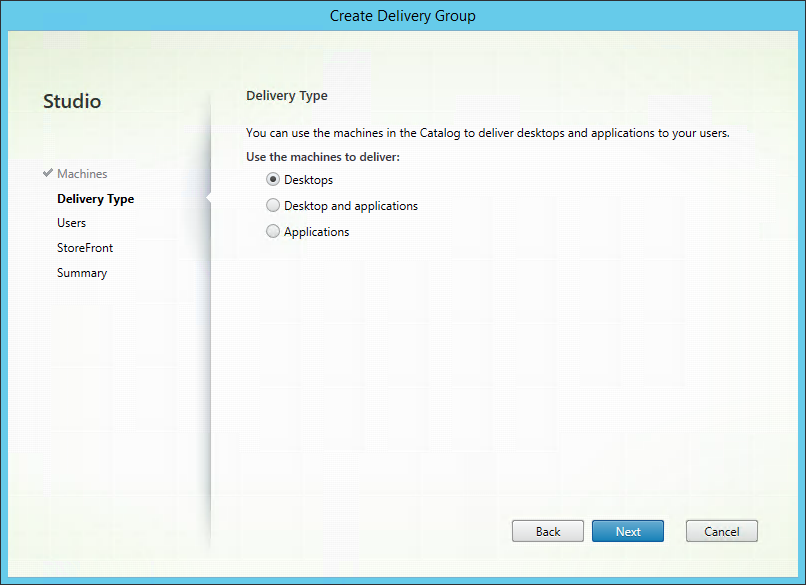
To help explain the code, I’ll first run through the Create Delivery Group wizard and show how the code relates to options in the wizard and the Delivery Group properties.
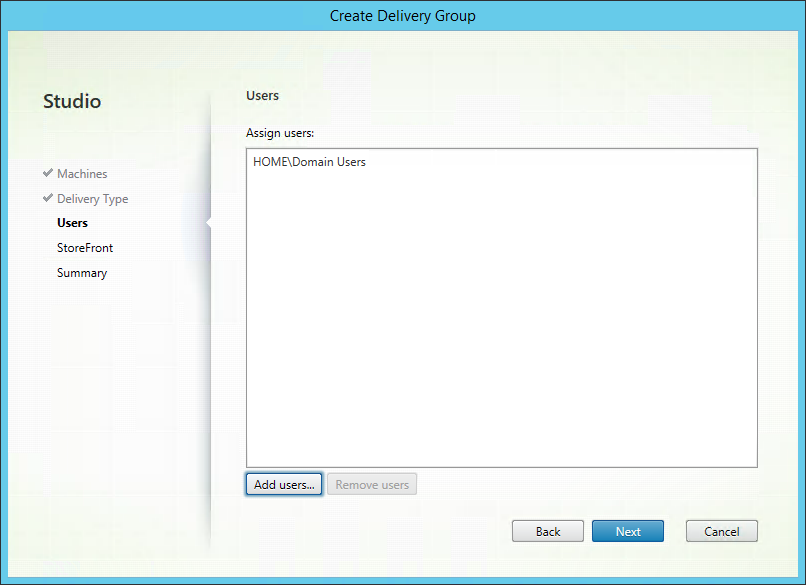
Assigning users to the Desktop Group - New-BrokerEntitlementPolicyRule -Name “Windows 8 x86_1” -IncludedUsers “HOME\Domain Users” -DesktopGroupUid 11
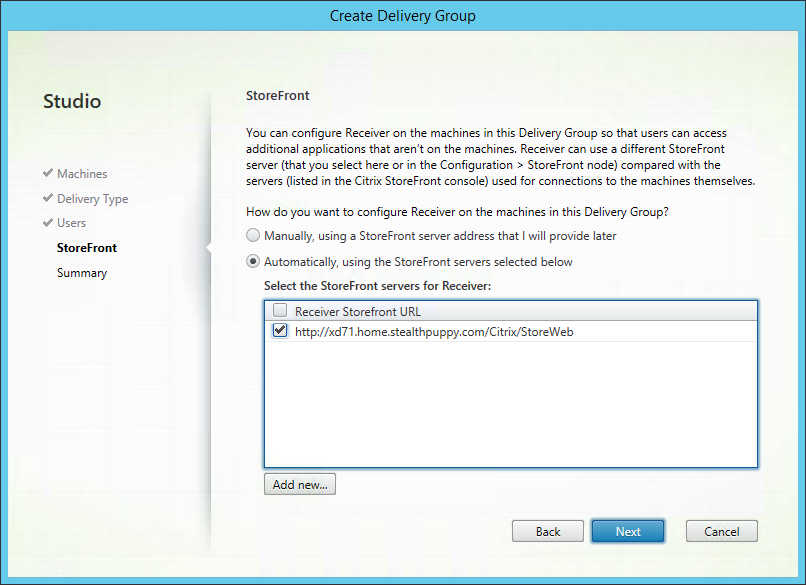
Add-BrokerMachineConfiguration adds StoreFront and UPM configurations to a Delivery Group. The function just adds a machine configuration - the configuration is setup separately. To avoid selecting a StoreFront server for the Delivery Group, don’t use this function.
Selecting a StoreFront server - Add-BrokerMachineConfiguration -DesktopGroup “Windows 8 x86” -InputObject @(1005)
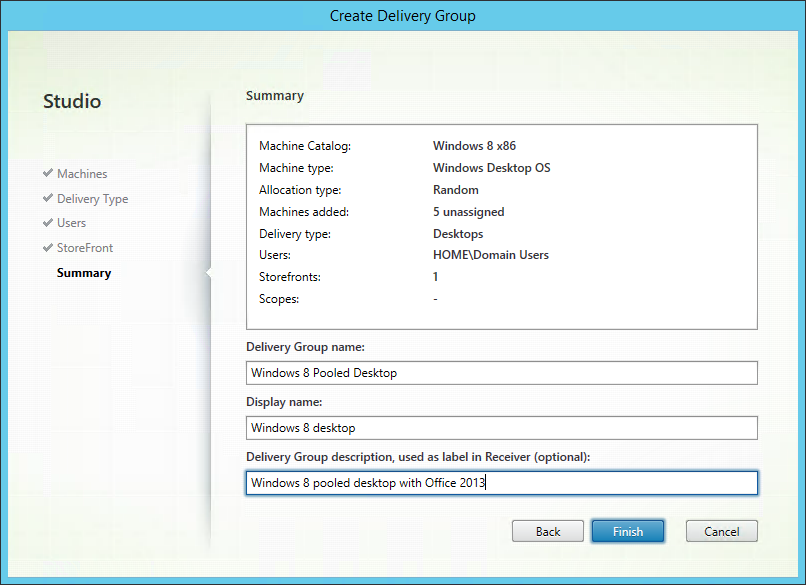
When calling New-BrokerDesktopGroup, the Delivery Group name, display or published name and description is specified.
Group name, Display name and description - New-BrokerDesktopGroup -Name “Windows 8 x86” -PublishedName “Windows 8 x86” -Description “Windows 8 x86 with Office 2013, Pooled desktops”*
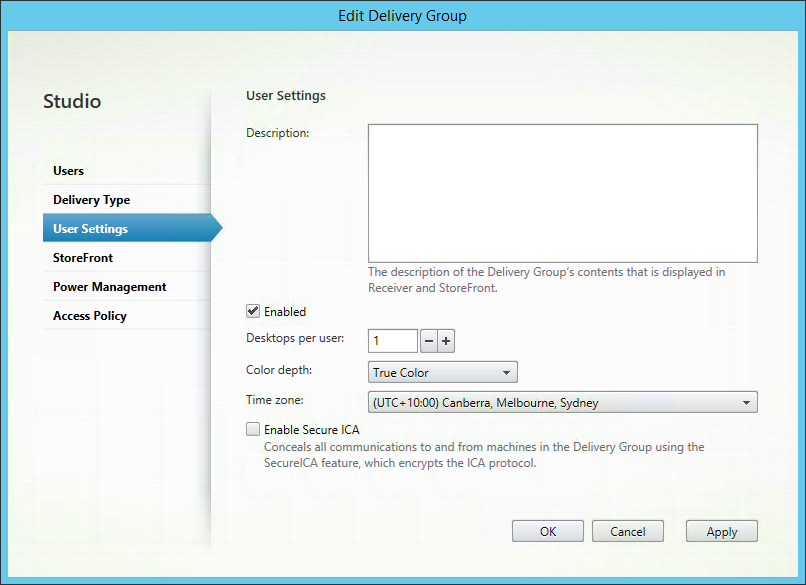
The wizard does not expose all settings for the Delivery Group, so additional settings require opening the properties of the new group. These can be set during creation of the group when using PowerShell.
The same call to New-BrokerDesktopGroup is used to specify user settings including colour depth and time zone preferences.
Controlling various user settings - New-BrokerDesktopGroup -ColorDepth TwentyFourBit -TimeZone “AUS Eastern Standard Time” -SecureIcaRequired $False
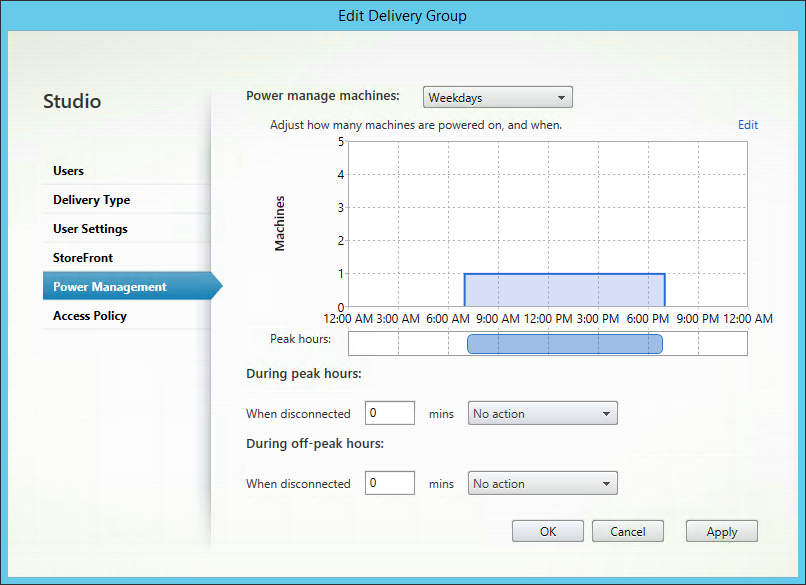
New-BrokerDesktopGroup and New-BrokerPowerTimeScheme are both used to manage virtual machine power management settings. Setting or modifying the peak and off peak hours isn’t friendly either.
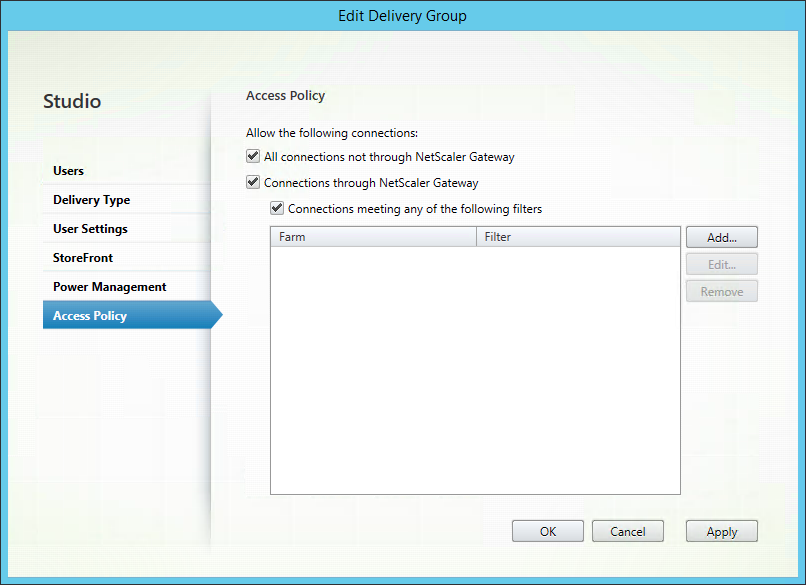
New-BrokerAccessPolicyRule modifies the access policies. This is called twice - once for connections through NetScaler Gateway and once for direct connections.
Creating the Delivery Group is relatively straight-forward; however there are some additional steps, such as creating a StoreFront server and working out how to manage peak and off peak times, that require a bit more investigation.
The Code
Below is the full code listing with comments inline that should provide some detail on the process the code follows. At this point the code provides some error checking for the most important steps. There are still some additional steps and error checking that could be integrated into the code.
#---------------------------------------------------------------------------# Author: Aaron Parker# Desc: Using PowerShell to create a XenDesktop 7.x Delivery Group# Date: Aug 23, 2014# Site: http://stealthpuppy.com#---------------------------------------------------------------------------# # Set variables for the target infrastructure# ----------$adminAddress='xd71.home.stealthpuppy.com'#The XD Controller we're going to execute against$xdControllers='xd71.home.stealthpuppy.com'# Desktop Group properties$desktopGroupName="Windows 8 desktops"$desktopGroupPublishedName="Windows 8 desktops"$desktopGroupDesc="Windows 8 x86 with Office 2013, Pooled desktops"$colorDepth='TwentyFourBit'$deliveryType='DesktopsOnly'$desktopKind='Shared'$sessionSupport="SingleSession"#Also: MultiSession$functionalLevel='L7'$timeZone='AUS Eastern Standard Time'$offPeakBuffer=10$peakBuffer=10$assignedGroup="HOME\Domain Users"#Machine Catalog$machineCatalogName="Windows 8 x86"# ----------# Change to SilentlyContinue to avoid verbose output$VerbosePreference="Continue"# Create the Desktop Group# http://support.citrix.com/proddocs/topic/citrix-broker-admin-v2-xd75/new-brokerdesktopgroup-xd75.htmlIf(!(Get-BrokerDesktopGroup-Name$desktopGroupName-ErrorActionSilentlyContinue)){Write-Verbose"Creating new Desktop Group: $desktopGroupName"$desktopGroup=New-BrokerDesktopGroup-ErrorActionSilentlyContinue-AdminAddress$adminAddress-Name$desktopGroupName-DesktopKind$desktopKind-DeliveryType$deliveryType-Description$desktopGroupPublishedName-PublishedName$desktopGroupPublishedName-MinimumFunctionalLevel$functionalLevel-ColorDepth$colorDepth-SessionSupport$sessionSupport-ShutdownDesktopsAfterUse$True-TimeZone$timeZone-InMaintenanceMode$False-IsRemotePC$False-OffPeakBufferSizePercent$offPeakBuffer-PeakBufferSizePercent$peakBuffer-SecureIcaRequired$False-TurnOnAddedMachine$False-OffPeakDisconnectActionSuspend-OffPeakDisconnectTimeout15-Scope@()}# At this point, we have a Desktop Group, but no users or desktops assigned to it, no power management etc.# Open the properties of the new Desktop Group to see what's missing.# If creation of the desktop group was successful, continue modifying its propertiesIf($desktopGroup){# Add a machine configuration to the new desktop group; This line adds an existing StoreFront server to the desktop group# Where does Input Object 1005 come from?# http://support.citrix.com/proddocs/topic/citrix-broker-admin-v2-xd75/add-brokermachineconfiguration-xd75.html# Write-Verbose "Adding machine configuration to the Desktop Group: $desktopGroupName"# Add-BrokerMachineConfiguration -AdminAddress $adminAddress -DesktopGroup $desktopGroup -InputObject @(1005)# Add machines to the new desktop group. Uses the number of machines available in the target machine catalog# http://support.citrix.com/proddocs/topic/citrix-broker-admin-v2-xd75/add-brokermachinestodesktopgroup-xd75.htmlWrite-Verbose"Getting details for the Machine Catalog: $machineCatalogName"$machineCatalog=Get-BrokerCatalog-AdminAddress$adminAddress-Name$machineCatalogNameWrite-Verbose"Adding $machineCatalog.UnassignedCount machines to the Desktop Group: $desktopGroupName"$machinesCount=Add-BrokerMachinesToDesktopGroup-AdminAddress$adminAddress-Catalog$machineCatalog-Count$machineCatalog.UnassignedCount-DesktopGroup$desktopGroup# Create a new broker user/group object if it doesn't already exist# http://support.citrix.com/proddocs/topic/citrix-broker-admin-v2-xd75/new-brokeruser-xd75.htmlWrite-Verbose"Creating user/group object in the broker for $assignedGroup"If(!(Get-BrokerUser-AdminAddress$adminAddress-Name$assignedGroup-ErrorActionSilentlyContinue)){$brokerUsers=New-BrokerUser-AdminAddress$adminAddress-Name$assignedGroup}Else{$brokerUsers=Get-BrokerUser-AdminAddress$adminAddress-Name$assignedGroup}# Create an entitlement policy for the new desktop group. Assigned users to the desktop group# First check that we have an entitlement name available. Increment until we do.$Num=1Do{# http://support.citrix.com/proddocs/topic/citrix-broker-admin-v2-xd75/test-brokerentitlementpolicyrulenameavailable-xd75.html$Test=Test-BrokerEntitlementPolicyRuleNameAvailable-AdminAddress$adminAddress-Name@($desktopGroupName+"_"+$Num.ToString())-ErrorActionSilentlyContinueIf($Test.Available-eq$False){$Num=$Num+1}}While($Test.Available-eq$False)#http://support.citrix.com/proddocs/topic/citrix-broker-admin-v2-xd75/new-brokerentitlementpolicyrule-xd75.htmlWrite-Verbose"Assigning $brokerUsers.Name to Desktop Catalog: $machineCatalogName"$EntPolicyRule=New-BrokerEntitlementPolicyRule-AdminAddress$adminAddress-Name($desktopGroupName+"_"+$Num.ToString())-IncludedUsers$brokerUsers-DesktopGroupUid$desktopGroup.Uid-Enabled$True-IncludedUserFilterEnabled$False# Check whether access rules exist and then create rules for direct access and via Access Gateway# http://support.citrix.com/proddocs/topic/citrix-broker-admin-v2-xd75/new-brokeraccesspolicyrule-xd75.html$accessPolicyRule=$desktopGroupName+"_Direct"If(Test-BrokerAccessPolicyRuleNameAvailable-AdminAddress$adminAddress-Name@($accessPolicyRule)-ErrorActionSilentlyContinue){Write-Verbose"Allowing direct access rule to the Desktop Catalog: $machineCatalogName"New-BrokerAccessPolicyRule-AdminAddress$adminAddress-Name$accessPolicyRule-IncludedUsers@($brokerUsers.Name)-AllowedConnections'NotViaAG'-AllowedProtocols@('HDX','RDP')-AllowRestart$True-DesktopGroupUid$desktopGroup.Uid-Enabled$True-IncludedSmartAccessFilterEnabled$True-IncludedUserFilterEnabled$True}Else{Write-Error"Failed to add direct access rule $accessPolicyRule. It already exists."}$accessPolicyRule=$desktopGroupName+"_AG"If(Test-BrokerAccessPolicyRuleNameAvailable-AdminAddress$adminAddress-Name@($accessPolicyRule)-ErrorActionSilentlyContinue){Write-Verbose"Allowing access via Access Gateway rule to the Desktop Catalog: $machineCatalogName"New-BrokerAccessPolicyRule-AdminAddress$adminAddress-Name$accessPolicyRule-IncludedUsers@($brokerUsers.Name)-AllowedConnections'ViaAG'-AllowedProtocols@('HDX','RDP')-AllowRestart$True-DesktopGroupUid$desktopGroup.Uid-Enabled$True-IncludedSmartAccessFilterEnabled$True-IncludedSmartAccessTags@()-IncludedUserFilterEnabled$True}Else{Write-Error"Failed to add Access Gateway rule $accessPolicyRule. It already exists."}# Create weekday and weekend access rules# http://support.citrix.com/proddocs/topic/citrix-broker-admin-v2-xd75/new-brokerpowertimescheme-xd75.html$powerTimeScheme="Windows 8 Pooled Desktop_Weekdays"If(Test-BrokerPowerTimeSchemeNameAvailable-AdminAddress$adminAddress-Name@($powerTimeScheme)-ErrorActionSilentlyContinue){Write-Verbose"Adding new power scheme $powerTimeScheme"New-BrokerPowerTimeScheme-AdminAddress$adminAddress-DisplayName'Weekdays'-Name$powerTimeScheme-DaysOfWeek'Weekdays'-DesktopGroupUid$desktopGroup.Uid-PeakHours@($False,$False,$False,$False,$False,$False,$False,$True,$True,$True,$True,$True,$True,$True,$True,$True,$True,$True,$True,$False,$False,$False,$False,$False)-PoolSize@(0,0,0,0,0,0,0,1,1,1,1,1,1,1,1,1,1,1,1,0,0,0,0,0)}Else{Write-Error"Failed to add power scheme rule $powerTimeScheme. It already exists."}$powerTimeScheme="Windows 8 Pooled Desktop_Weekend"If(Test-BrokerPowerTimeSchemeNameAvailable-AdminAddress$adminAddress-Name@($powerTimeScheme)-ErrorActionSilentlyContinue){Write-Verbose"Adding new power scheme $powerTimeScheme"New-BrokerPowerTimeScheme-AdminAddress$adminAddress-DisplayName'Weekend'-Name$powerTimeScheme-DaysOfWeek'Weekend'-DesktopGroupUid$desktopGroup.Uid-PeakHours@($False,$False,$False,$False,$False,$False,$False,$True,$True,$True,$True,$True,$True,$True,$True,$True,$True,$True,$True,$False,$False,$False,$False,$False)-PoolSize@(0,0,0,0,0,0,0,0,0,0,0,0,0,0,0,0,0,0,0,0,0,0,0,0)}Else{Write-Error"Failed to add power scheme rule $powerTimeScheme. It already exists."}}#End If DesktopGroup
Comments or feedback on bugs, better ways to do things or additional steps is welcome.
Driving XenDesktop with PowerShell is a challenge to say the least. While documentation for the XenDesktop PowerShell modules is OK and Citrix Studio outputs PowerShell code after you’ve completed a task in the console, there’s still plenty of work to get that code into something usable.
As part of an ongoing series of articles themed around automating virtual desktop deployment, I’ve written some PowerShell code to automate the creation of an non-persistent, MCS-based Machine Catalog based on a specific Windows image, that we’ve already automated with a solution such as MDT.
Don’t expect to copy and paste the PowerShell output in Citrix Studio and have a complete script. The code is missing a number of lines that link tasks together. I found this article on the Citrix Blogs quite useful - Using PowerShell to Create a Catalog of Machine Creations Services Machines; however I’ve taken my script a few steps further.
Linking the Code to the UI
While the Create Machine Catalog wizard doesn’t expose everything that goes on behind the scenes when a machine catalog is created, I think it’s still worth showing how specific functions relate to choices that the administrator makes in the wizard.
The screenshots below show just a snippet of the functions required to automate the catalog creation using PowerShell. These walkthrough the same environment that the full code listing at the end of this article is creating. See the image captions for example code that applies to each step.
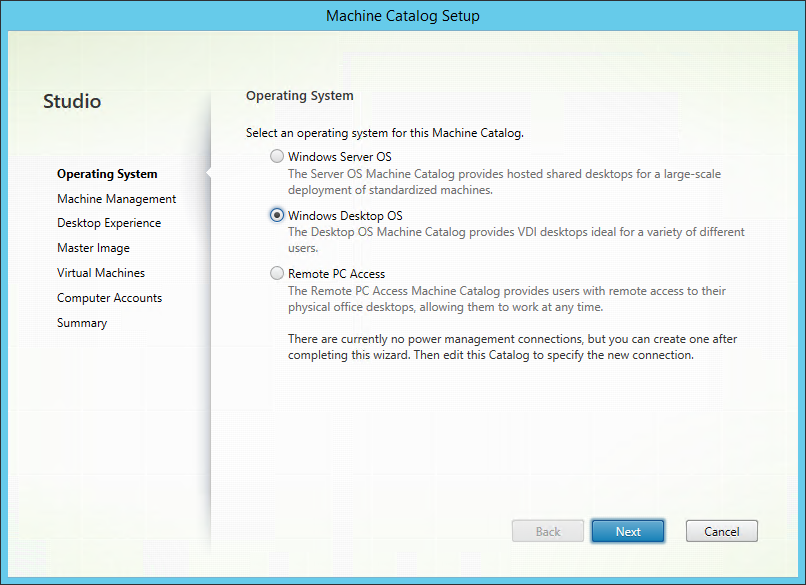
New-BrokerCataog is used to create the machine catalog and set a number of properties. You’ll see New-BrokerCatalog across a number of these screen shots. First up is setting the broker type - in this instance, I’m deploying a Windows 8 image, so need to choose ‘Windows Desktop OS’:
Selecting the Machine Catalog type - New-BrokerCatalog -SessionSupport SingleSession
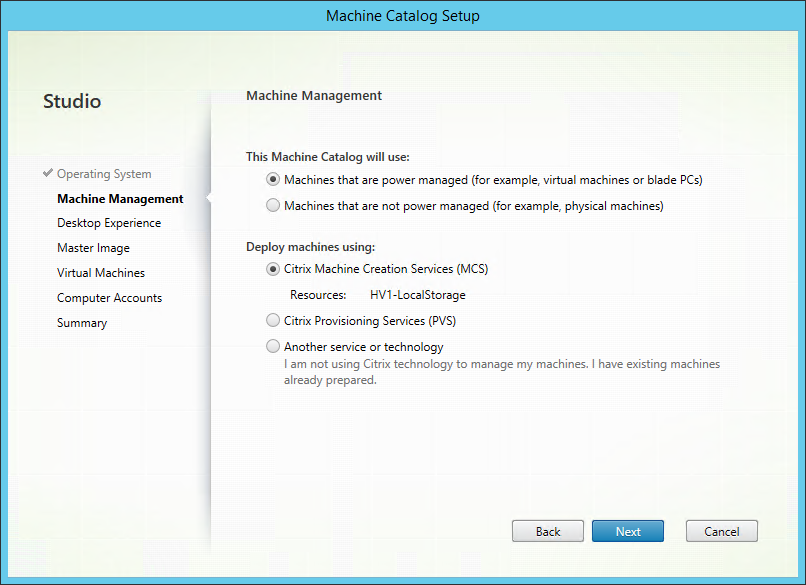
Because were using MCS, I’m going to specify that I’m using virtual machines and choose the storage on which to deploy those VMs and use the ProvisioningType parameter on New-BrokerCatalog to specify MCS. This is done in PowerShell via a number of commands - see around line 45 where we specify the hypervisor management and storage resource to use.
Selecting the provisioning type - New-BrokerCatalog -ProvisioningType MCS
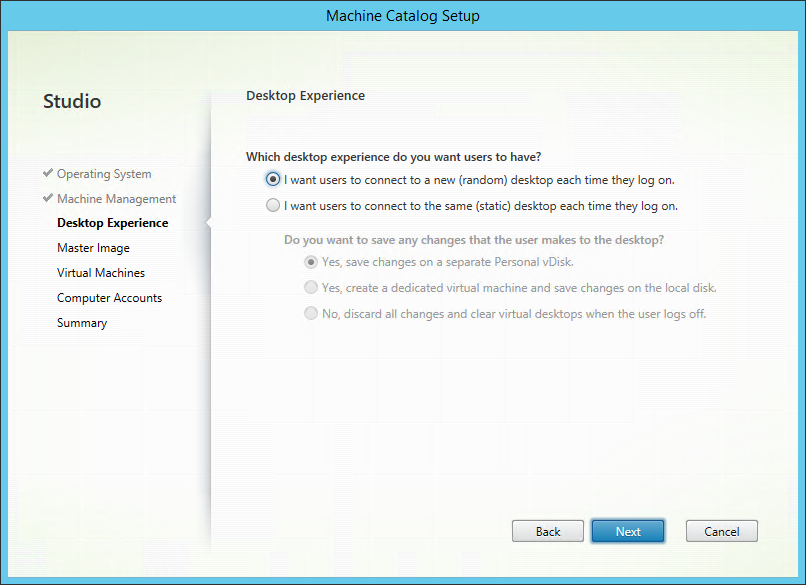
Also on the New-BrokerCatalog, we can specify that this is a set of randomly assigned desktops.
Selecting Random or Static desktops - New-BrokerCatalog -AllocationType Random
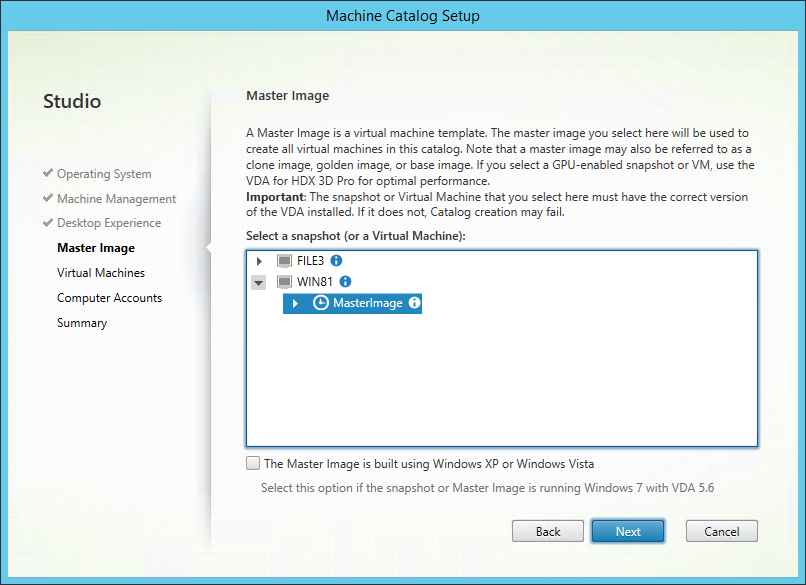
To find the image to use, I’ve obtained the path to the master image and its snapshot via the Get-ChildItem command (on the path XDHyp:\HostingUnits<Storage Resource>) and passed that to New-ProvScheme.
Selecting the master image and snapshot to use - New-ProvScheme -ProvisioningSchemeName “Windows 8” -HostingUnitName “HV1-LocalStorage” -MasterImageVM “XDHyp:\HostingUnits\HV1-LocalStorage\WIN81.vm\MasterImage.snapshot”
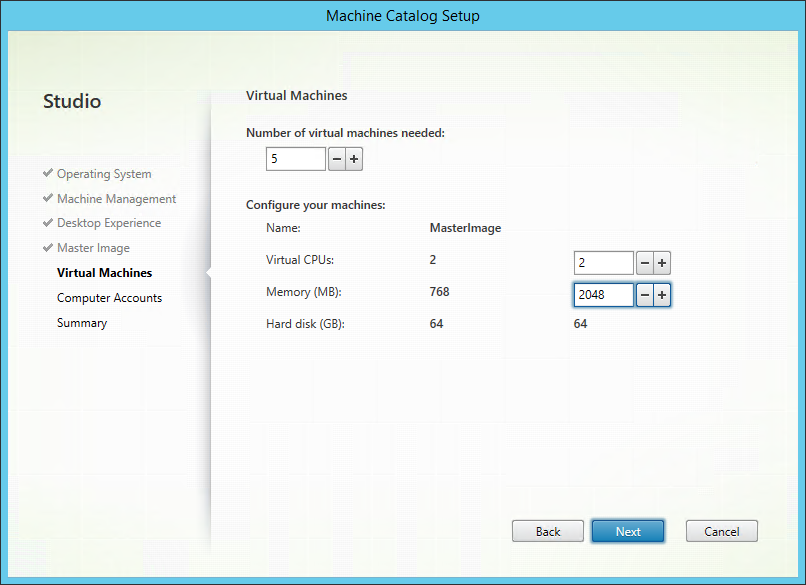
Also with New-ProvScheme we can set the number of virtual CPUs and the amount of RAM to assign to each virtual desktop. To specify the number of desktops to create, we’re actually first specifying the number of AD machine accounts to create via New-AcctADAccount and then creating the same number of desktops to assign to those accounts.
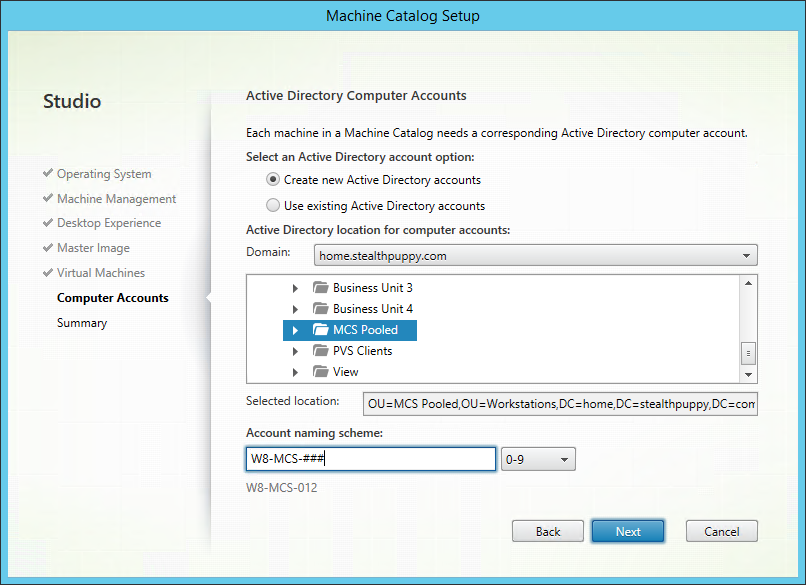
New-AcctIdentityPool is used to create an identity pool that stores the machine accounts by specifying the naming convention and where the accounts will be stored.
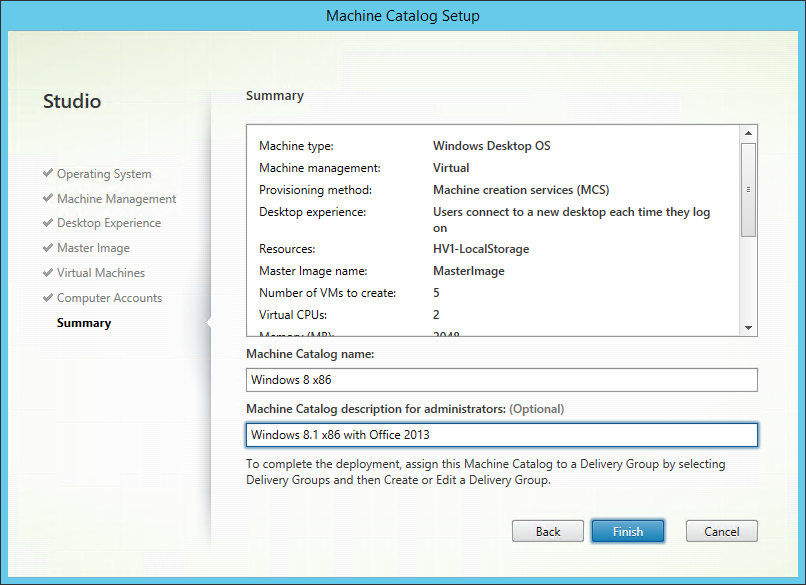
Again we can see where New-BrokerCataog is used to specify the catalog name and description.
Setting the machine catalog name and description - New-BrokerCatalog -Name “Windows 8 x86” -Description “Windows 8.1 x86 SP1 with Office 2013”
There’s plenty that the wizard does to hide the complexity of setting up a catalog from the administrator. If you attempt the same via PowerShell, what goes on under the hood is laid bare.
The Code
Below is the full code listing with comments inline that should provide some detail on the process the code follows. At this point the code provides some error checking for the most important steps. There are still some additional steps and error checking that could be integrated:
This code should find the last snapshot of the target master image; it would be simple enough to specify a particular snapshot if required
Checking whether provisioning schemes are already available or exist before attempting to create a new provisioning scheme
Additional checking that some tasks have completed successfully before continuing
#---------------------------------------------------------------------------# Author: Aaron Parker# Desc: Using PowerShell to create a XenDesktop 7.x machine catalog # Date: Aug 19, 2014# Site: http://stealthpuppy.com#---------------------------------------------------------------------------# Set variables for the target infrastructure# ----------$adminAddress='xd71.home.stealthpuppy.com'#The XD Controller we're going to execute against$xdControllers='xd71.home.stealthpuppy.com'# Hypervisor and storage resources# These need to be configured in Studio prior to running this script# This script is hypervisor and management agnostic - just point to the right infrastructure$storageResource="HV1-LocalStorage"#Storage$hostResource="Lab SCVMM"#Hypervisor management# Machine catalog properties$machineCatalogName="Windows 8 x86"$machineCatalogDesc="Windows 8.1 x86 SP1 with Office 2013"$domain="home.stealthpuppy.com"$orgUnit="OU=MCS Pooled,OU=Workstations,DC=home,DC=stealthpuppy,DC=com"$namingScheme="W8-MCS-###"#AD machine account naming conventions$namingSchemeType="Numeric"#Also: Alphabetic$allocType="Random"#Also: Static$persistChanges="Discard"#Also: OnLocal, OnPvD$provType="MCS"#Also: Manual, PVS$sessionSupport="SingleSession"#Also: MultiSession$masterImage="WIN81*"$vCPUs=2$VRAM=2048# ----------# Change to SilentlyContinue to avoid verbose output$VerbosePreference="Continue"# Load the Citrix PowerShell modulesWrite-Verbose"Loading Citrix XenDesktop modules."Add-PSSnapinCitrix*# Get information from the hosting environment via the XD Controller# Get the storage resourceWrite-Verbose"Gathering storage and hypervisor connections from the XenDesktop infrastructure."$hostingUnit=Get-ChildItem-AdminAddress$adminAddress"XDHyp:\HostingUnits"|Where-Object{$_.PSChildName-like$storageResource}|Select-ObjectPSChildName,PsPath# Get the hypervisor management resources$hostConnection=Get-ChildItem-AdminAddress$adminAddress"XDHyp:\Connections"|Where-Object{$_.PSChildName-like$hostResource}$brokerHypConnection=Get-BrokerHypervisorConnection-AdminAddress$adminAddress-HypHypervisorConnectionUid$hostConnection.HypervisorConnectionUid$brokerServiceGroup=Get-ConfigServiceGroup-AdminAddress$adminAddress-ServiceType'Broker'-MaxRecordCount2147483647# Create a Machine Catalog. In this case a catalog with randomly assigned desktopsWrite-Verbose"Creating machine catalog. Name: $machineCatalogName; Description: $machineCatalogDesc; Allocation: $allocType"$brokerCatalog=New-BrokerCatalog-AdminAddress$adminAddress-AllocationType$allocType-Description$machineCatalogDesc-Name$machineCatalogName-PersistUserChanges$persistChanges-ProvisioningType$provType-SessionSupport$sessionSupport# The identity pool is used to store AD machine accountsWrite-Verbose"Creating a new identity pool for machine accounts."$identPool=New-AcctIdentityPool-AdminAddress$adminAddress-Domain$domain-IdentityPoolName$machineCatalogName-NamingScheme$namingScheme-NamingSchemeType$namingSchemeType-OU$orgUnit# Creates/Updates metadata key-value pairs for the catalog (no idea why).Write-Verbose"Retrieving the newly created machine catalog."$catalogUid=Get-BrokerCatalog|Where-Object{$_.Name-eq$machineCatalogName}|Select-ObjectUid$guid=[guid]::NewGuid()Write-Verbose"Updating metadata key-value pairs for the catalog."Set-BrokerCatalogMetadata-AdminAddress$adminAddress-CatalogId$catalogUid.Uid-Name'Citrix_DesktopStudio_IdentityPoolUid'-Value$guid# Check to see whether a provisioning scheme is already availableWrite-Verbose"Checking whether the provisioning scheme name is unused."If(Test-ProvSchemeNameAvailable-AdminAddress$adminAddress-ProvisioningSchemeName@($machineCatalogName)){Write-Verbose"Success."# Get the master VM image from the same storage resource we're going to deploy to. Could pull this from another storage resource available to the hostWrite-Verbose"Getting the master image details for the new catalog: $masterImage"$VM=Get-ChildItem-AdminAddress$adminAddress"XDHyp:\HostingUnits\$storageResource"|Where-Object{$_.ObjectType-eq"VM"-and$_.PSChildName-like$masterImage}# Get the snapshot details. This code will assume a single snapshot exists - could add additional checking to grab last snapshot or check for no snapshots.$VMDetails=Get-ChildItem-AdminAddress$adminAddress$VM.FullPath# Create a new provisioning scheme - the configuration of VMs to deploy. This will copy the master image to the target datastore.Write-Verbose"Creating new provisioning scheme using $VMDetails.FullPath"# Provision VMs based on the selected snapshot.$provTaskId=New-ProvScheme-AdminAddress$adminAddress-ProvisioningSchemeName$machineCatalogName-HostingUnitName$storageResource-MasterImageVM$VMDetails.FullPath-CleanOnBoot-IdentityPoolName$identPool.IdentityPoolName-VMCpuCount$vCPUs-VMMemoryMB$vRAM-RunAsynchronously$provTask=Get-ProvTask-AdminAddress$adminAddress-TaskId$provTaskId# Track the progress of copying the master imageWrite-Verbose"Tracking progress of provisioning scheme creation task."$totalPercent=0While($provTask.Active-eq$True){Try{$totalPercent=If($provTask.TaskProgress){$provTask.TaskProgress}Else{0}}Catch{}Write-Progress-Activity"Creating Provisioning Scheme (copying and composing master image):"-Status"$totalPercent% Complete:"-percentcomplete$totalPercentSleep15$provTask=Get-ProvTask-AdminAddress$adminAddress-TaskID$provTaskId}# If provisioning task fails, there's no point in continuing further.If($provTask.WorkflowStatus-eq"Completed"){# Apply the provisioning scheme to the machine catalogWrite-Verbose"Binding provisioning scheme to the new machine catalog"$provScheme=Get-ProvScheme|Where-Object{$_.ProvisioningSchemeName-eq$machineCatalogName}Set-BrokerCatalog-AdminAddress$adminAddress-Name$provScheme.ProvisioningSchemeName-ProvisioningSchemeId$provScheme.ProvisioningSchemeUid# Associate a specific set of controllers to the provisioning scheme. This steps appears to be optional.Write-Verbose"Associating controllers $xdControllers to the provisioning scheme."Add-ProvSchemeControllerAddress-AdminAddress$adminAddress-ControllerAddress@($xdControllers)-ProvisioningSchemeName$provScheme.ProvisioningSchemeName# Provisiong the actual machines and map them to AD accounts, track the progress while this is happeningWrite-Verbose"Creating the machine accounts in AD."$adAccounts=New-AcctADAccount-AdminAddress$adminAddress-Count5-IdentityPoolUid$identPool.IdentityPoolUidWrite-Verbose"Creating the virtual machines."$provTaskId=New-ProvVM-AdminAddress$adminAddress-ADAccountName@($adAccounts.SuccessfulAccounts)-ProvisioningSchemeName$provScheme.ProvisioningSchemeName-RunAsynchronously$provTask=Get-ProvTask-AdminAddress$adminAddress-TaskId$provTaskIdWrite-Verbose"Tracking progress of the machine creation task."$totalPercent=0While($provTask.Active-eq$True){Try{$totalPercent=If($provTask.TaskProgress){$provTask.TaskProgress}Else{0}}Catch{}Write-Progress-Activity"Creating Virtual Machines:"-Status"$totalPercent% Complete:"-percentcomplete$totalPercentSleep15$ProvTask=Get-ProvTask-AdminAddress$adminAddress-TaskID$provTaskId}# Assign the newly created virtual machines to the machine catalog$provVMs=Get-ProvVM-AdminAddress$adminAddress-ProvisioningSchemeUid$provScheme.ProvisioningSchemeUidWrite-Verbose"Assigning the virtual machines to the new machine catalog."ForEach($provVMin$provVMs){Write-Verbose"Locking VM $provVM.ADAccountName"Lock-ProvVM-AdminAddress$adminAddress-ProvisioningSchemeName$provScheme.ProvisioningSchemeName-Tag'Brokered'-VMID@($provVM.VMId)Write-Verbose"Adding VM $provVM.ADAccountName"New-BrokerMachine-AdminAddress$adminAddress-CatalogUid$catalogUid.Uid-MachineName$provVM.ADAccountName}Write-Verbose"Machine catalog creation complete."}Else{# If provisioning task fails, provide error# Check that the hypervisor management and storage resources do no have errors. Run 'Test Connection', 'Test Resources' in Citrix StudioWrite-Error"Provisioning task failed with error: [$provTask.TaskState] $provTask.TerminatingError"}}
Comments or feedback on bugs, better ways to do things or additional steps is welcome.
I’ve previously posted about retrieving the UUID from a virtual machine hosted on vSphere. UUIDs are useful if you want to uniquely identify a target machine for OS deployment task sequences and the like (e.g. MDT). Here’s how to obtain the UUID from a virtual machine hosted on Hyper-V.
Just like with vSphere, the UUID isn’t a property of the virtual machine that can be queried directly. We need to go via WMI to query the target virtual machine. Note that in this function, I’m using version 2 of the Root\Virtualization WMI namespace (root\virtualization\v2. This means the function as written, will only work on Windows 8 and Windows Server 2012 (and above). If you want to use this function on earlier versions of Hyper-V, remove the “\v2” from the namespace.
As an example, here’s how to retrieve the UUIDs from a set of VMs on a target Hyper-V host named hv1:
Here’s the full function code listing. Please let me know if you find any bugs:
#---------------------------------------------------------------------------# Author: Aaron Parker# Desc: Function that uses retrieves the UUID from a specified VM and# formats it into the right format for use with MDT/SCCM etc# Date: Aug 18, 2014# Site: http://stealthpuppy.com#---------------------------------------------------------------------------FunctionGet-HypervVMUUID{<#
.SYNOPSIS
Retrieve the UUID from a virtual machine or set of virtual machines.
.DESCRIPTION
This function will retrieve the UUID from from a virtual machine or set of virtual machines from a Hyper-V host.
.PARAMETER ComputerName
Specifies the host from which to query the virtual machine or set of virtual machines.
.PARAMETER VM
Specifies the virtual machine or set of virtual machines (a comma delimited list) from which to obtain the UUID/s.
.EXAMPLE
PS C:\> Get-HypervVMUUID -ComputerName hv1 -VM win71, win72
This command retrieves the UUIDs from the virtual machines win71 and win72 from the host hv1.
.EXAMPLE
PS C:\> Get-HypervVMUUID -VM win71, win72
This command retrieves the UUIDs from the virtual machines win71 and win72 from the local host.
.EXAMPLE
PS C:\> Get-HypervVMUUID
This command retrieves the UUIDs from the all of the virtual machines on the local host.
.NOTES
/retrieving-a-vms-uuid-from-hyperv/ for support information.
.LINK
/retrieving-a-vms-uuid-from-hyperv/
#>[cmdletbinding(SupportsShouldProcess=$True)]param([Parameter(Mandatory=$false,HelpMessage="Specifies one or more Hyper-V hosts from which virtual machine UUIDs are to be retrieved. NetBIOS names, IP addresses, and fully-qualified domain names are allowable. The default is the local computer — use ""localhost"" or a dot (""."") to specify the local computer explicitly.")][string]$ComputerName,[Parameter(Mandatory=$false,Position=0,HelpMessage="Specifies the virtual machine from which to retrieve the UUID.")][string[]]$VM)# If ComputerName parameter is not specified, set value to the local hostIf(!$ComputerName){$ComputerName="."}# If VM parameter is specified, return those VMs, else return all VMsIf($VM){$UUIDs=Get-VM-ComputerName$ComputerName-VM$VM-ErrorActionSilentlyContinue|Select-ObjectName,@{Name="BIOSGUID";Expression={(Get-WmiObject-ComputerName$_.ComputerName-Namespace"root\virtualization\v2"-ClassMsvm_VirtualSystemSettingData-PropertyBIOSGUID-Filter("InstanceID = 'Microsoft:{0}'"-f$_.VMId.Guid)).BIOSGUID}}}Else{$UUIDs=Get-VM-ComputerName$ComputerName-ErrorActionSilentlyContinue|Select-ObjectName,@{Name="BIOSGUID";Expression={(Get-WmiObject-ComputerName$_.ComputerName-Namespace"root\virtualization\v2"-ClassMsvm_VirtualSystemSettingData-PropertyBIOSGUID-Filter("InstanceID = 'Microsoft:{0}'"-f$_.VMId.Guid)).BIOSGUID}}}# Remove curly brackets from the UUIDs and return the arrayForEach($UIDin$UUIDs){$UID.BIOSGUID=$UID.BIOSGUID-replace"}";$UID.BIOSGUID=$UID.BIOSGUID-replace"{"}Return$UUIDs}
Running VMs under ESXi will incur a memory overhead for each virtual machine. You can read about this overhead here: Understanding Memory Overhead. Essentially memory overhead is: