Tips for Enabling SSO with Salesforce and Azure AD

I was recently testing out the setup of single sign-on (SSO) and user provisioning with Azure Active Directory and Salesforce via the Azure Resource Manager portal and came across a couple of minor hiccups that I wanted to share. With Salesforce being as popular as it is, it’s a great target for enabling SSO in any organisation and improving the user experience.
Azure Active Directory
If you happen to be new to Azure Active Directory (Azure AD), whether you’re an IT Pro looking to learn more about it or an organisation that is managing cloud-based or SaaS applications, Azure AD is a Microsoft technology that most certainly in your future.
You can create an Azure tenant and set up Azure AD using the free tier, integrating your on-premises identities and start configuring single sign-on for cloud-based applications without spending any money with Microsoft. Great for IT Pros with home labs and any organisation getting started on their cloud journey.
I won’t cover the setup of Azure AD here, but the links above are plenty to get you started if you’re not already using Azure. Note that in this article I’m covering a couple of tips for single sign-on and user account provisioning with Salesforce. While SSO comes with the free tier of Azure AD, user account provisioning requires an Azure AD Premium subscription.
Salesforce
There’s probably a good chance you’re already Salesforce organisation if you’re reading this, but for those of us not using it or wanting to test single sign-on and user account provisioning with a real enterprise SaaS application, Salesforce provides a free developer version.
To test out SSO and account provisioning functionality in a lab environment or before you implement in production, sign up for the developer edition. This took me all of 5 minutes and I have an enterprise application that I can test with web, mobile and desktop apps.
Single Sign-On
Setting up SSO for Salesforce is straight-forward; however due to a certificate issue, it took a bit longer that it should have. Starting with access to an Azure AD tenant and a Salesforce subscription, configuring SSO should take an hour or less.
There are several articles on setting up SSO with Salesforce:
- For the Azure Classic Portal a tutorial with videos on Azure Active Directory integration
- From Salesforce, an article on Login with Azure AD, also covering the Classic portal
- When configuring Salesforce in the Azure RM portal, a blade is provided that includes the steps for configuring SSO
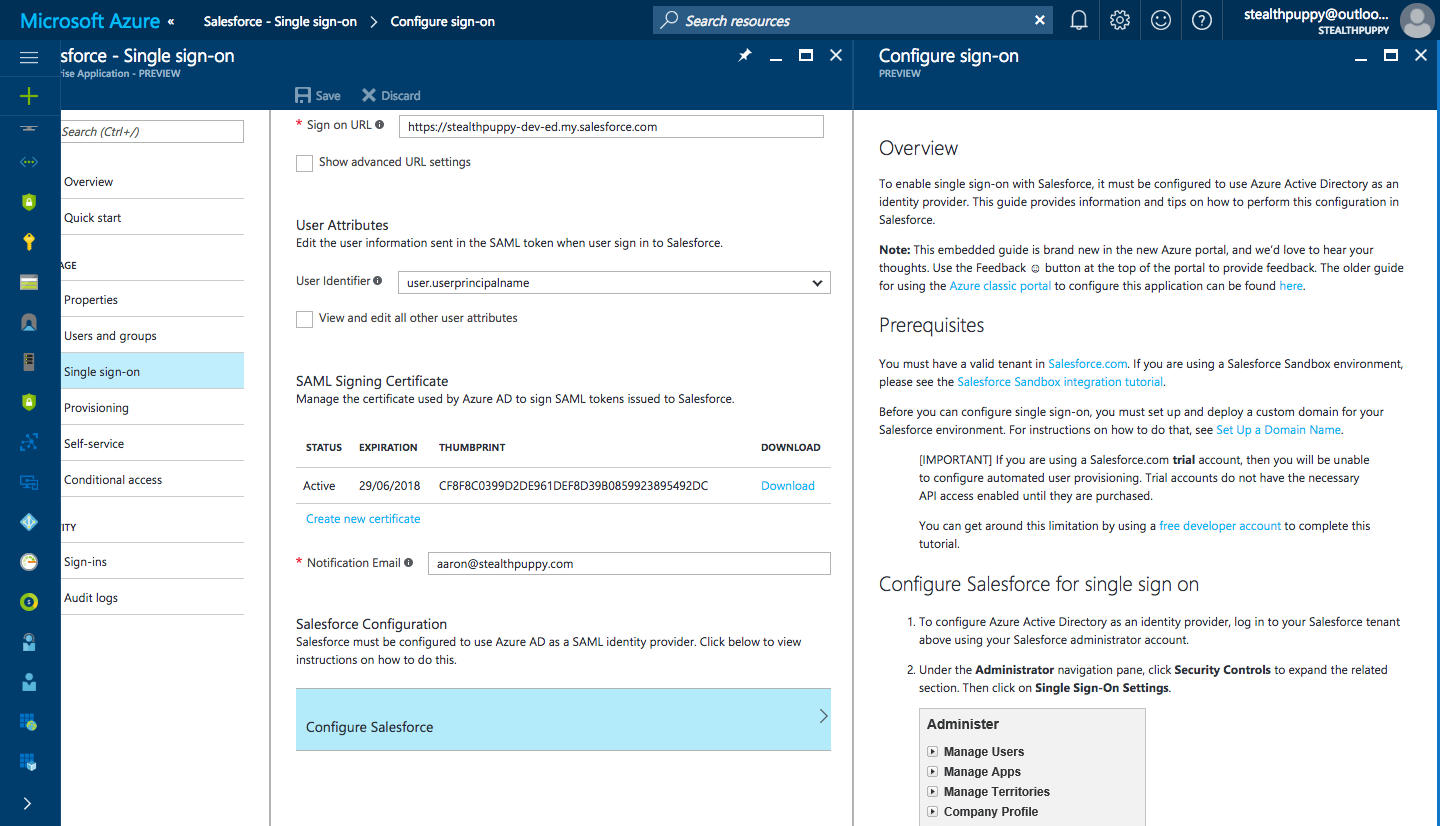
To configure SSO for Salesforce, log into the Azure Portal and open the Azure Active Directory blade, click on Enterprise Applications, click Add, find and select Salesforce then click Add. Once the application has been added, click on Single sign-on to start the configuration steps.

Configuring SSO for Salesforce in the Azure RM portal
During the Salesforce SAML configuration, I came across an issue with the SAML signing certificate issued by Azure.
Request Signing Certificate Issue
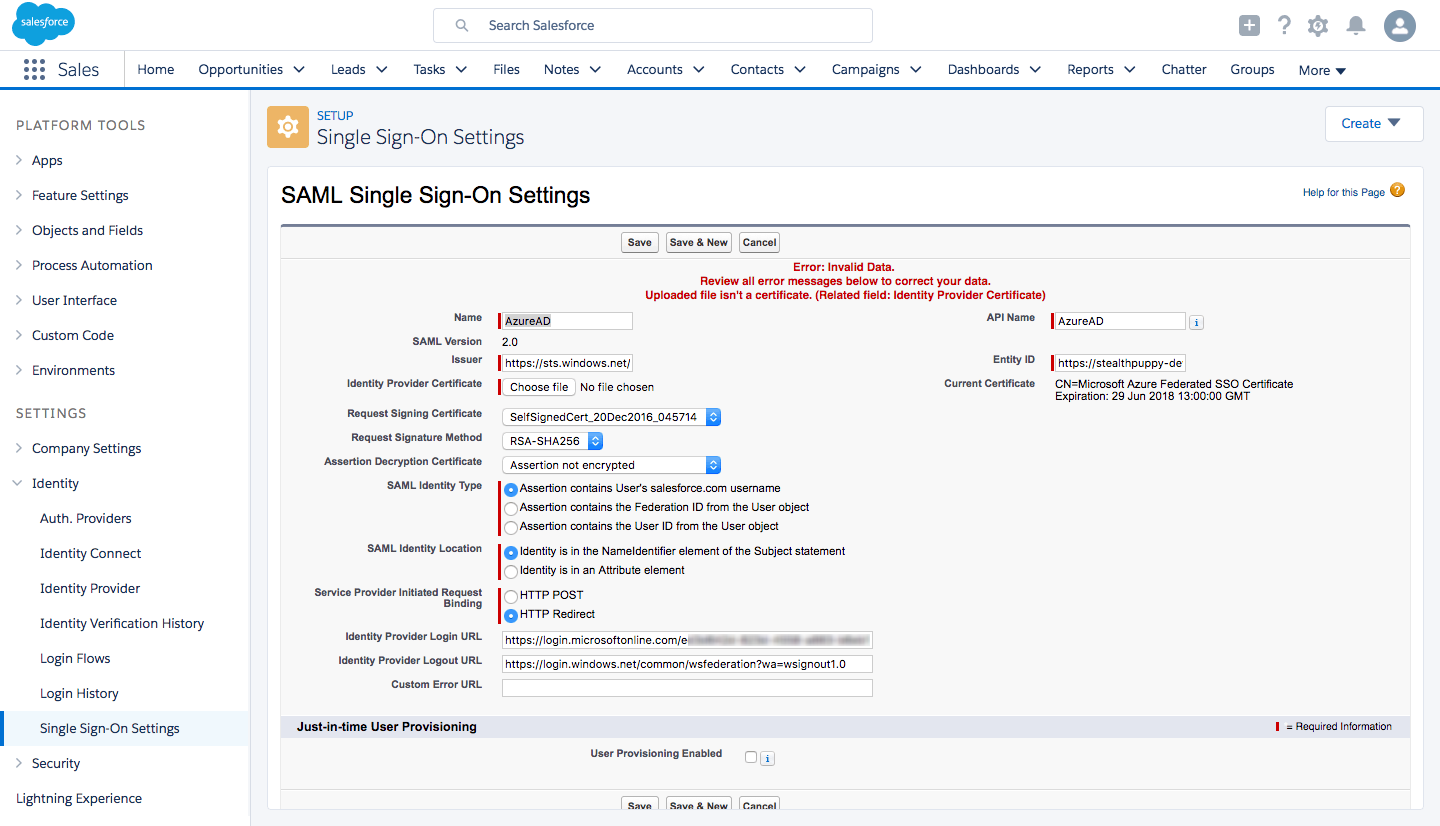
When configuring SAML from within Salesforce using the certificate from Azure, the following error is shown when attempting to save the configuration.
Uploaded file isn’t a certificate. (Related field: Identity Provider Certificate)
Which looks like this:

Receiving “Uploaded file isn’t a certificate. (Related field: Identity Provider Certificate)” when saving the Salesforce SSO settings
This was a little disconcerting as the certificate is automatically generated by Azure, but not recognised by Salesforce. In this case, I’m using the Azure RM portal rather than the Classic portal, so perhaps there’s an issue with the generation of certificates through the new portal.
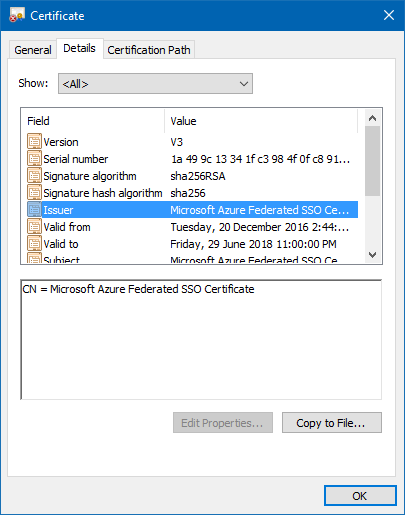
The certificate properties don’t reveal anything out of the ordinary.

Azure SAML certificate properties
I thought it worth exporting the certificate to DER format to test. Open the certificate, click Details / Copy to File… (as shown above) and export it to DER encoded binary X.509 format. Use that version of the certificate when configuring SAML in Salesforce and it will save successfully.
Recommendations
When configuring SAML single sign-on in Salesforce here’s a quick list of my recommendations:
- Export the SAML signing certificate generated by Azure to DER format
- Set the Request Signature Method to RSA-SHA256. Note in the screenshot above that the signature algorithm and signature hash algorithm are in SHA256.
- The Name field in the Salesforce Single Sign-on settings will be displayed to end-users on the Salesforce login page. Use text here that is descriptive to ensure users (“Azure AD” might not make sense)
- SAML Identity Type needs to be set to Assertion contains the User’s salesforce.com username. When configuring account provisioning, this must instead be set to Assertion contains the Federation ID from the User object
This then leads me to enabling account provisioning.
Account Provisioning
Salesforce is one of the handful of SaaS apps that are supported for Automated User Provisioning with Azure AD. Just follow the steps provided by Microsoft for enabling user provisioning; however, once enabled the following message is displayed when attempting single sign-on:
We can’t log you in. Check for an invalid assertion in the SAML Assertion Validator (available in Single Sign-On Settings) or check the login history for failed logins.
Checking the SAML Validator, we can see this error for the target account:
Unable to map the subject to a Salesforce.com user
In the Salesforce user properties, I can see that the Federation ID under Single Sign-On is blank. Adding the user’s account name (i.e. email address or UPN) manually, then successfully enabled SSO.
So what’s the problem? Turns out that we need to add an attribute mapping in Azure AD to ensure that this field is populated when the user account provisioning process creates accounts. I’m not sure why this mapping isn’t there by default.
In the Azure portal, navigate to Azure AD, Enterprise applications, Salesforce and click on Provisioning. Under Mappings, click on the enabled mapping to open the attribute properties blade. At the bottom of that blade, you will find Add New Mapping.
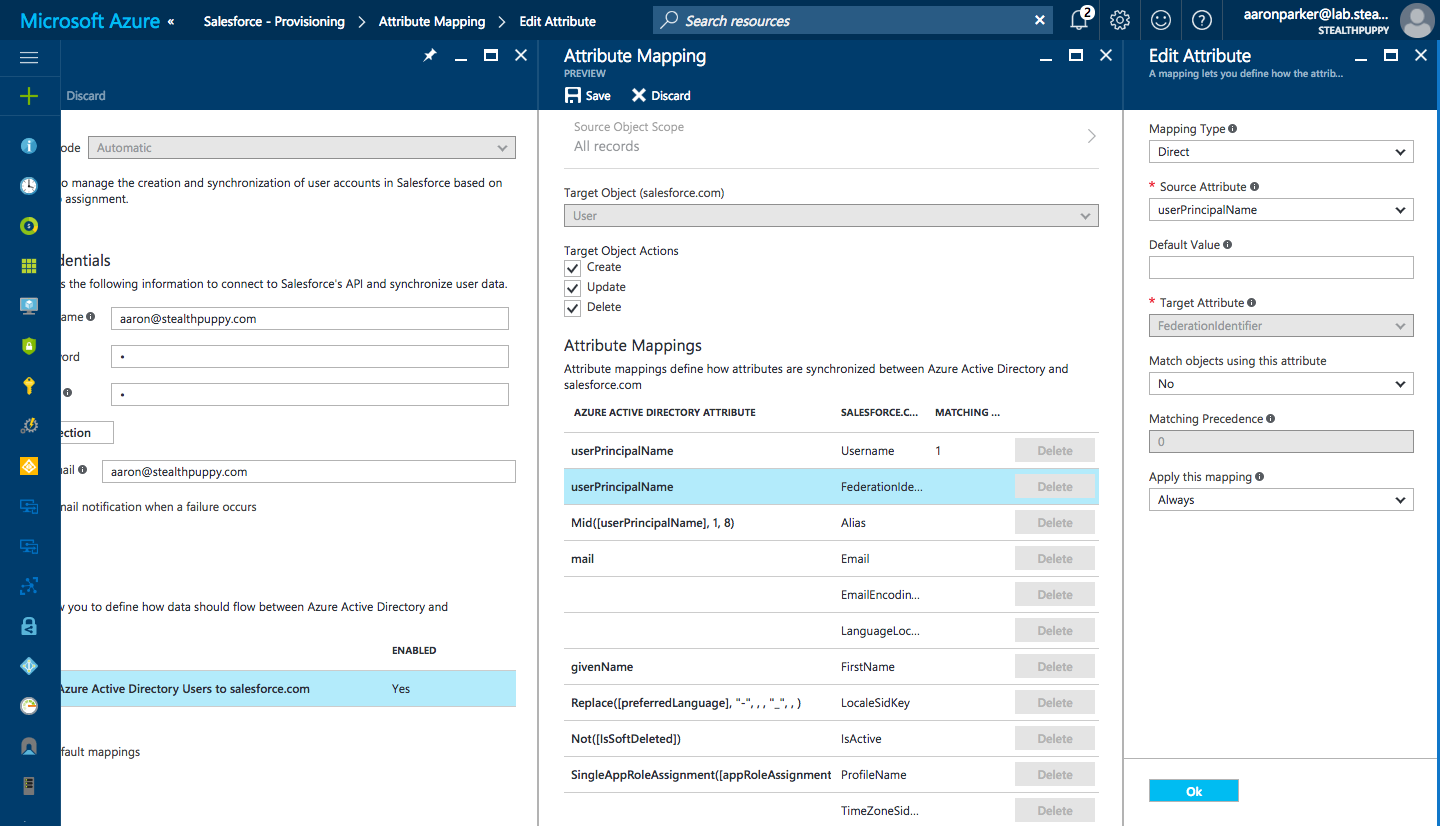
Add a new mapping with these values:
- Mapping Type: Direct
- Source Attribute: userPrincipalName
- Default Value:
<blank> - Source Attribute: FederationIdentifier
- Match objects using this attribute: No
- Apply this mapping: Always
This should look similar to the screenshot below:

Adding the FederationIdentity Attribute Mapping for Salesforce
Save the configuration and start the provisioning synchronisation and single sign-ins should now work.
Conclusion
Being able to setup an enterprise SaaS application for single sign-on and user account provisioning from Azure AD in a lab environment is ideal. While in this instance I should have been done with the configuration within an hour, a couple of hurdles were in the way. Hopefully, this article will ensure anyone configuring SSO for this application in the future won’t have the same challenges.
