Thunderbolt 3 - One Cable to Rule Them All

- The Quest for Less Clutter
- The Hunt for More Pixels
- Playing Hardware Roulette
- Hardware Experiences
- Wrap-Up
Thunderbolt 3 and USB-C have arrived to make our life easier and more confusing all at the same time. The promise of a single cable that does everything is appealing but for the average consumer, knowing what to purchase is challenging. This article is a view into my research into Thunderbolt, USB-C and 4K monitors and what I’ve ultimately purchased.
In an effort to reduce the clutter on my desk and improve my viewing experience for work, I’ve invested in a Thunderbolt 3 dock and a 4K monitor. This article isn’t necessarily a review of this hardware - instead consider this a walk-through of how I made these specific choices and my experiences with a Thunderbolt 3 dock. In a follow up article, I’ll discuss Thunderbolt and high HPI experiences on macOS and Windows.
The Quest for Less Clutter
I work primarily from home and given my job, I’m in front of a computer for extended periods; thus, I need a clean and neat workspace to be able to focus. I’m not great at keeping my workspace tidy as I should be, so anything I can do to reduce clutter on my desk has got to assist. This is where the right choice in hardware comes in - I run a 13” MacBook Pro that comes with four Thunderbolt ports, as my primary driver, so I have the opportunity to do everything through a single cable.
With the right solution, I should be able to run power to the laptop plus all other inputs and outputs from a Thunderbolt dock, providing me the ability to cleanly route cables (as much as I can). This also means that I can arrive at my desk or leave by pulling out or plugging in a single cable. Everything else I then need for travel remains in my backpack, requiring me to only transfer my laptop.
The Hunt for More Pixels
After upgrading to the MacBook Pro last year (from the MacBook Air), the biggest impact to my daily experience has been the quality of the display. Crisp text, icons and high quality OS and application artefacts in both macOS and Windows 10 is a joy to use.
https://twitter.com/stealthpuppy/status/892717333730308098
I’m of course spoilt by having access to a MacBook display, but it’s driven me to want a similar experience from my external monitor. To that end, I’ve looked at adding a 4K display to my layout. I have been plugging into an external 1080p monitor for dual screen work and the difference in quality to a 4K display is noticeable.
Playing Hardware Roulette
When I first started looking at simplifying my setup, I started with the monitor - originally I was looking at a USB-C or Thunderbolt monitor that could drive everything rather than the seperate dock and monitor that I’ve ended up with. The choices for USB-C monitors are still limited in 2018 and Thunderbolt even more so; however, it seems we’re at an inflection point with USB-C and I suspect that within 12-months, USB-C will be everywhere. Thunderbolt 3 is even appearing in a good number of PCs.
To make a choice for what works for you, I would recommend starting with a display with a resolution and size that suits your needs, then consider ports and how you’ll connect it to your MacBook or PC. However, unless you can test your hardware choices you’re often playing roulette when purchasing tech devices, so relying on reviews and crossing my fingers is what I’ve done with this purchase.
Pixels Be Gone!
High resolution displays are moving beyond 1080p with 4K monitors being a common option for both PC displays and TVs. With a pixel density matched to the right physical size of the display you can have resolutions where it’s impossible to see individual pixels providing an outstanding visual feast.
Here’s two articles I recommend reading on the topic of displays and pixel density - while written primarily for a Mac audience, they’re still applicable to Windows PCs:
The short version is this - the aim of a ‘Retina’ display is that you don’t see individual pixels, so as the screen size increases, you need to increase resolution. Sounds simple enough, but I think it’s easy to believe that a 4K 27″ display will give you retina quality, which is just not the case.
So with the desire to improve my external display options, I needed to find the right monitor and look at how to connect to it.
Choosing a 4K Display
LG provides two purpose built monitors for the Mac both of which come with trade offs and caveats if you want to support cross platform:
- The LG Ultrafine 4K monitor. This 21.5″ monitor has an amazing display with full macOS support (given that it was built for the Mac), but the additional 3 USB-C ports are USB 2 speeds only. With the peripherals I need to drive as well, this would just require too many additional dongles. On top of the $1010 AUD, I’d need to account for the price of additional dongles
- The LG Ultrafine 5K monitor, this model does come with USB-C 3.1 ports, but to drive this display, you’ll need the 15″ MacBook Pro. It has the same number of USB-C outputs and the same issue with dongles if you have more than 3 peripherals to plug into it. This is the model I’ve seen in person and the display is outstanding
Both of these monitors should in theory work with Windows devices, but given that all control is provided in software (built into macOS), they aren’t really going to be a monitor to consider if you’re on PC. There’s plenty of reviews on these monitors if you’re interested.
There is a range of USB-C monitors available in 2018 which typically start at 27″ and for anything reasonable, you’ll be paying $500 USD and up, but I had three drivers for a choice in monitor:
- A 4K resolution to get to a Retina display as close as possible
- Keep the size 24″ to match my existing 1080p monitor and not go above a physical size that would show individual pixels
- Desk space - dual 24″ monitors takes up almost my entire desk, so anything larger would force me back to a single monitor setup
The choices of 24″ 4K monitors is even more limited and considering that I need to connect to it, I need to factor in the cost of a dock. Sticking with a 4K 24″ monitor should match the scaling of my existing monitor at 200%, so items should appear at exactly the same size, but four times the fidelity. However, I had no way of determining exactly how it would look before purchasing.
Picking the Right Cable
To drive a 4K monitor, you have a choice of DisplayPort or HDMI, but today, DisplayPort is your best choice - this might change soon though as HDMI 2.1 devices arrive. DisplayPort and HDMI are a bit of a mess right now with multiple versions that support different resolutions and frame rates. HDMI 2.0 is needed at a minimum, but DisplayPort 1.4 is pretty common.
With DisplayPort though, keep in mind you’re likely to require an Active DisplayPort cable when connecting over DP from a dock. This might be monitor and dock dependant and there’s no guarantee that the DP cable that comes with your monitor is an Active cable.
Thunderbolt 3 Docks
At this point, I should probably explain my choice of Thunderbolt over USB-C - it comes down to bandwidth. Thunderbolt is capable of 40 Gbit/s, while USB 3.1 over USB-C has a 10 Gbit/s maximum throughput. To drive 4K and 1080p monitors, 1 Gbit/s ethernet, a USB microphone, scanner, audio and an external HDD, I need no bottlenecks over a single cable. I could possibly replace the 1080p monitor with another 4K, but I may be pushed the Intel GPU a bit far at that point. So Thunderbolt ensures that I have no issue with bandwidth for the foreseeable future.
Here’s a couple of great articles that test and compare various docks and I used these to inform my choice of dock.
- Guidemaster: Picking the right Thunderbolt 3 or USB-C dock for your desk at ArsTechnica
- The Best Thunderbolt 3 Docks at WireCutter
Thunderbolt Cable Considerations
If you do go down the Thunderbolt route, be aware that it too has requirements on cables - if you go beyond a 50cm cable, the bandwidth will half and you need to source an Active Thunderbolt cable to keep the 40 Gbit/s bandwidth. My recommendation is to stick with a 50cm cable if you can.
Hardware Experiences
So what is the experience or usability like? Here’s a quick overview of my chosen hardware.
Caldigit TS3 Plus
Picking a Thunderbolt 3 docks was fairly simple - ensure I have enough ports, including DisplayPort, and see what the reviews recommend. With that info in hand, I settled on the Caldigit TS3 Plus. This dock has plenty of ports for all of the peripherals I need to plug into it, including DisplayPort and Ethernet.
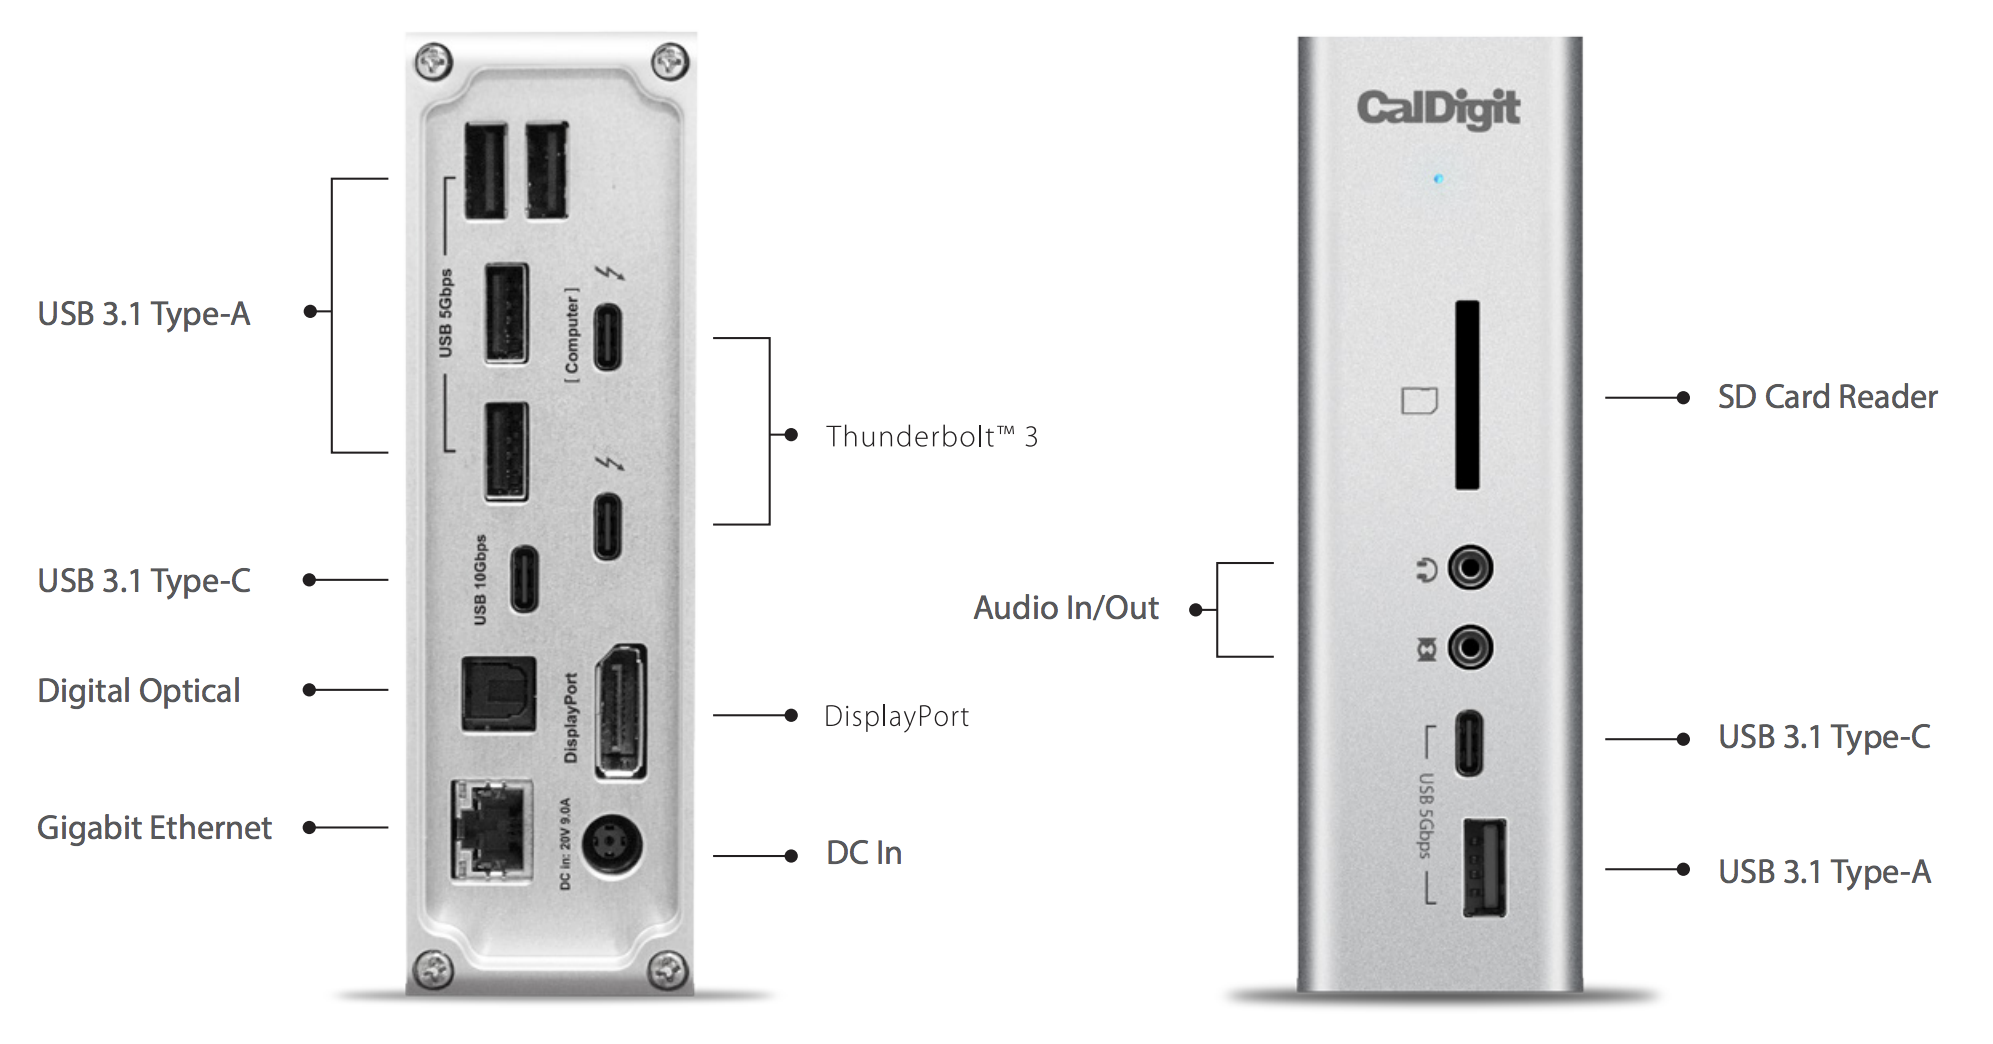
Ports on the Caldigit TS3Pro Thunderbolt 3 dock
I have added a USB-C to HDMI adapter to connect my existing 1080p monitor. I’ve found StarTech adapters and cables to be good quality at reasonable prices. Interestingly, I’ve had to plug this into the second Thunderbolt port on the dock to get video out, so even though the dock as 2 USB 3.1 Type-C ports, only the second Thunderbolt port must support DP Alt Mode.
The dock came with a 50cm Thunderbolt 3 port and 85W output, thus the single cable powers my laptop and connects to all external peripherals. It’s a solid unit in brushed aluminium with a power supply larger than the device itself, which should hopefully assist with heat dissipation.
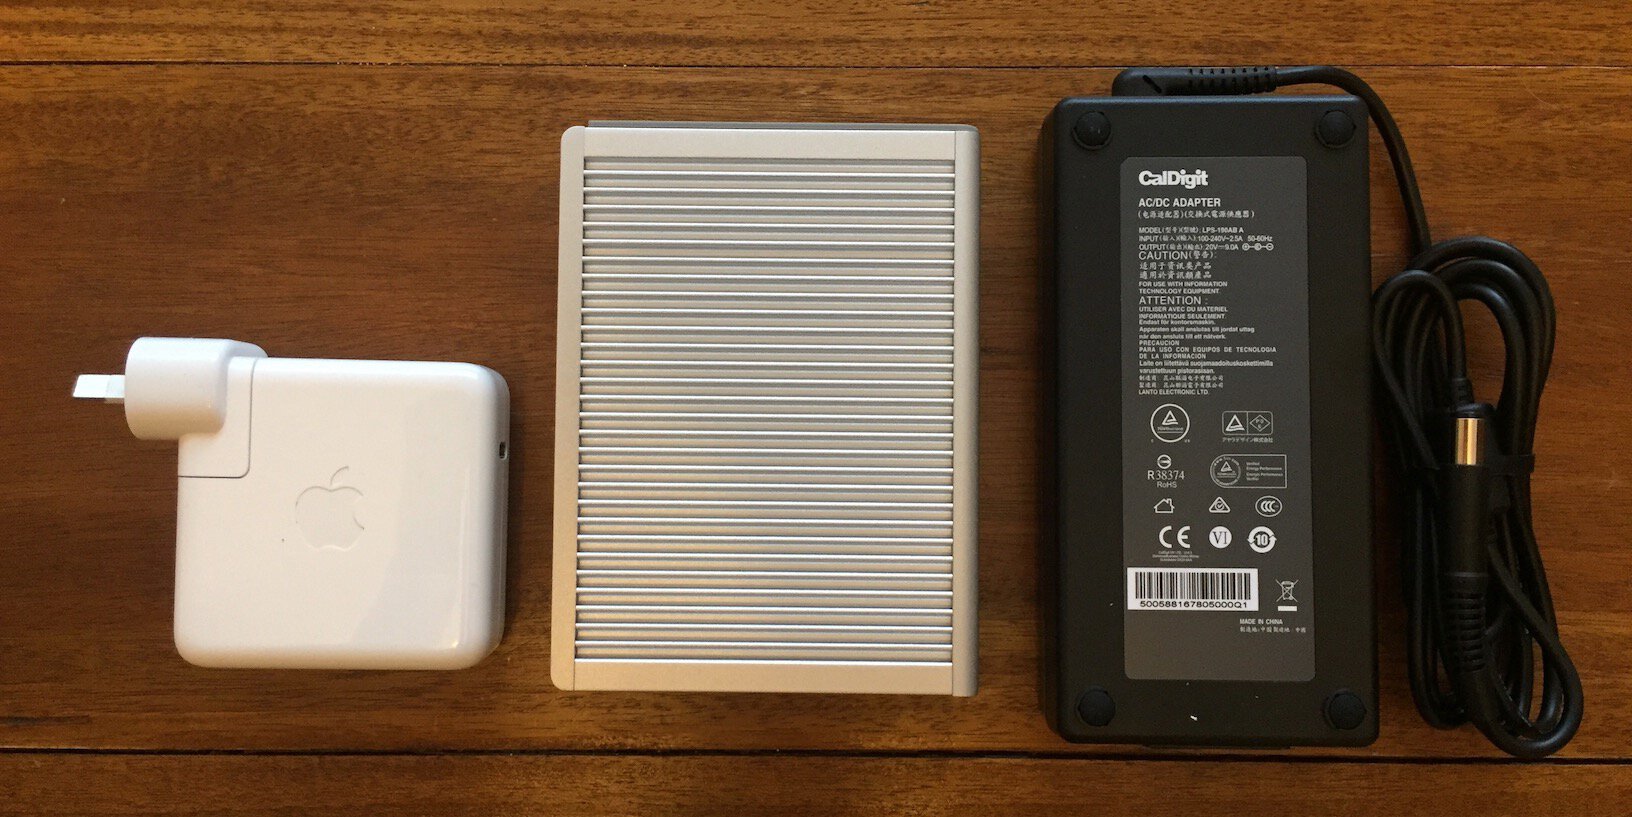
The Caldigit TS3 Plus next to a 60W Apple power supply and its own external power supply
Thunderbolt on macOS is plug-and-play and I was able to unbox the dock and plug-in within a few minutes. I have the dock on top of my desk rather than mounting underneath for access to the SD card slot and front facing USB slot. The only change I would have liked to see would be to have the audio ports on the back of the unit to make routing cables easier.
Purchase? Yes, absolutely.
Dell P2415Q
In 24″ 4K monitors I had basically two choices:
- The LG 24UD58-B; and
- The Dell P2415Q
Based on reviews, an in-built USB hub and an optional speaker that attaches to the bottom of the monitor, I went with the Dell. It has bezels that are thicker than I’d like, but overall it provides a pretty good display. It’s not near the LG Ultrafine in quality, but it’s reasonable for the price. The difference in display quality due to the sheer number of pixels between this screen and the 1080p next to it, is huge.
The monitor comes with a cable with DisplayPort to Mini DisplayPort connectors, which I assume is to either reduce cost, or enable input from Dell PCs with Mini DisplayPort. Thankfully it has work OK, going from full size DisplayPort into the dock and Mini DisplayPort into the monitor. Presumably then, the cable is an Active cable. There are two more full size DisplayPort ports available, so I should be able to plug in my desktop PC in the future.
Scaling in macOS and Windows 10 works a treat and I’ll discuss that in more detail in another article; however, what concerned me before the purchase is exactly how macOS would scale on screen windows. Fortunately, the default scaling is spot on.
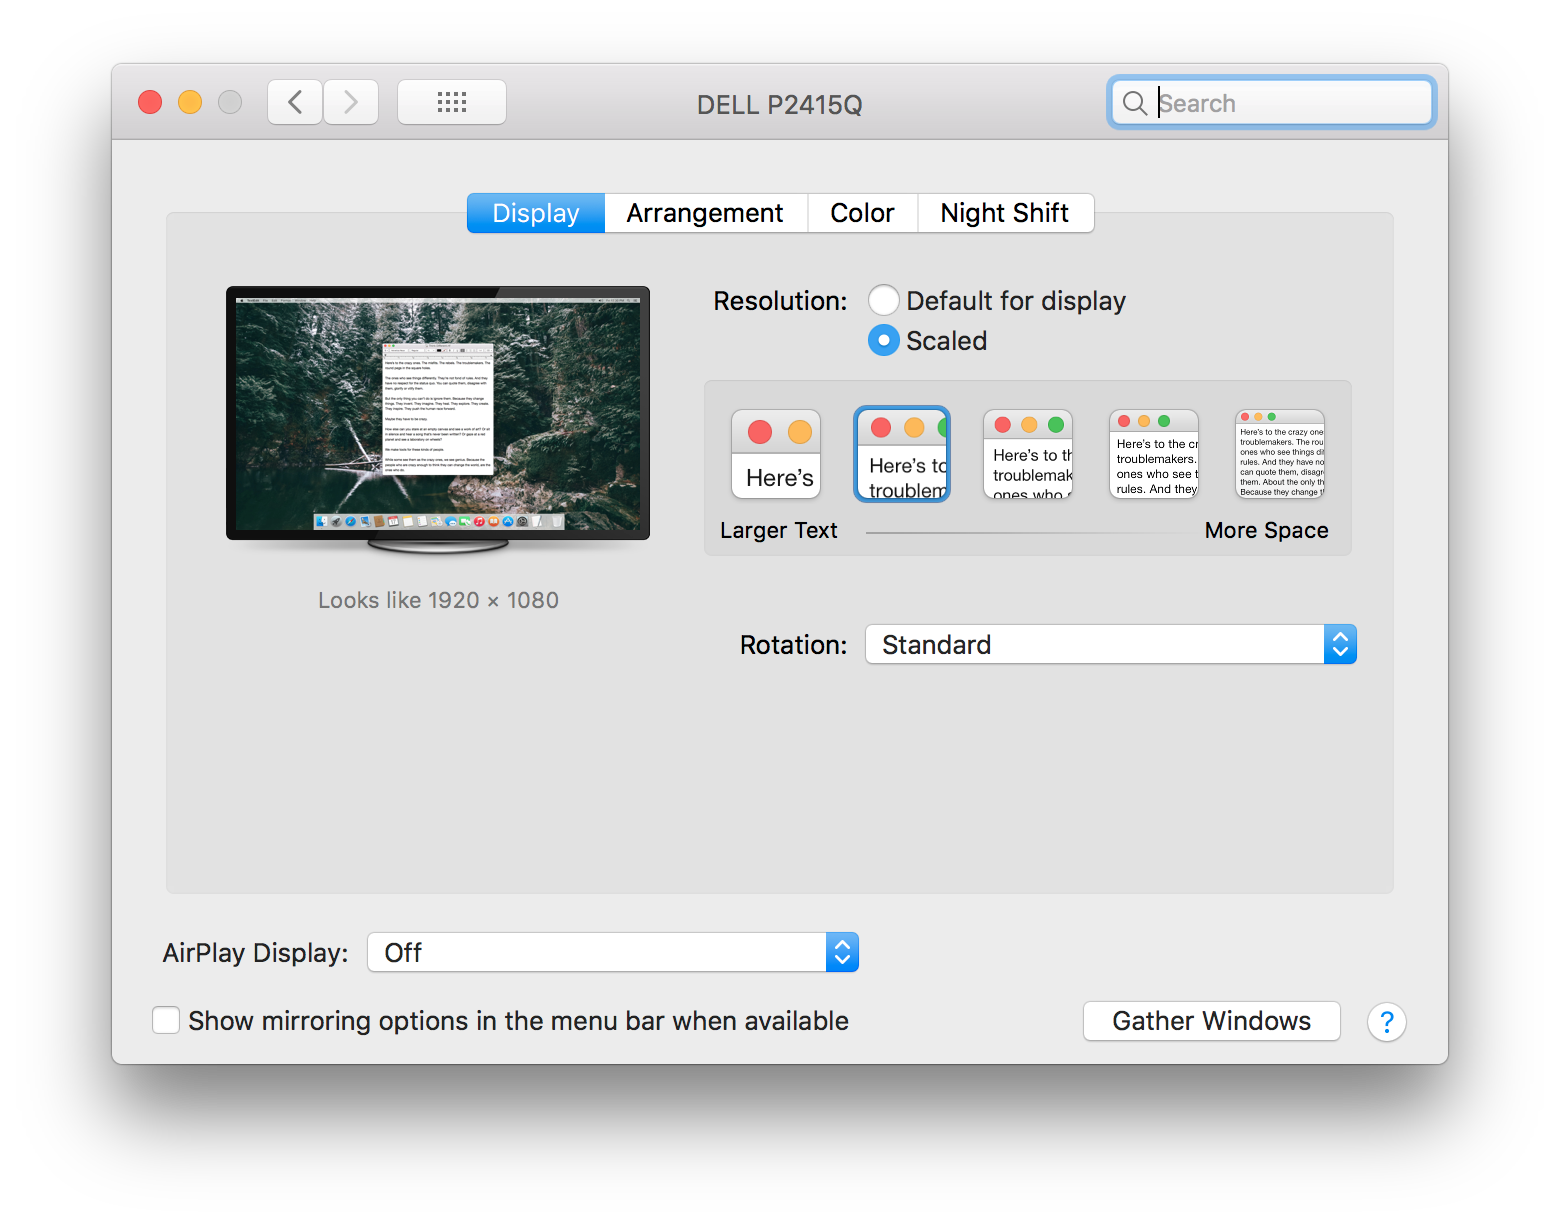
Dell P2415Q scaling options on macOS
My audio inputs and outputs are now a little over the top:
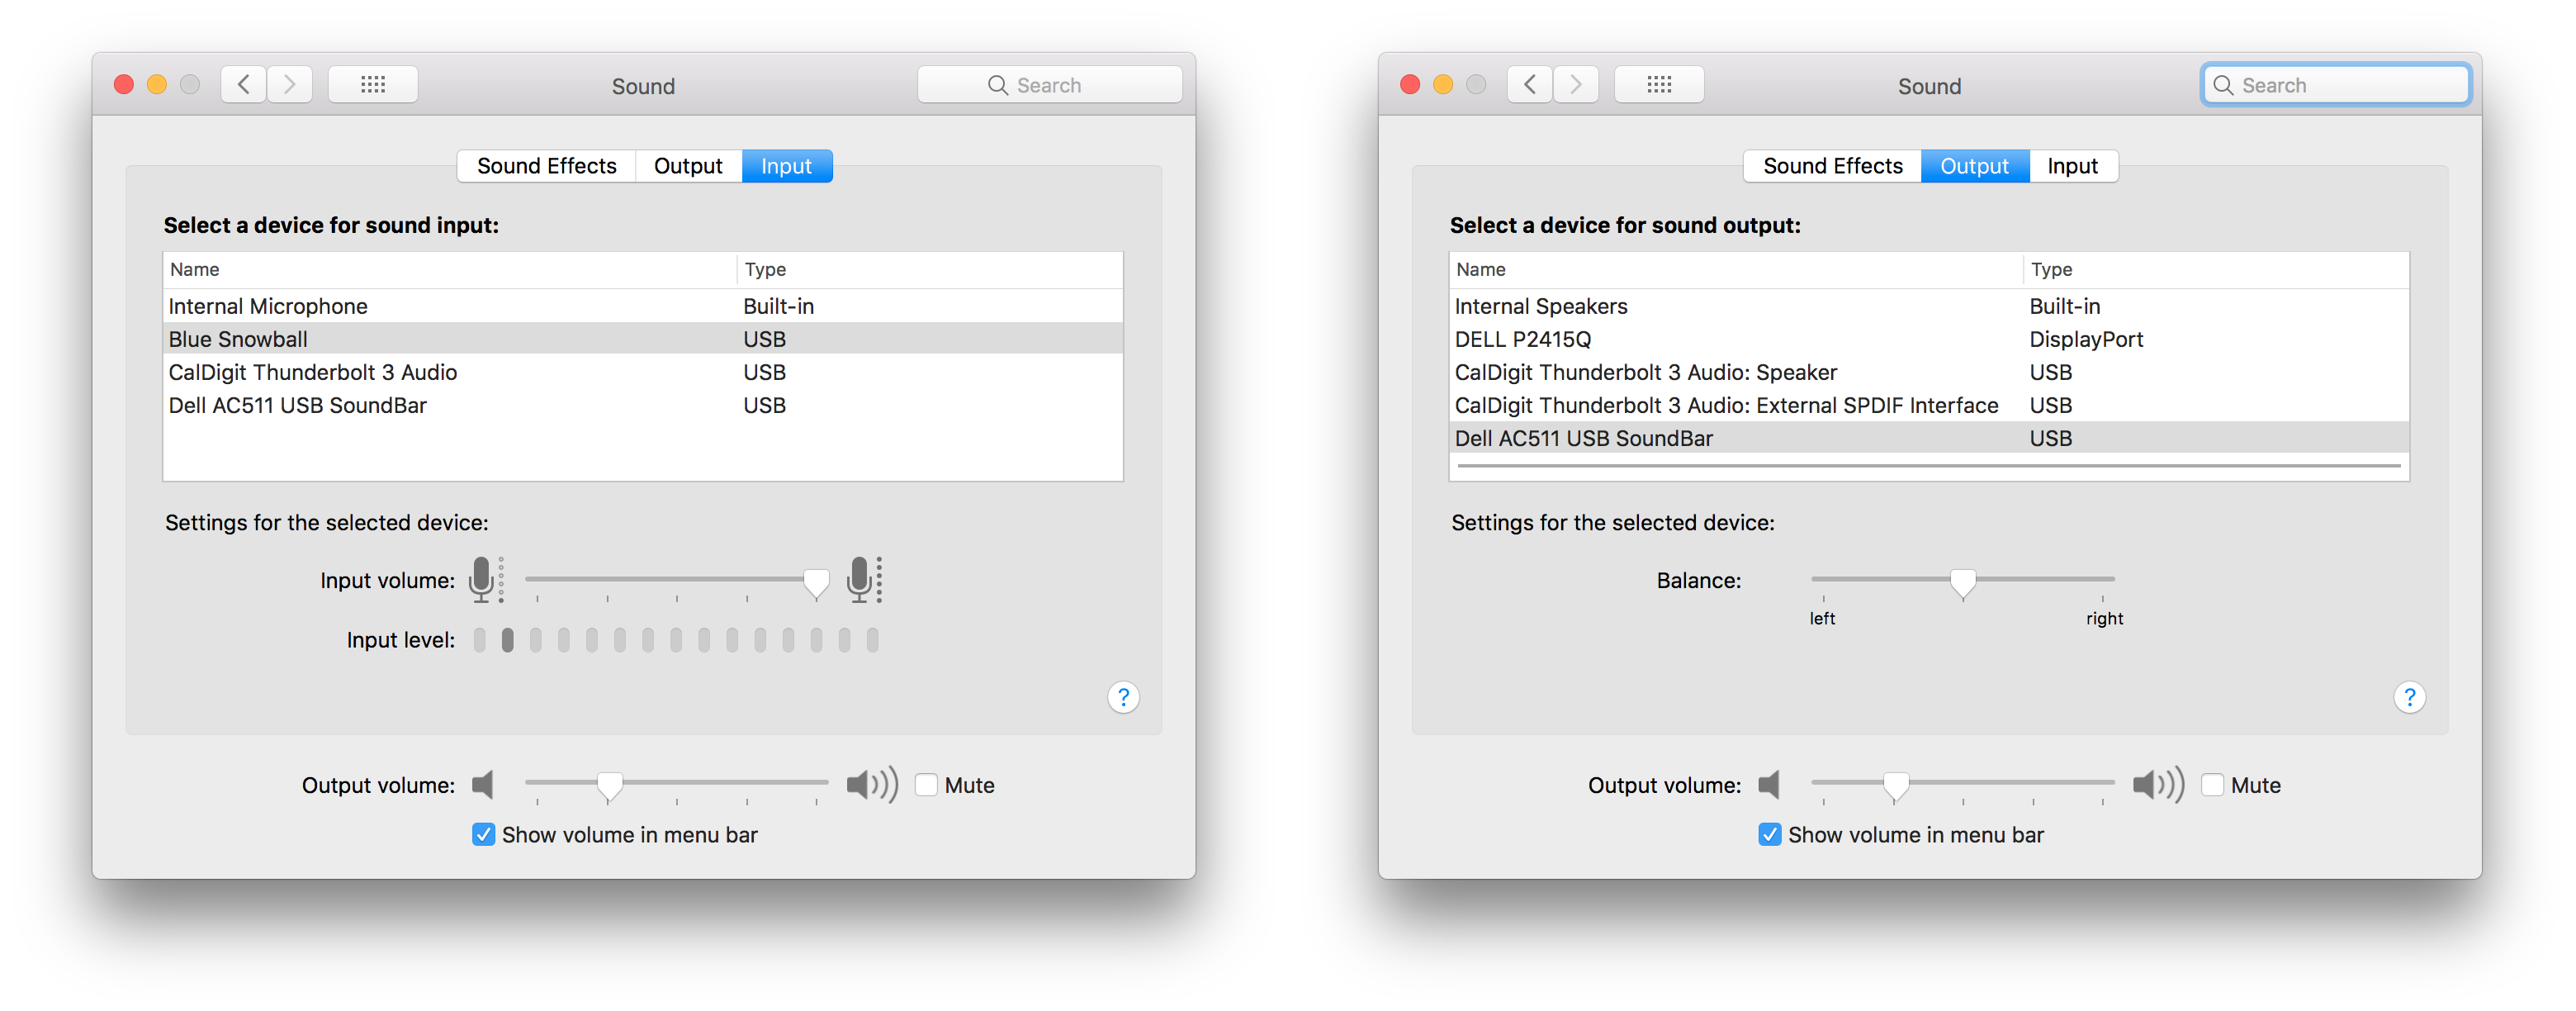
macOS audio outputs / inputs with Thunderbolt 3 and DisplayPort
Purchase? Maybe - this depends on your space requirements and budget. Whatever you purchase, keep in mind the capabilities of your GPU and how sharp you want windows and text to appear on screen. The larger the screen the more chance you’ll see pixels.
Wrap-Up
Overall, I’m very happy with this setup. I’ve had a chance to tidy my workspace by connecting to a single cable that does it all. While I’ve chosen Thunderbolt, USB-C might work for you and the options for doing so are increasing.
Fortunately, this particular setup has worked well and does support both Mac and PC. I started with the intention to discuss the software side as well and compare the experience of macOS and Windows 10 for Thunderbolt and high DPI screens, but that will now have to wait for a follow up.