Monitoring AV and Windows 10 Updates with Intune MDM

- Intune Client vs. MDM
- Monitoring for MDM Clients
- Signing Up for OMS
- Customising OMS
- Deploying the OMS Agent via MDM
- Conclusion
In a previous article, I wrote about the differences between managing Windows 10 PCs with the Intune Client vs. the Windows 10 MDM channel. Two key monitoring pieces that you lose with going to MDM instead of the Intune Client is the ability to report on Windows updates and Endpoint Protection (Windows Defender) status.
The reason for this is that the MDM channel in Windows 10 does not report status for these components, while the Intune Client installs the Microsoft Management Agent and reports this status via the Microsoft Operations Management Suite (OMS). We can see the difference in the Intune management console for environments managed with the Intune client vs. MDM.
Intune Client vs. MDM
If we look at an environment that uses the Intune Client for management, Windows update and Endpoint Protection status are reported. See the Updates and Endpoint Protection tiles in the screenshot below.
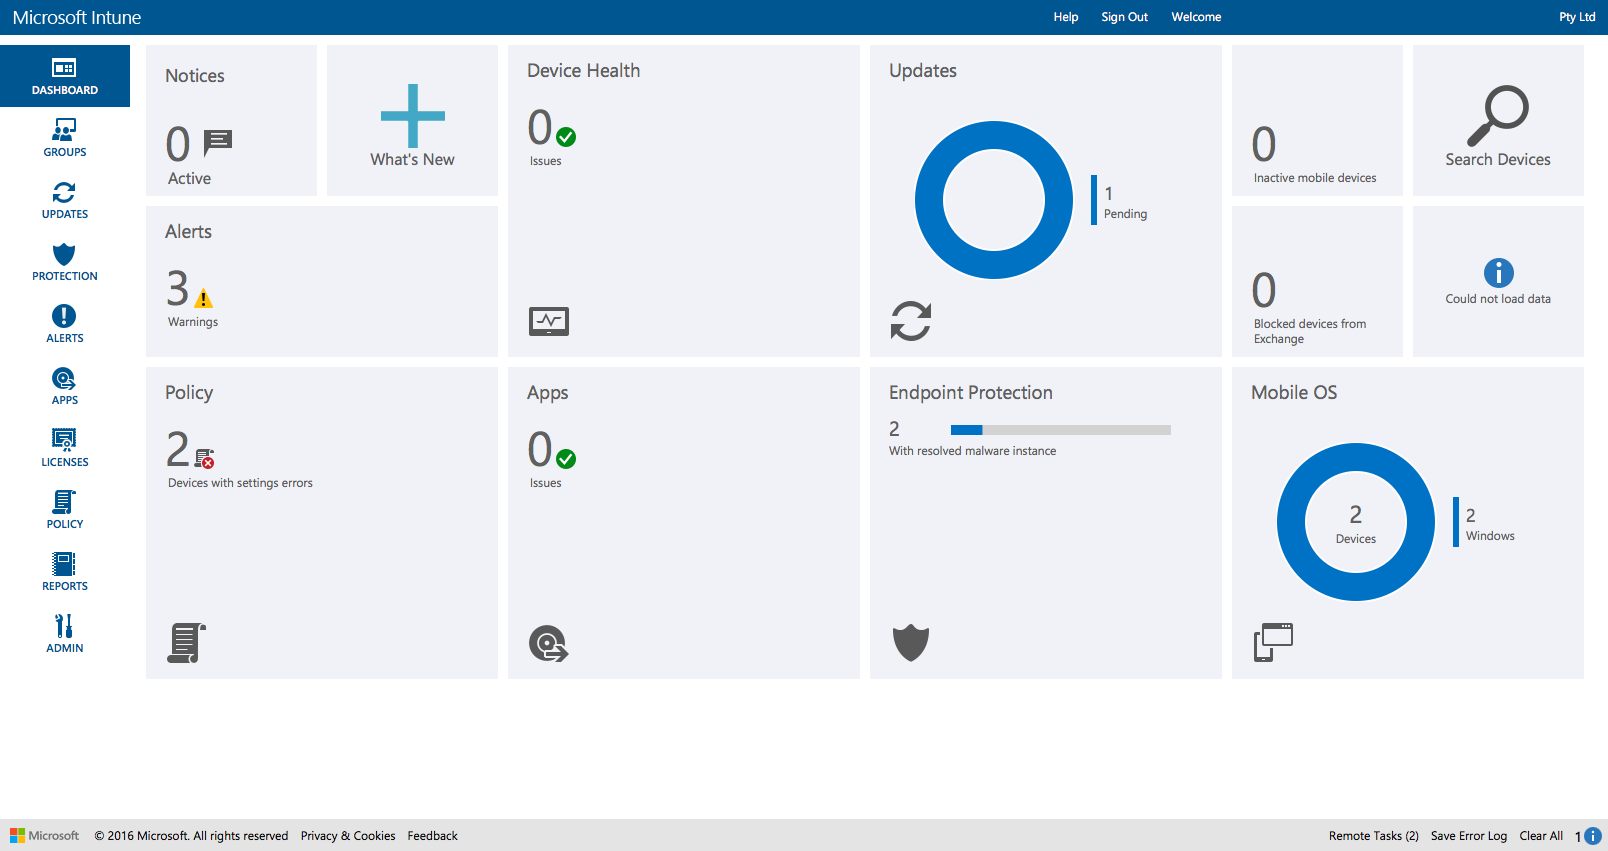
Intune with devices management via the client and potentially MDM
In an environment with machines managed via the MDM channel only, these tiles are missing:
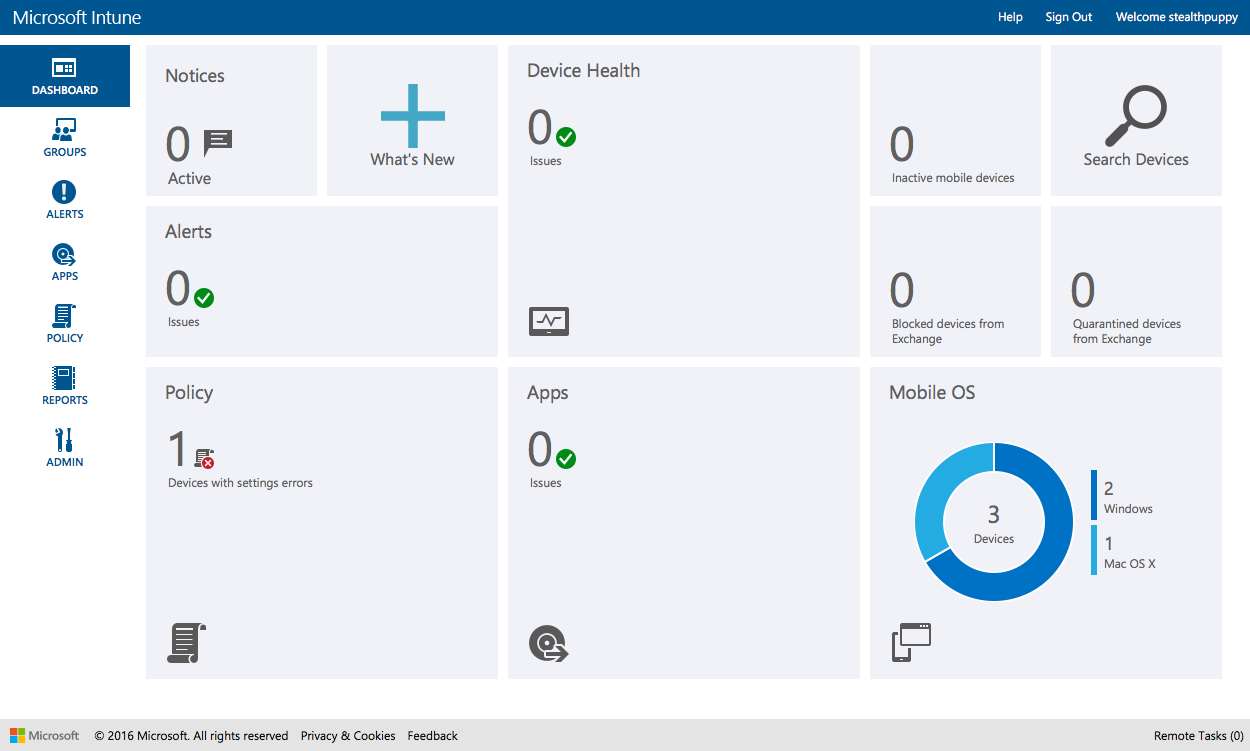
Intune with devices management via MDM only
This information being reported from clients is really important to have better visibility into the current status of those machines across your estate. With the current differences in the way that Intune manages Windows 10 PCs, you’re forced to make a choice between manageability and visibility.
Monitoring for MDM Clients
For PCs managed with the Intune client, Intune leverages the Microsoft Operations Management Suite (OMS), or at least Log Analytics, to gather this data and present it from within the Intune console. This is seamless to the administrator which means no additional steps taken other than setting up the Intune subscription.
I had hoped to be able to grab the OMS Workspace ID from a machine managed with the Intune Client and use that to connect the OMS agents installed on an MDM managed machine to see whether I can pass the update and endpoint protection data from those clients. I’ve been able to identify the Workspace ID, but unfortunately I can’t find the authentication key to allow the client to connect to OMS.
To enable monitoring with Intune MDM clients, we can set up an OMS subscription separately and deploy the OMS agent to the target PCs. Monitoring those clients requires a separate console, but we do at least get information back from the end points.
Fortunately, this is straightforward and I’ll walk through the process here.
Signing Up for OMS
Signing up for the Microsoft Operations Management Suite requires an Azure subscription and the basic OMS tier is free. If you’re using Intune you’ll already be paying for Azure services with your EMS subscription, so add OMS to your existing subscription.
Once you have your Azure subscription (and in this case I presume Intune) setup, navigate to the OMS portal sign in page and you’ll be notified that your account is not associated with an Operations Management Suite workspace. Here you have the opportunity to create one. Create the new workspace and link it to your selected Azure subscription:
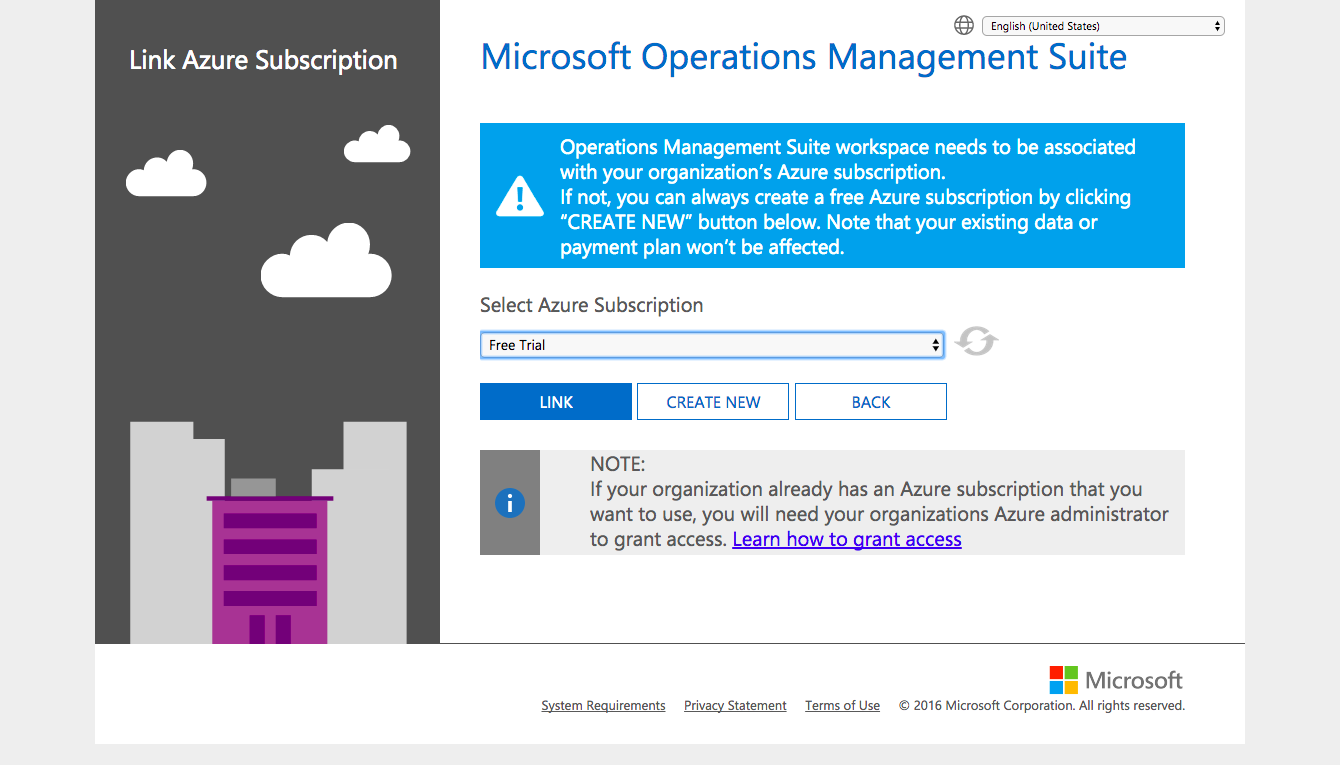
Linking an Azure subscription to a new OMS workspace
Give the new OMS workspace a name, select your region for the workspace, enter contact details and create the workspace. Once created, you can view the data plan from the ‘Data Plan’ menu at the top of the screen.
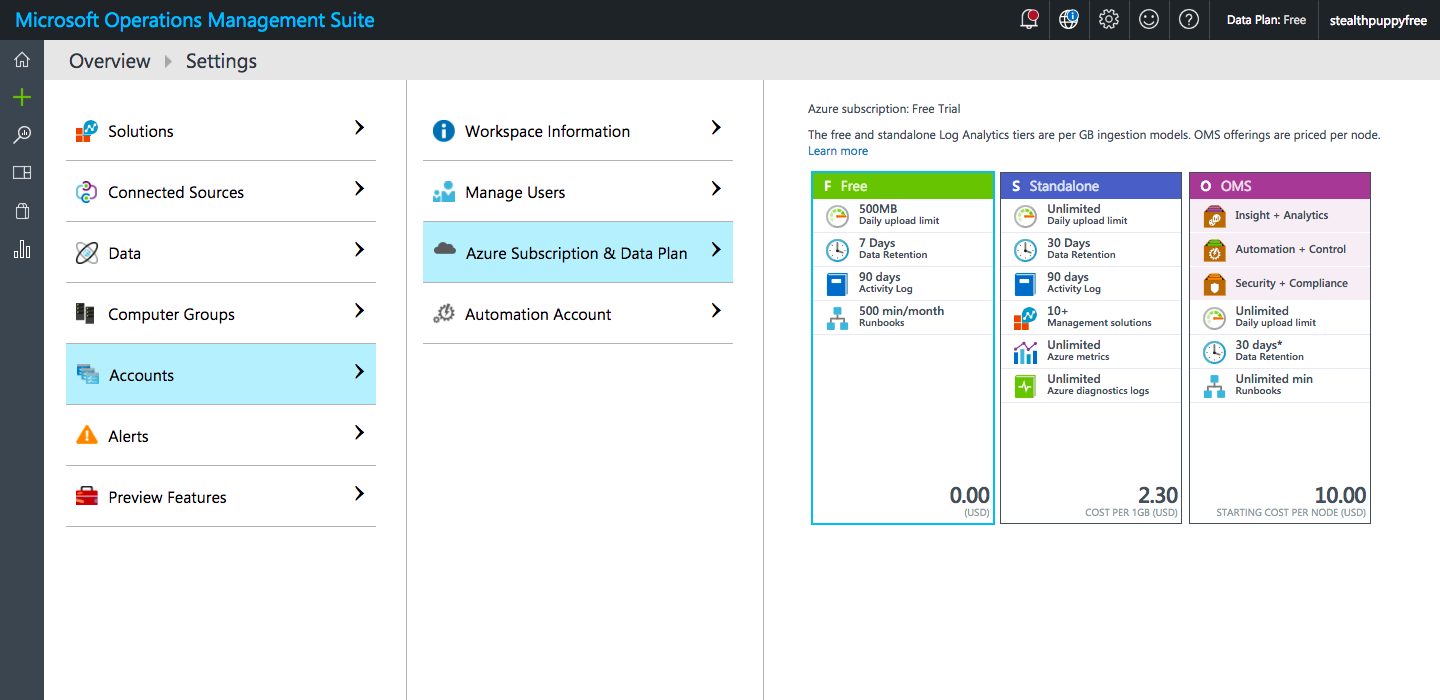
Selecting a data plan for the OMS workspace
The free data plan tier provides 500MB of daily data uploads and 7 days data retention. I’m yet to see exactly how many workstations I can manage with 500MB of data and with only 7 days of data retention, you’ll want to keep an eye on the reporting weekly.
Customising OMS
OMS provides solutions (or plug-ins) to enable reporting, recommendations and actions on data collected from agents. These need to be added to your OMS workspace to make it useful and there are some very interesting solutions that can be installed.
You’ll need to add the Update Management and Antimalware Assessment solutions.
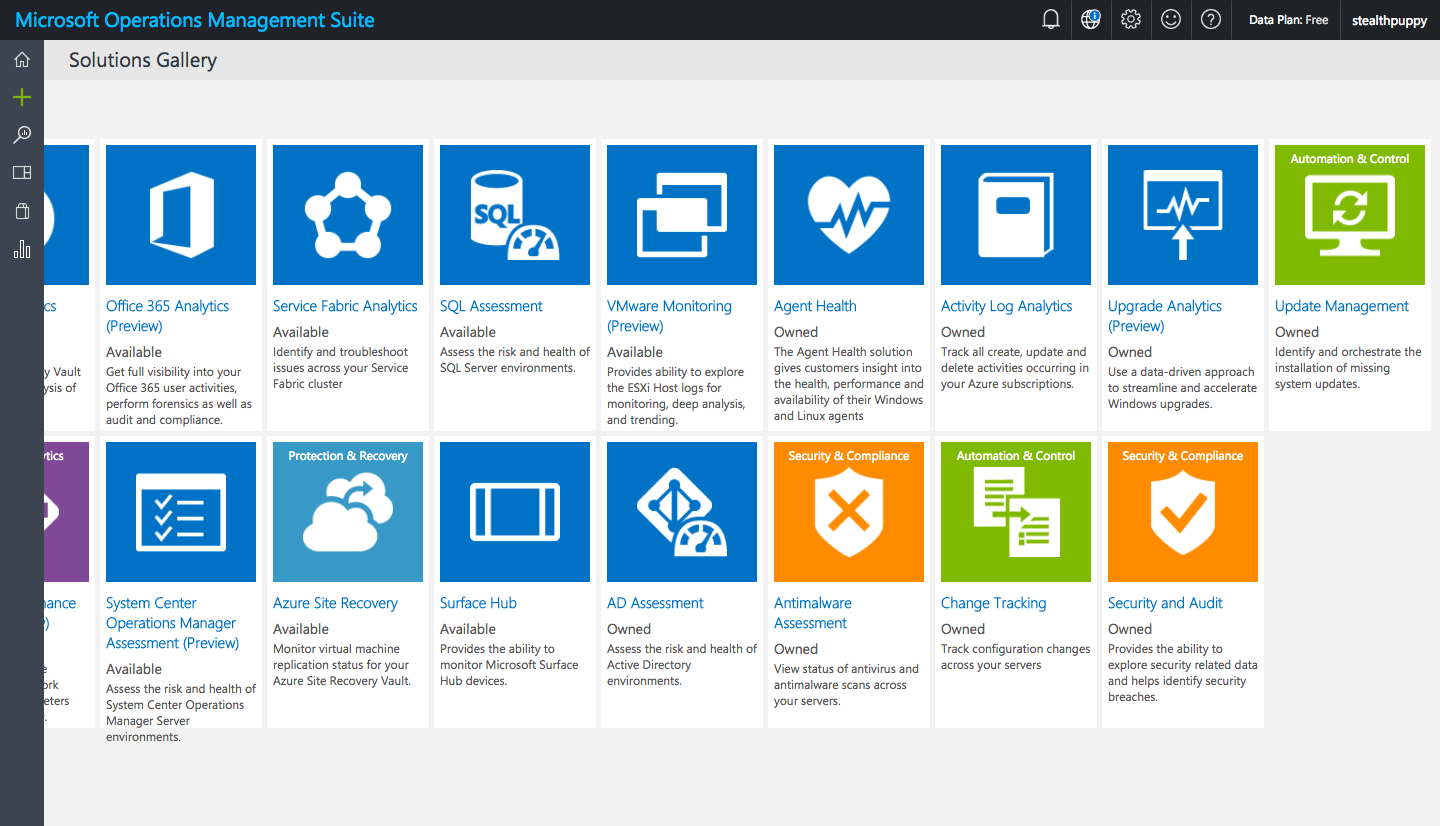
OMS Solutions Gallery
Update Management requires additional configuration during the add process by asking you to create an Azure Automation account. In one instance I was unable to create the automation account, so went back to the Azure portal and created one from there in the same Resource Group used by the OMS Workspace.
Once the solutions are added, you are able to view installed solutions and remove solutions as required.
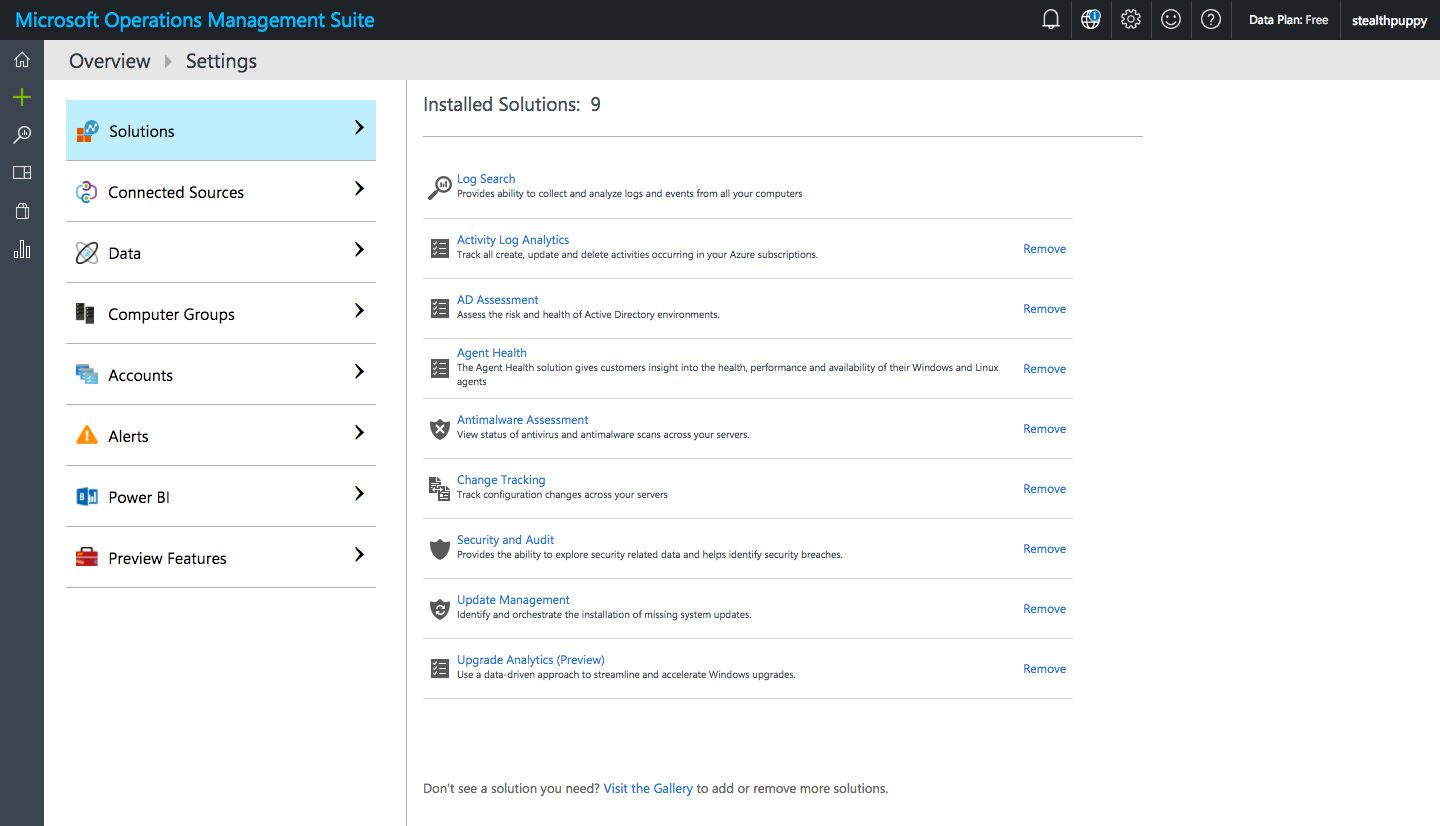
OMS Installed Solutions
Once agents start reporting data, these solutions will provide an assessment of your Windows PCs enrolled in Intune via MDM. Here I can see the status of missing updates across Windows agents and even Linux PCs.
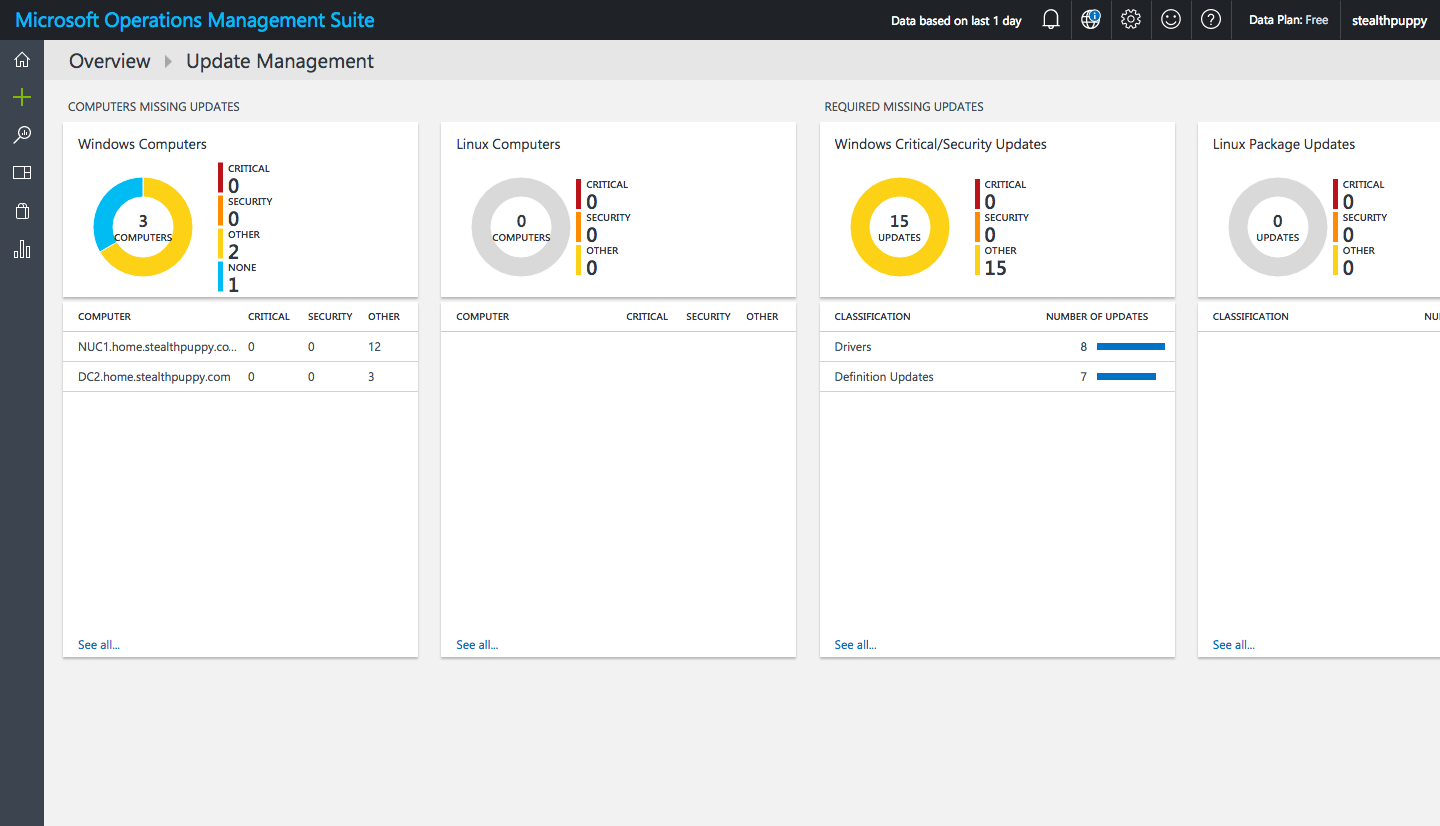
Update Management overview in OMS
So too can I see the antimalware assessment across managed PCs.
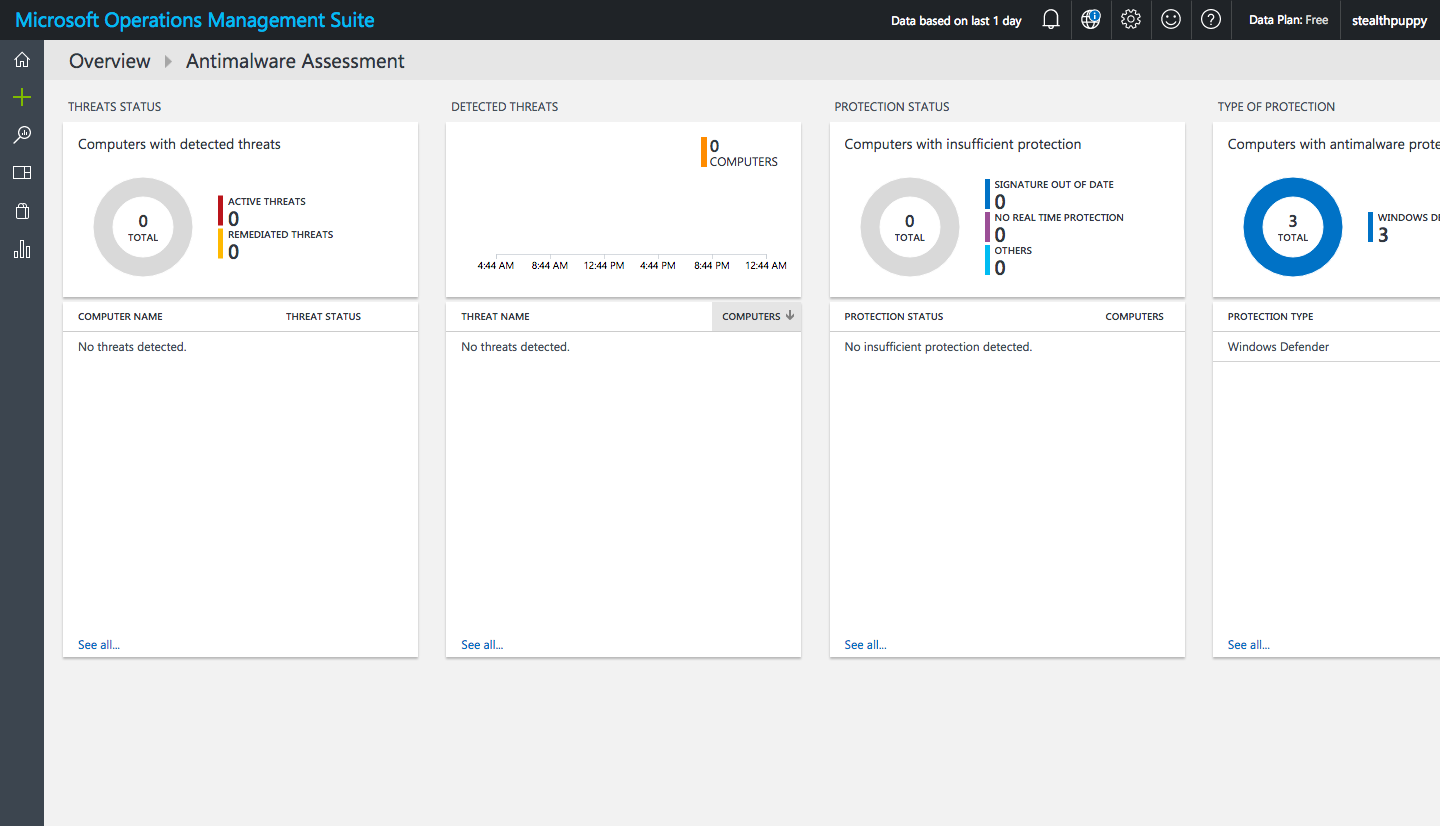
Antimalware Assessment in OMS
Because there is no direct integration with Intune, I have no remediation actions to take from within the OMS console; however, at least having visibility where I previously had none, allows me to understand the security posture of the managed PCs.
For Windows 10 PCs managed with MDM, we have a reasonable amount of control of the Windows Defender configuration, but for Windows Update, basic settings such as deferred updates and upgrades and reboot windows can be controlled, but individual updates cannot be managed as is the case for PCs managed with the Intune client.
Deploying the OMS Agent via MDM
To enable PCs to report data to the OMS workspace, we need to deploy the Microsoft Monitoring Agent to managed devices. To do that we need the OMS agent (used to send data to OMS), the OMS Workspace ID (used to uniquely identify the OMS Workspace) and the Workspace Key (used to authenticate to the Workspace).
From the OMS console download the agent - Settings / Connected Sources / Windows Servers / Download Windows Agent. This is an executable, so we need to extract the agent to obtain the embedded MSI to deploy to Windows 10 via MDM. Use /? on the executable to view the command line options. To extract it, use the /T option to extract to a specified folder and /C to extract files from the executable.
MMASetup-AMD64.exe /T:C:\OMS /C
Once extracted you’ll see the files as below. We need MOMAgent.msi to deploy the agent. If you have specific language requirements, you must edit the MSI, apply your language MST and save the MSI as we cannot apply MST files at deployment time via MDM. User’s don’t necessarily need to interact with the agent (via the Control Panel), so if you’re admins are comfortable with English you may not need to apply a language transform.
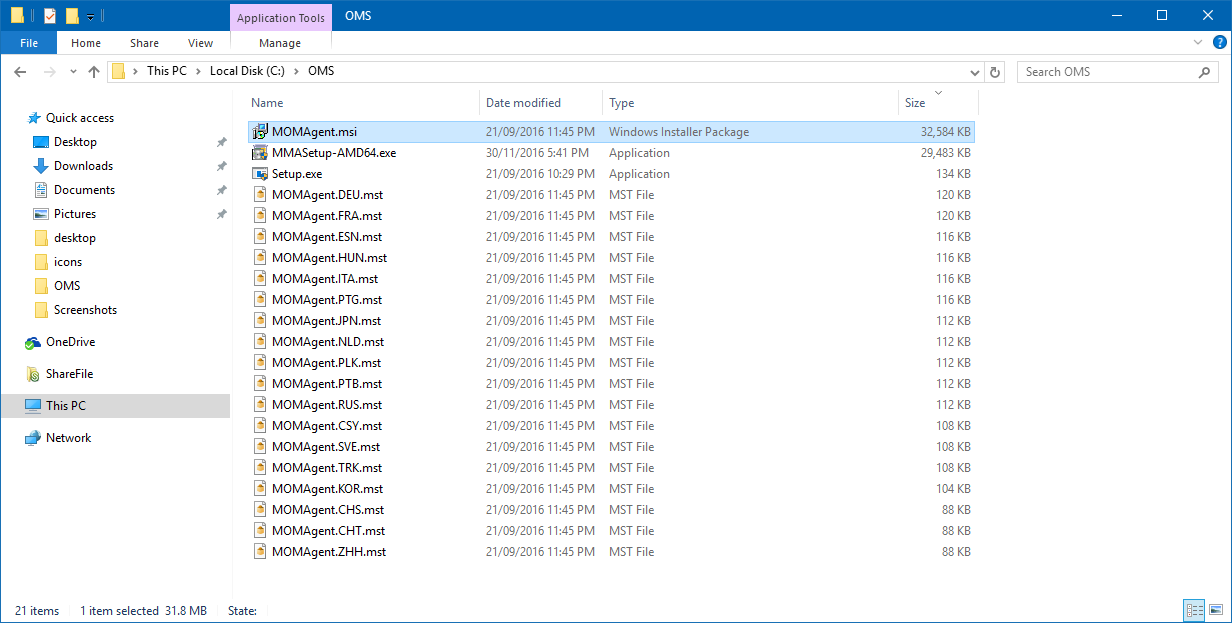
Extracting the OMS agent to access the MSI
Now that we have the MSI and have optionally modified it for specific language support, we can add it as an application to Intune for deployment.
In the Intune console:
- Navigate to Apps, click Add Apps to start the Intune Software Publisher
- Choose Software installer and Windows Installer through MDM (*.msi)
- Select the MOMAgent.msi file
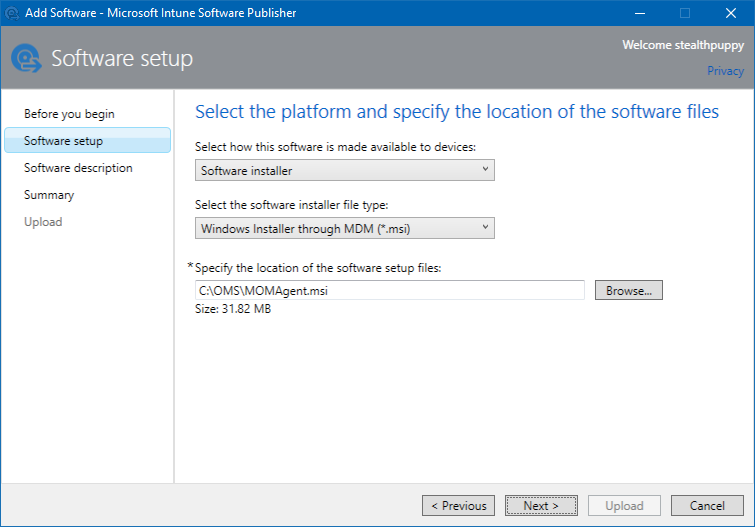
Adding MOMAgent.MSI via the Intune Software Publisher
- Click Next and add the Software description. While users won't see this application in a portal, still add the right software Publisher, Name, Description, icon etc.
- Click Next to view the Summary page and then Upload the application.
The current release of Intune now requires you to go back into the Intune Software Publisher to make some additional changes.
- Edit the newly created application to apply the required command line arguments
- Navigate to the Command line arguments page
- Add the details below so that the agent will have the Workspace ID and Key applied at install time
Microsoft has an article on Connecting Windows computers to Log Analytics that covers a number of ways that you can install and configure the OMS agent.
ADD_OPINSIGHTS_WORKSPACE=1 OPINSIGHTS_WORKSPACE_ID=<your workspace id> OPINSIGHTS_WORKSPACE_KEY=<your workspace key> AcceptEndUserLicenseAgreement=1
In my example, I have added these arguments with my specific Workspace ID and Key. Notice in the screenshot that my Workspace Key has a couple of equal signs at the end of the key, so I’ve enclosed the key in quotes.
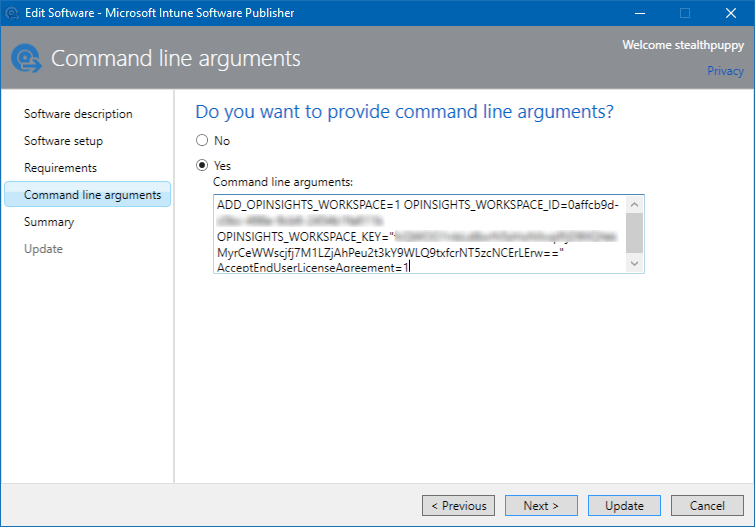
Setting command line arguments on the application properties
- Click Next to view the Summary page and then Update the application.
- Manage the deployment of the application in the Intune console again and apply the agent against the **All Devices** group (unless you have a specific group of machines to target). This will ensure that any Windows 10 machine enrolled via MDM will receive the agent.
Once the agent is deployed out to managed machines, the Operations Management Suite console will display data related to the components that you’re monitoring. For Update Management and Antimalware Assessment, this will provide details that you didn’t have previously.
Conclusion
Windows 10 releases are moving pretty fast with about 2 major release every 12-months so far. MDM management will continue to mature and improve so we may eventually have this reporting available without requiring this additional agent or approach.
Most Windows 10 PCs managed with MDM are going to be running Current Branch or Current Branch for Business and the need to approve specific updates is either reducing or being removed completely as Microsoft changes their approach to Windows updates. For antimalware, Microsoft’s preferred approach is to move customers to Windows Defender Advanced Threat Protection which provides far more insight and control.
