Deploying an Enterprise Root Certificate Authority

How to setup an Active Directory Certificate Services Enterprise Root Certificate Authority on Windows Server 2012 R2.
Setting up an Enterprise Root Certificate Authority isn’t a task that you’ll complete on a regular basis and something I think I’ve done twice, maybe 3 times, ever. Each time I forget what I did previously and you can guarantee I’m using a different version of Windows Server each time. Please note as you read these article and the next, that whilst I have an interest in PKI, I don’t consider myself an expert. Deploying a PKI is not a simple task, so read up carefully if you’ve not done this before.
So here’s how to setup an Enterprise Root Certificate Authority (CA) on Windows Server 2012 R2. Now that I’ve documented this, I’m hoping I won’t forget for next time.
Basics
I’m not going to go into too much detail here on the specific choices or considerations you should be making when setting up a CA in your environment; however, I would recommend that you do the following at least, to ensure certificate services is deployed securely:
- Configure a Root CA on a member server (not a member of the domain) and aim for this CA to be offline. This machine can be deployed just about anywhere and when turned off, you could protect it by removing the virtual machine from the environment and storing it in an encrypted format. This will help protect the root CA certificate. Just document where you left it, in case someone else has to take care of updates and changes.
- Deploy a subordinate CA that will be used to issue certificates. This will be a member of Active Directory to simplify management, issuance of certificates to domain members and enable certificate templates.
Using certificate templates requires Active Directory and also requires that you install and configure the subordinate CA as a member of the Enterprise Admins group. Potentially not an issue in most environments; however for large enterprise environments that may not be the case (permissions can be delegated). This also means that you won’t be installing an Enterprise CA in an environment using Azure Active Directory Domain Services because you won’t have rights.
Further Reading
There are a number of articles that I’ve drawn from and others worth reading for additional details or in-depth discussions on certificate services. I’ve listed a few here to provide some further detail:
- The DOs and DON’Ts of PKI – Microsoft ADCS
- CA Guidance for Windows Server 2012 R2/2012
- Enterprise PKI with Windows Server 2012 R2 Active Directory Certificate Services (Part 1 of 2)
- Enterprise PKI with Windows Server 2012 R2 Active Directory Certificate Services (Part 2 of 2)
- AD CS on TechNet
- Test Lab Guide: Deploying an AD CS Two-Tier PKI Hierarchy
- Active Directory Certificate Services (AD CS) Public Key Infrastructure (PKI) Frequently Asked Questions (FAQ)
Deploying an Enterprise Root Certificate Authority
The following steps are taken on a virtual machine running Windows Server 2012 R2 with all current updates as a stand-alone server. Installing the root CA on a stand-alone server ensures no issues with domain communication when the VM is booted at a later date.
Installing Certificate Services
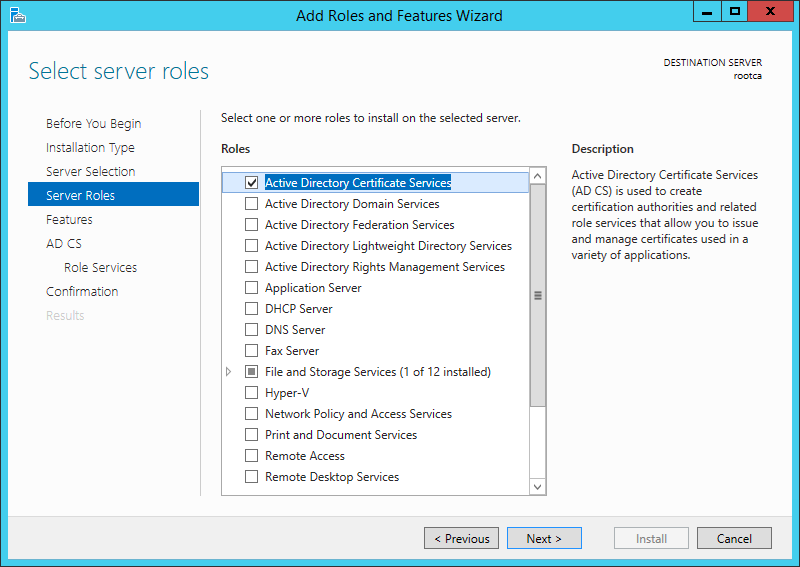
Deploying Certificate Services on Windows Server 2012 R2 is simple enough - open Server Manager, open the Add Roles and Features wizard and choose Active Directory Certificate Services under Server Roles. Ensure you choose only the Certificate Authority role for the Root CA.
Installing Active Directory Certificate Services
To make installing Certificate Services simpler, do it via PowerShell instead via Add-WindowsFeature:
Add-WindowsFeature -Name ADCS-Cert-Authority -IncludeManagementTools
Which will look like this, no reboot required:
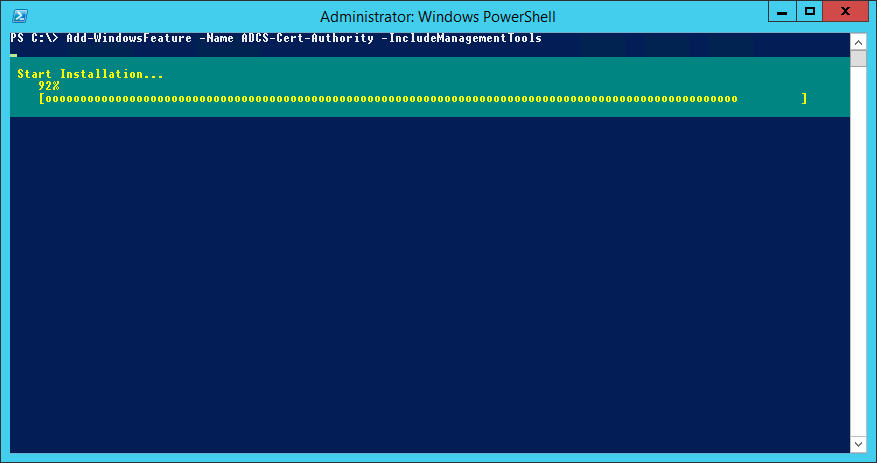
Install Certificate Services via PowerShell
Configuring Certificate Services
After Certificate Services is installed, start the configuration wizard from Server Manager:
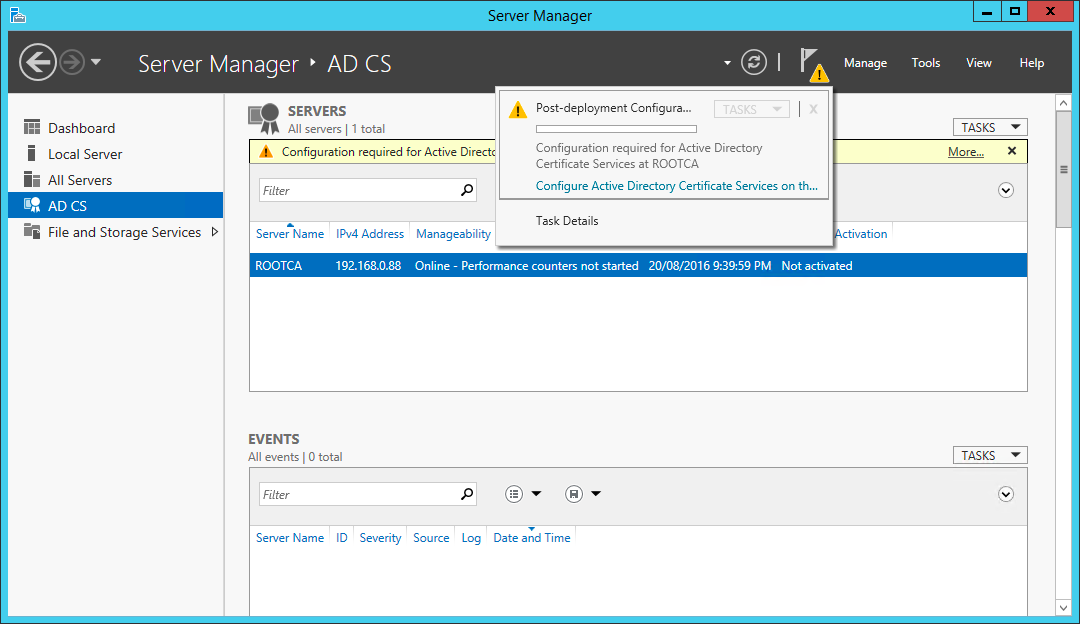
Start the Certificate Services configuration wizard
Set the credentials to be used while configuring Certificate Services. In this case, we’re configuring CA on a stand-alone machine and I’m logged on as local Administrator.
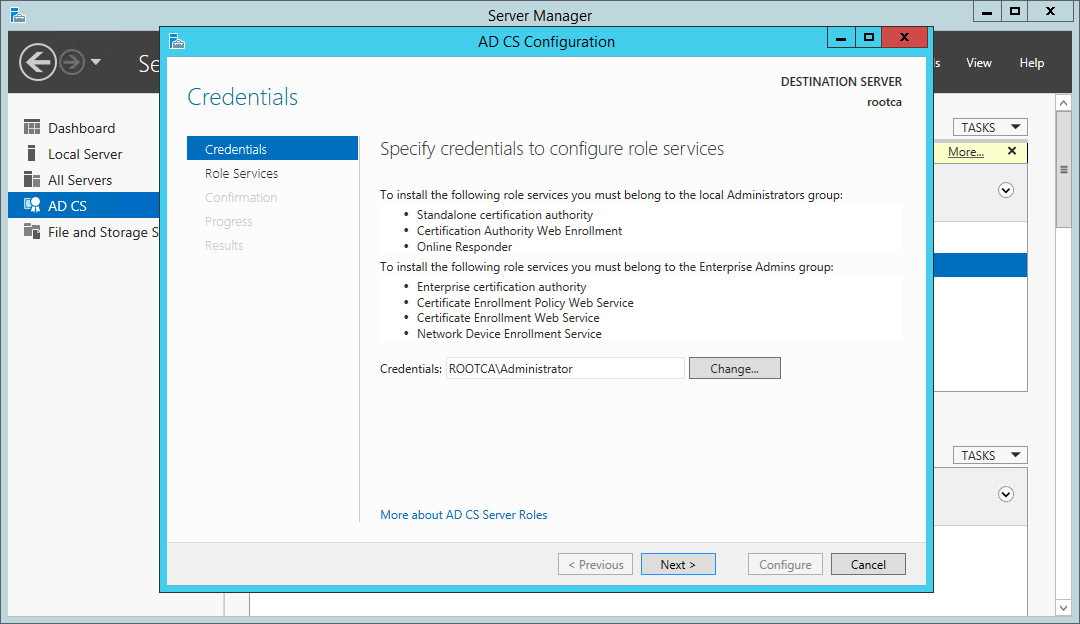
Certificate Services wizard - configuration credentials
For the Root CA, we have only one role to configure.
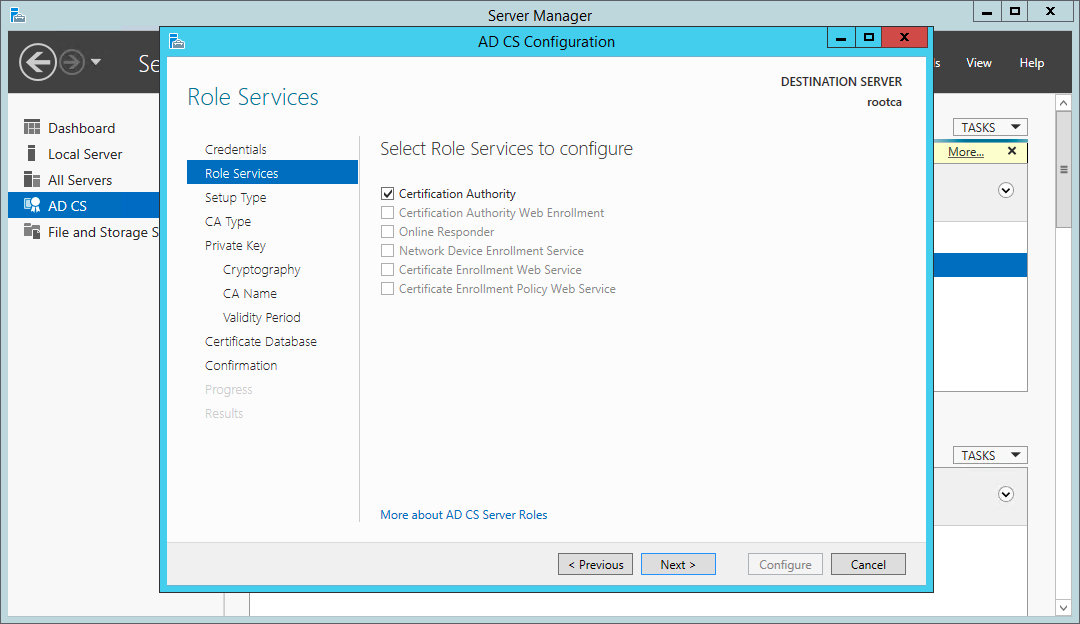
Certificate Services wizard - roles to configure
This certificate authority is being configured on a stand-alone server not a member of Active Directory, so we’ll only be able to configure a Standalone CA.
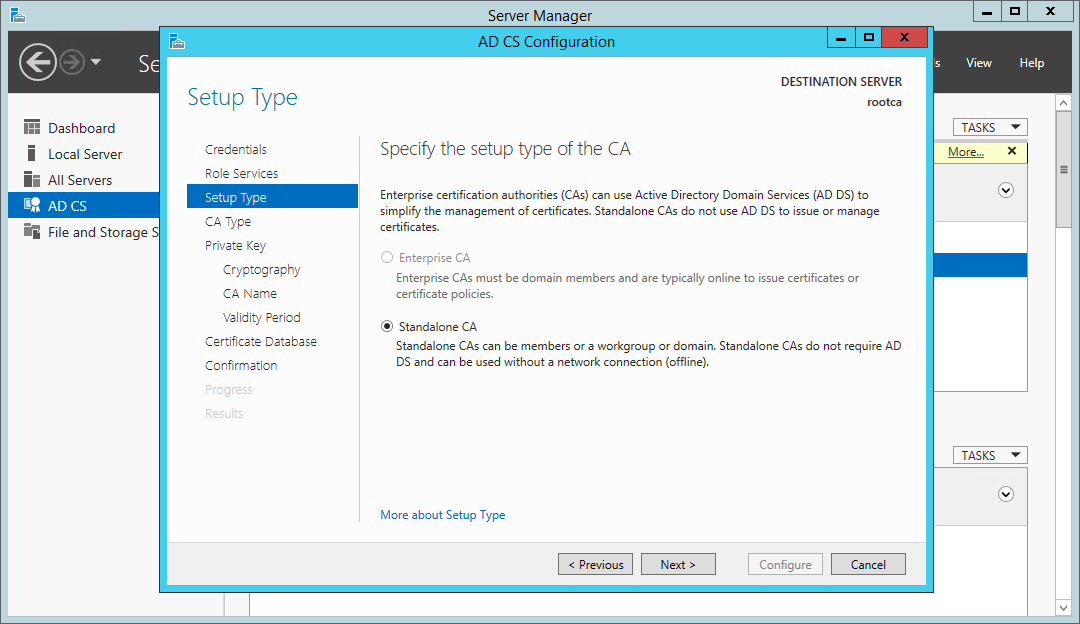
Certificate Services wizard - configure a standalone CA
This is the first CA in our environment, so be sure to configure this as a root CA.
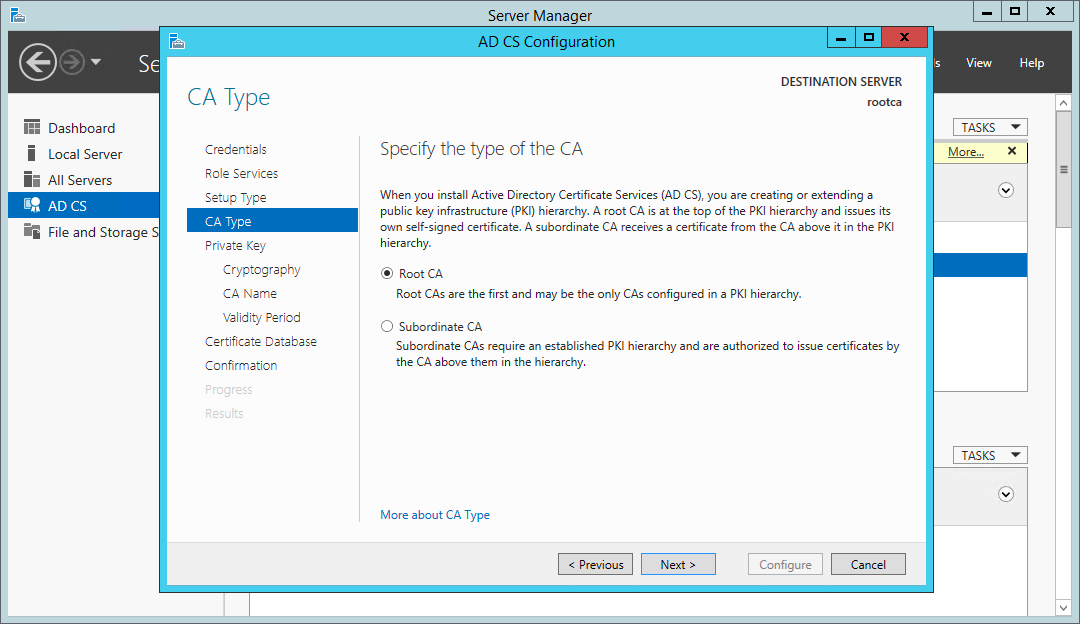
Certificate Services wizard - configure as a root CA
With the first CA in the environment, we’ll won’t have an existing private key, so must choose to create a new one.
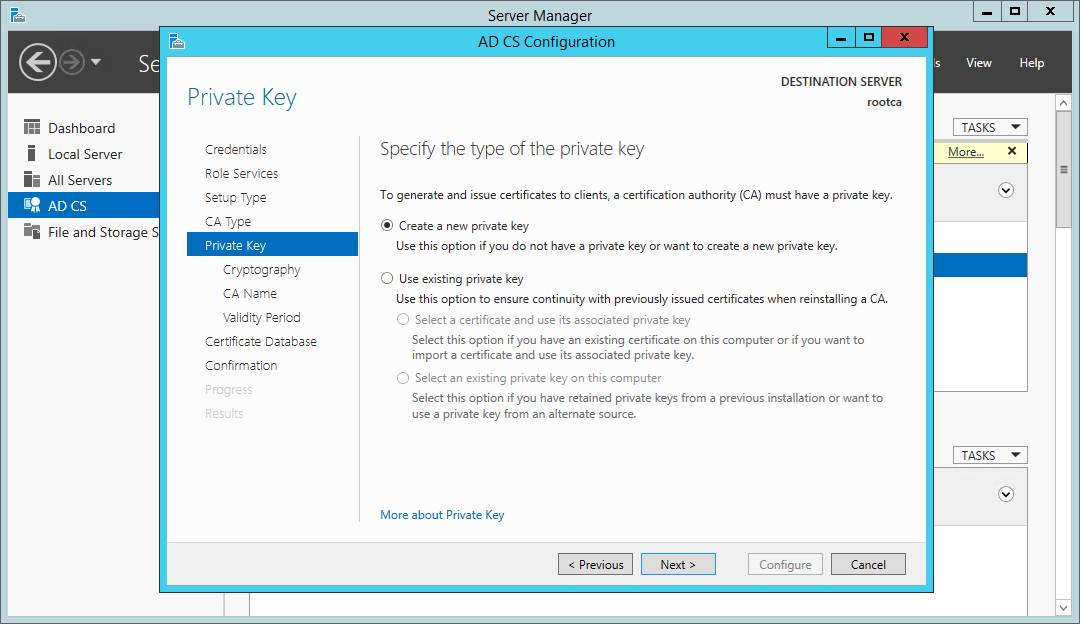
Certificate Services wizard - choose a new private key
When selecting a cryptographic provider and a hash algorithm, SHA1 will be the default hashing algorithm; however, Windows will no longer accept certificates signed with SHA1 after 1st of January 2017, so be sure to choose at least SHA256.
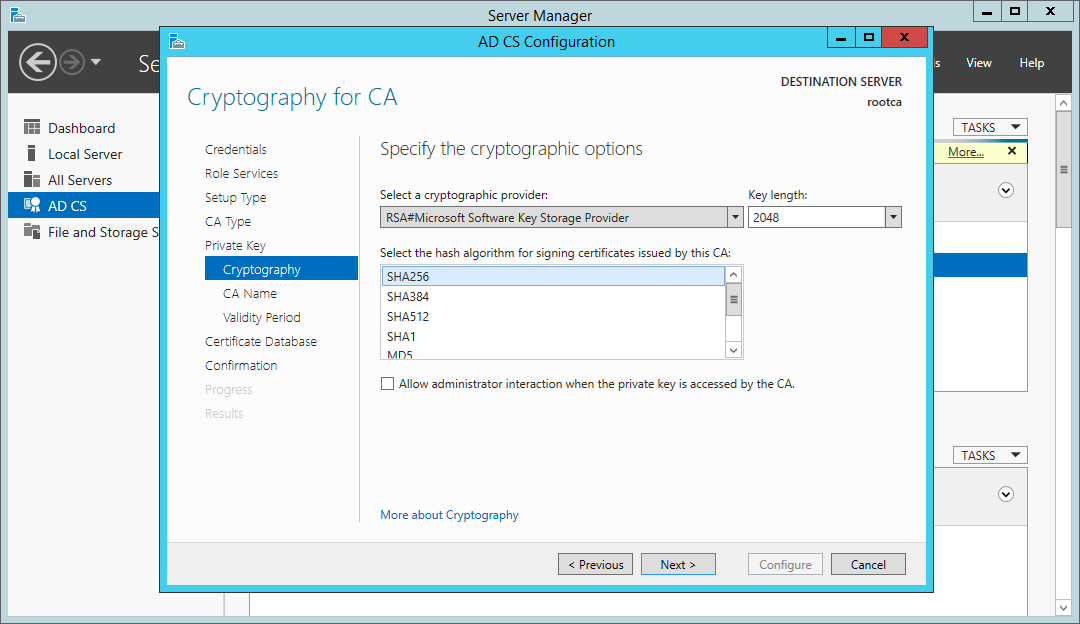
Certificate Services wizard - choosing cryptographic options
Specify a name for the new certificate authority. I’d recommend keeping this simple using the ANSI character set, using a meaningful name.
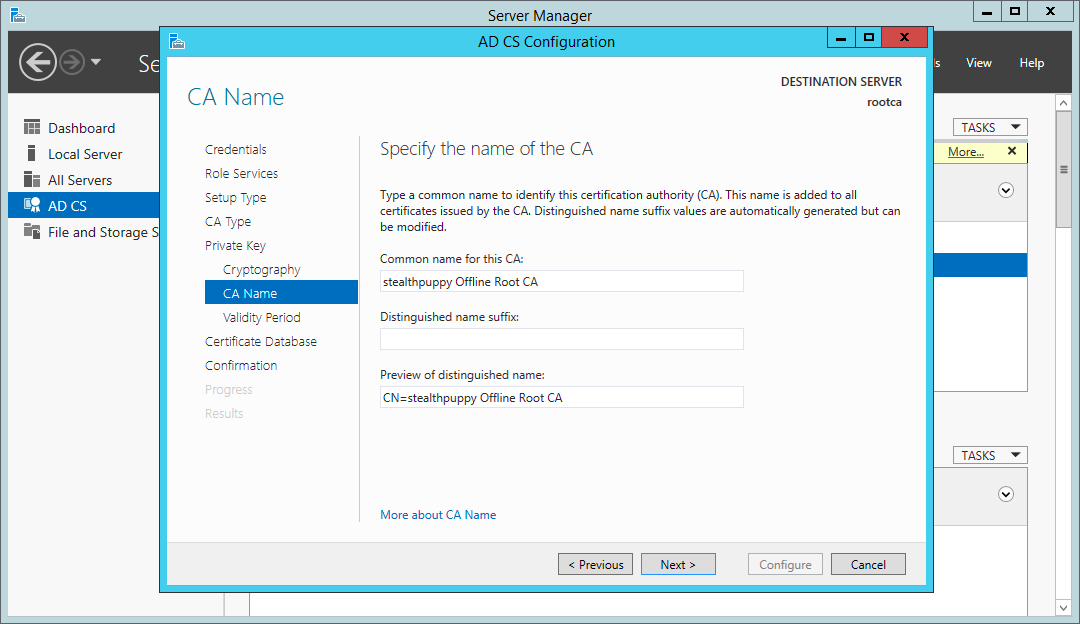
Certificate Services wizard - specify a CA name
Select the validity period - perhaps the default is the best to choose; however, this can be customised based on your requirements. This is a topic that is a whole security conversation in itself; however, renewing CA certificates isn’t something that you want to be doing too often. Considerations for setting the validity period should include business risk, the size and complexity of the environment you are installing the PKI into, and how mature the IT organisation is.
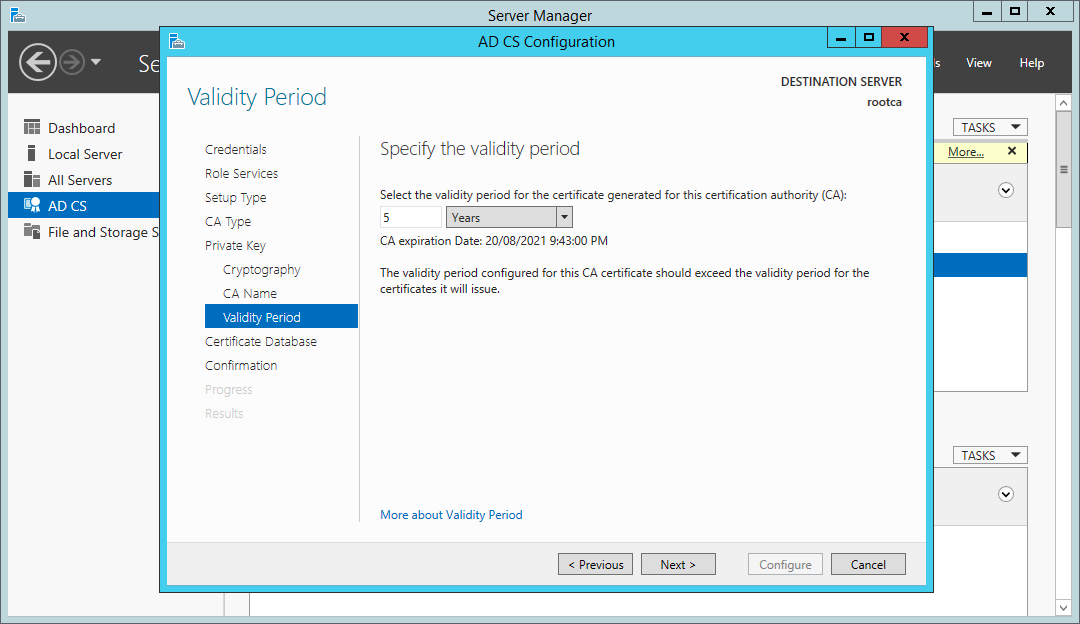
Certificate Services wizard – select the CA certificate validity period
On the next page of the wizard, you can choose the location of the certificate services database and logs location (C:\Windows\System32\Certlog), which can be changed depending on your specific environment.
On the last page, you will see a summary of the configuration before committing it to the local certificate services.
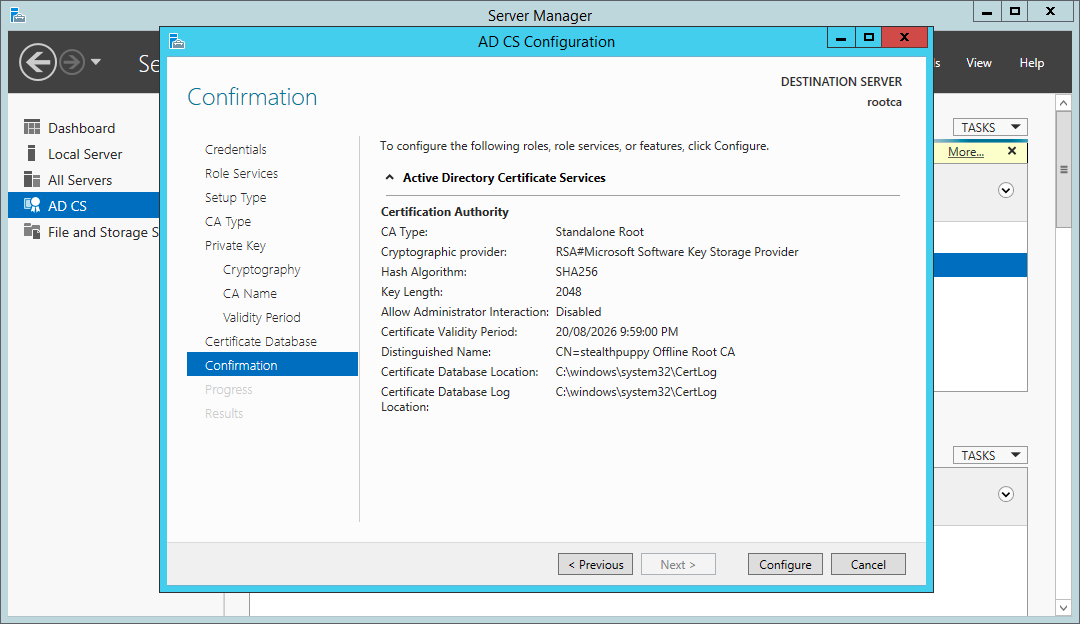
Certificate Services wizard – summary page
Configuring the Root CA
Now that certificate services have been installed and the base configuration is complete, a set of specific configuration changes is required to ensure that an offline Root CA will work for us.
If you open the Certificate Authority management console, you can view the properties of the certificate authority and the Root CA’s certificate:
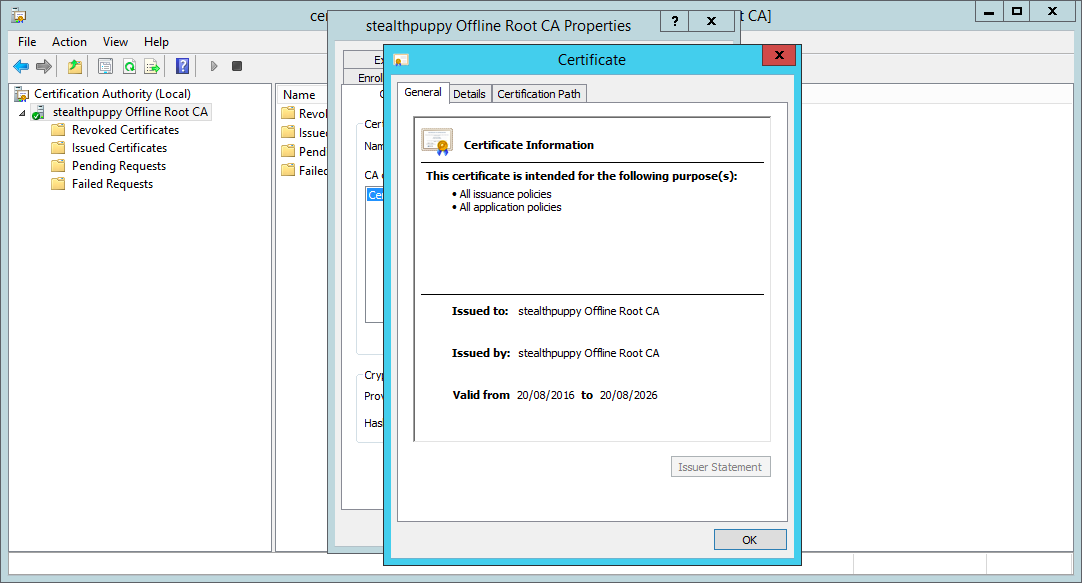
The freshly installed and configured certificate authority
Check the details and ensure the certificate hash algorithm is SHA256:
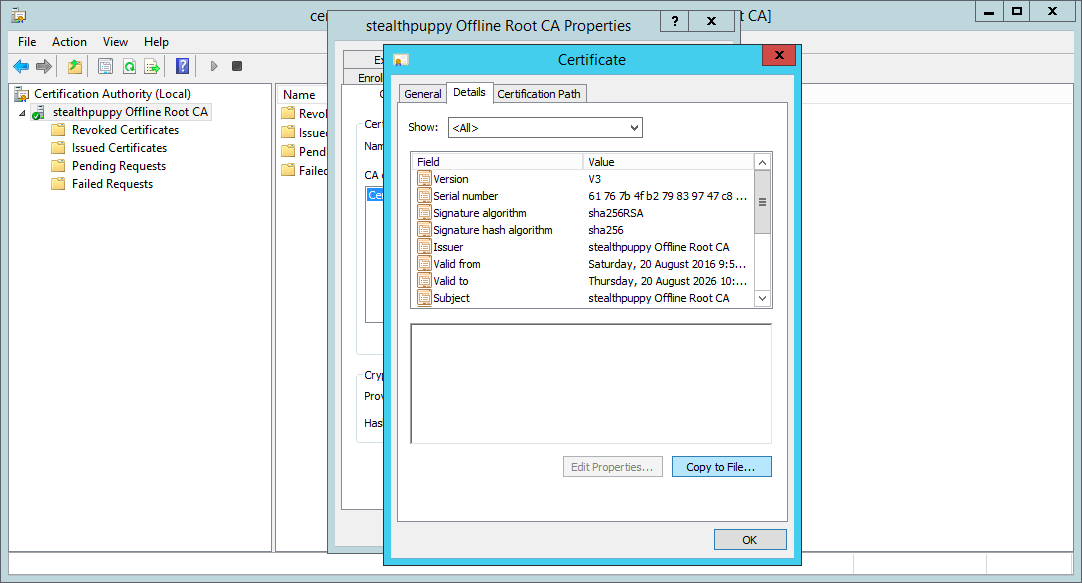
Certificate authority with SHA256 hashing algorithm
Configure CA Extensions
Before we take any further steps, including deploying a subordinate CA for issuing certificates, we need to configure the Certificate Revocation List (CRL) Distribution Point. Because this CA will be offline and not a member of Active Directory, the default locations won’t work.
In the properties of the CA, select the Extensions tab to view the CRL Distribution Points. By default, the ldap:// and file:// locations will be the default distribution points. These, of course, won’t work for the reasons I’ve just stated, and because these locations are embedded in the properties of certificates issued by this CA, we should change them.
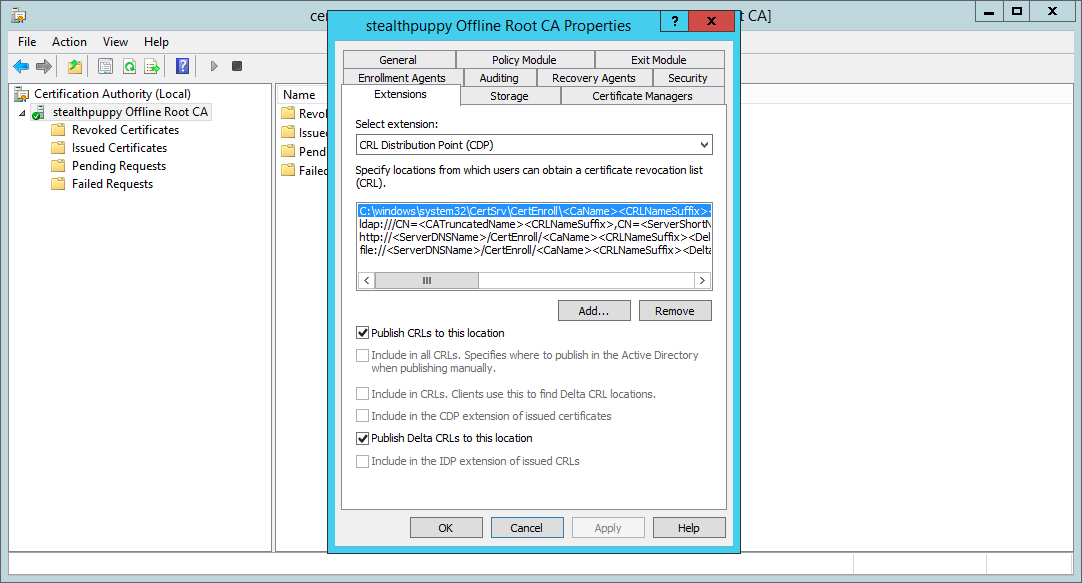
Configuring the Certificate Revocation List settings
The default CRL distribution points are as below. These can be copied by selecting each from within the dialog box and pressing Ctrl-C.
C:\windows\system32\CertSrv\CertEnroll\<CaName><CRLNameSuffix><DeltaCRLAllowed>.crl
ldap:///CN=<CATruncatedName><CRLNameSuffix>,CN=<ServerShortName>,CN=CDP,CN=Public Key Services,CN=Services,<ConfigurationContainer><CDPObjectClass>
http://<ServerDNSName>/CertEnroll/<CaName><CRLNameSuffix><DeltaCRLAllowed>.crl
file://<ServerDNSName>/CertEnroll/<CaName><CRLNameSuffix><DeltaCRLAllowed>.crl
To set up a CRL distribution point that will work with a location that’s online (so that clients can contact the CRL), we’ll add a new distribution point rather than modify an existing DP and use HTTP.
Before that we’ll want to do two things:
- Ensure that ‘Publish CRLs to this location’ and ‘Publish Delta CRLs to this location’ are selected on the default
C:\Windows\System32\CertSrv\CertEnrolllocation. This should be the default setting. - For each existing DP, remove any check marks enabled for ‘Include in CRLs’.
Now add a new CRL location, using the same HTTP location value included by default; however, change <ServerDNSName> for the FQDN for the host that will serve the CRL. In my example, I’ve changed:
http://<ServerDNSName>/CertEnroll/<CaName><CRLNameSuffix><DeltaCRLAllowed>.crl
to
http://crl.home.stealthpuppy.com/CertEnroll/<CaName><CRLNameSuffix><DeltaCRLAllowed>.crl
This FQDN is an alias for the subordinate certificate authority that I’ll be deploying to actually issue certificates to clients. This CA will be online with IIS installed, so will be available to serve the CRLs.

Adding a new CRL distribution point
Repeat the same process for the Authority Information Access (AIA) locations:
- Disable ‘Include in the AIA extensions of issued certificates’ for all existing locations
- Copy the existing
http://location - Add a new
http://location, changing<ServerDNSName>for the FQDN of the alias also used for the CRL distribution point
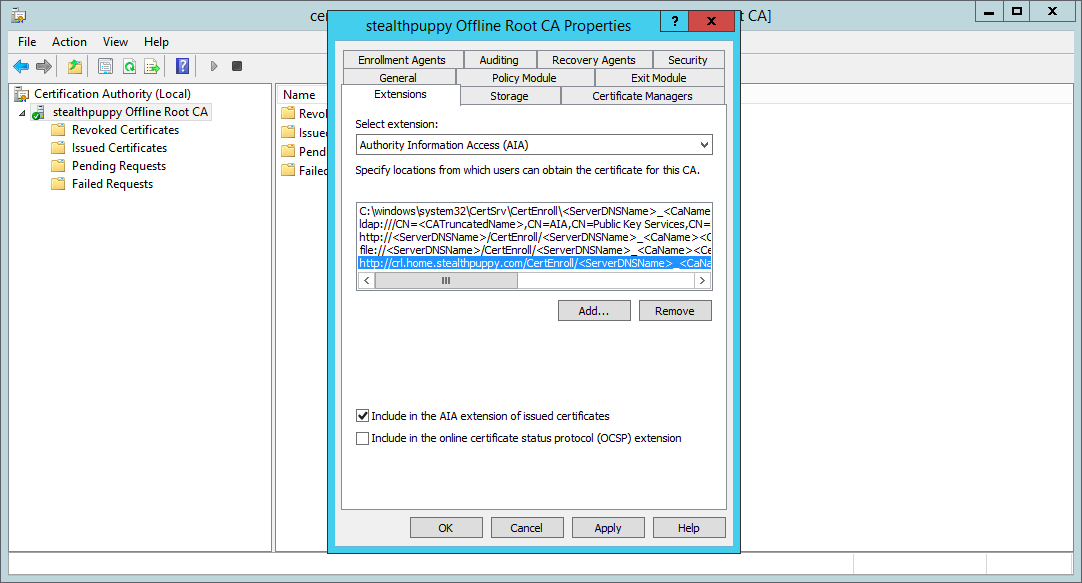
Adding an Authority Information Access location
Apply the changes, and you will be prompted to restart Active Directory Certificate Services. If you don’t remember to manually restart the service later.
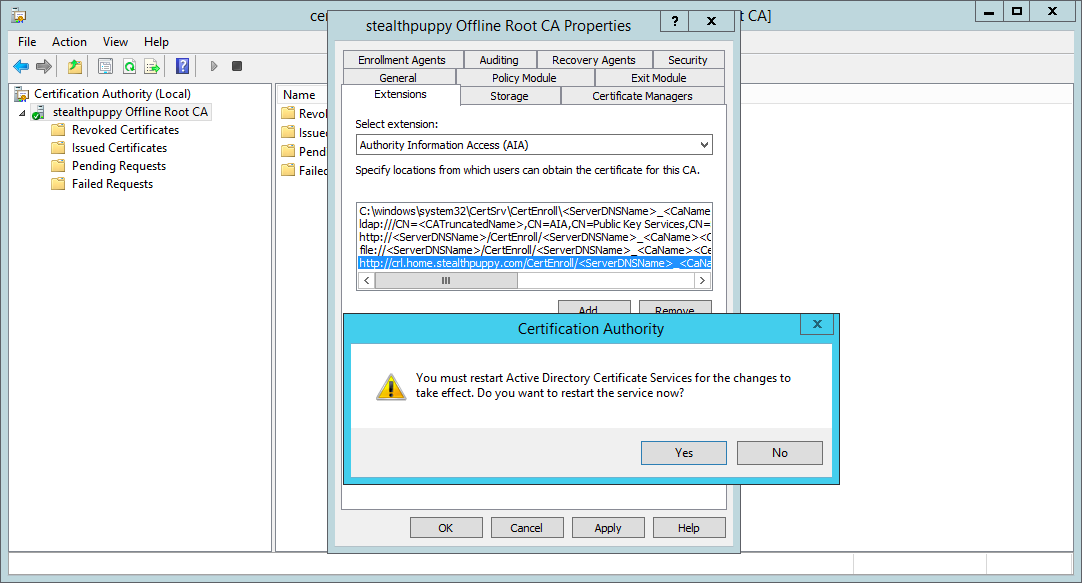
Applying the changes will require restarting the CA service
Configure CRL Publishing
Before publishing the CRL set the Publication Interval to something other than the default 1 week. Whatever you set the interval to, this will be the maximum amount of time that you’ll need to boot the CA, publish the CRL and copy it to you CRL publishing point.
Open the properties of the Revoked Certificates node and set the CRL publication interval to something suitable for the environment you have installed the CA into. Remember that you’ll need to boot the Root CA and publish a new CRL before the end of this interval.
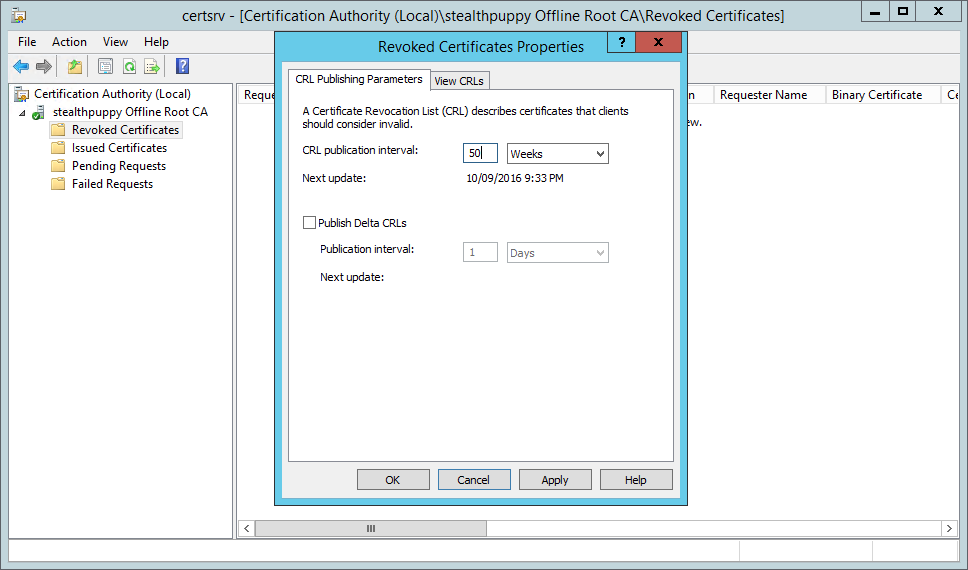
Setting the CRL Publication Interval on the Root CA
Ensure that the Certificate Revocation list is published to the to the file system - right-click Revoked Certificates, select All Tasks / Publish. We will then copy these to the subordinate CA.

Publish the Certificate Revocation list
Browse to C:\Windows\System32\CertSrv\CertEnroll to view the CRL and the root CA certificate.
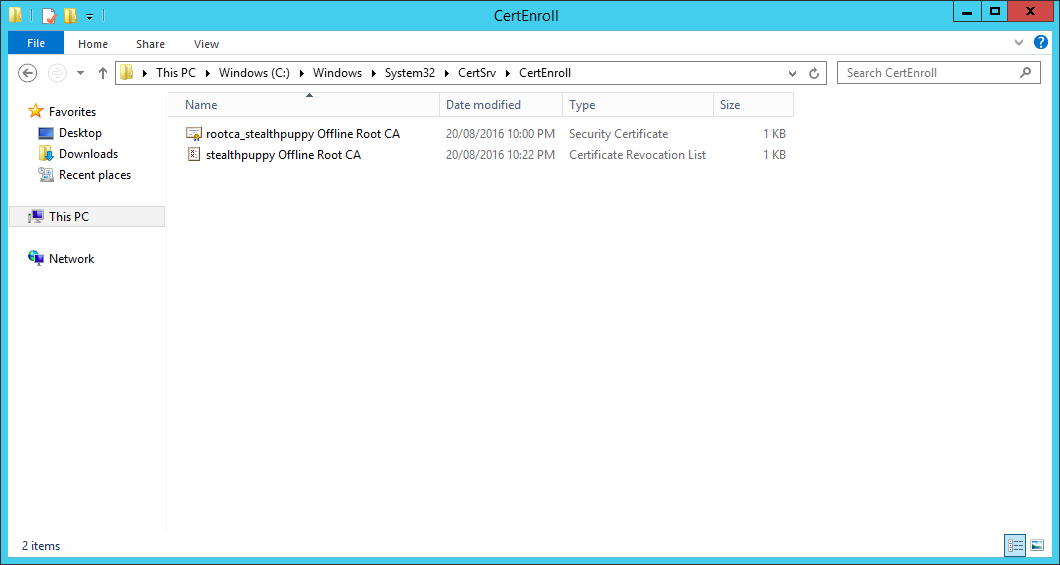
Certificates and CRL published to C:\Windows\System32\CertSrv\CertEnroll
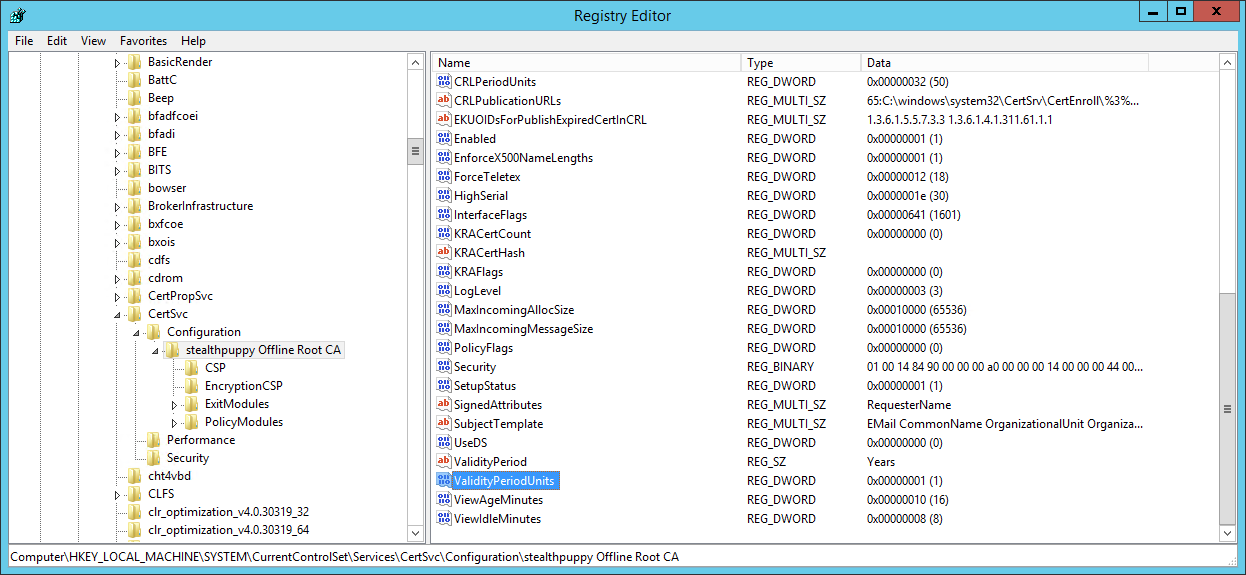
Setting the Issued Certificate Validity Period
The default validity period for certificates issued by this CA will be 1 year. Because this is a stand-alone certification authority, we don’t have templates available to use that we can use to define the validity period for issued certificates. So we need to set this in the registry.
As we’ll only be issuing subordinate CA certificates from this root CA, 1 year isn’t very long. If the subordinate CA certificate is only valid for 1 year, any certificates that it issues can only be valid for less than 1 year from the date of issue - not long indeed. Therefore, we should set the validity period on the root CA before we issue any certificates.
To change the validity period, open Registry Editor and navigate to the following key:
HKLM\SYSTEM\CurrentControlSet\Services\CertSvc\Configuration\<certification authority name>
In my lab, this path is:
HKLM\SYSTEM\CurrentControlSet\Services\CertSvc\Configuration\stealthpuppy Offline Root CA
Here I can see two values that define how long issued certificates are valid for - ValidityPeriod (defaults to 1) and ValidityPeriodUnits (defaults to “Years”).
Viewing the Root CA certificate validity lifetime
Open ValidityPeriodUnits and change this to the desired value. My recommendation would be to make this 1/2 the lifetime of Root CA’s certificate validity period, so if you’ve configured the Root CA for 10 years, set this to 5 years. You’ll need to restart the Certificate Authority service for this to take effect.
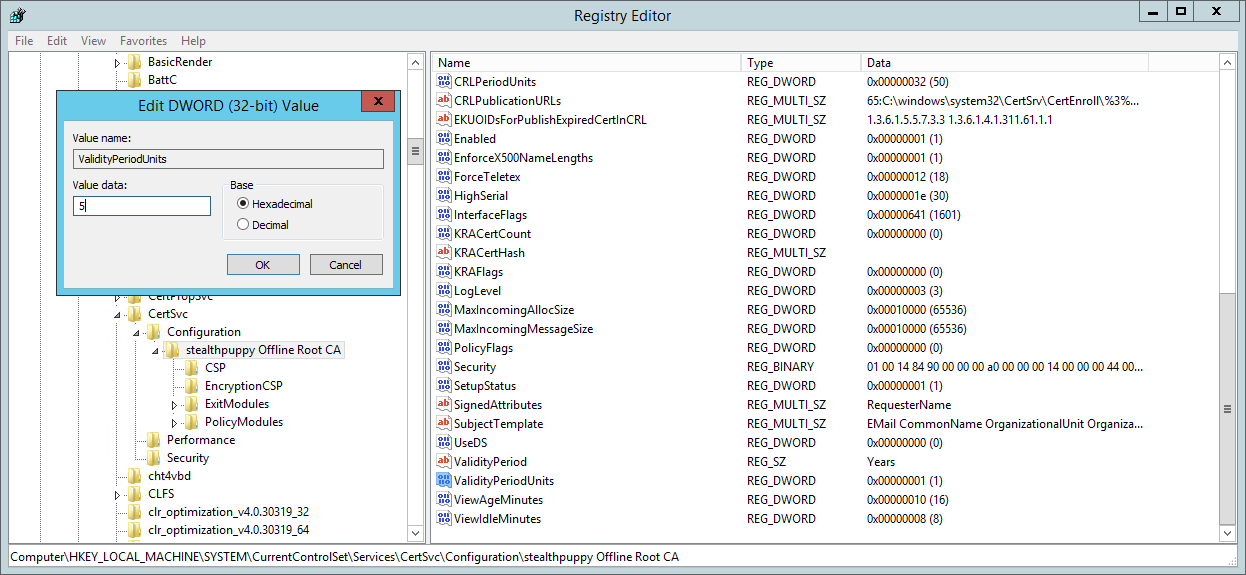
Setting the Root CA’s ValidityUnits
An alternative to editing the registry directly is to set this value to certutil.exe. To change the validity period to 5 years run:
certutil -setreg ca\ValidityPeriodUnits "5"
There are a couple of old articles on setting this value, but they still apply to current versions of Windows Server - How to change the expiration date of certificates that are issued by a Windows Server 2003 or a Windows 2000 Server CA and How to Set an Enterprise Subordinate CA to Have a Different Certificate Validity Period than the Parent CA.
Conclusion
In this article, I’ve provided the basic steps to creating a root certificate authority on Windows Server 2012 R2. The next step is to create a subordinate CA that will issue certificates to devices and users, allowing us to take the root CA offline and protecting it from attack.
Don’t shut down the Root CA just yet. In the next article, we’ll create and configure the subordinate CA.