Participate in the Project VRC "State of the VDI and SBC union 2015" survey

Participate in the Project VRC

The independent R&D project ‘Virtual Reality Check’ (VRC) was started in early 2009 by Ruben Spruijt (@rspruijt) of PQR and Jeroen van de Kamp (@thejeroen) of Login Consultants, and focuses on research in the desktop and application virtualization market. Several white papers with Login VSI test results were published about the performance and best practices of different hypervisors, Microsoft Office versions, application virtualization solutions, Windows Operating Systems in server hosted desktop solutions and the impact of antivirus in VDI environments.

Updating an MCS-based XenDesktop Machine Catalog with PowerShell

Updating an MCS-based XenDesktop Machine Catalog with PowerShell

I wrote previously about automating the creation of an MCS-based machine catalog in XenDesktop with PowerShell, so in this article I’ll cover updating that machine catalog via PowerShell.

Separate to this article would be the process of creating the updated image - that could be done manually (by updating the existing master image), or by automating a new master image deployment with MDT, or any other method that you can think of.

Just as with creating the machine catalog, the PowerShell output from Studio when updating a catalog is a place to start - the code provided isn’t reusable without some effort to make it work.

Linking the Code to the UI

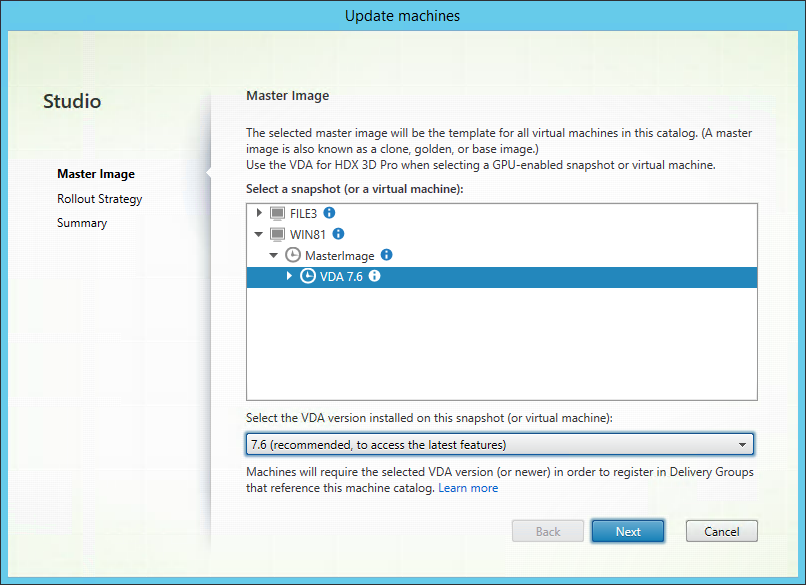
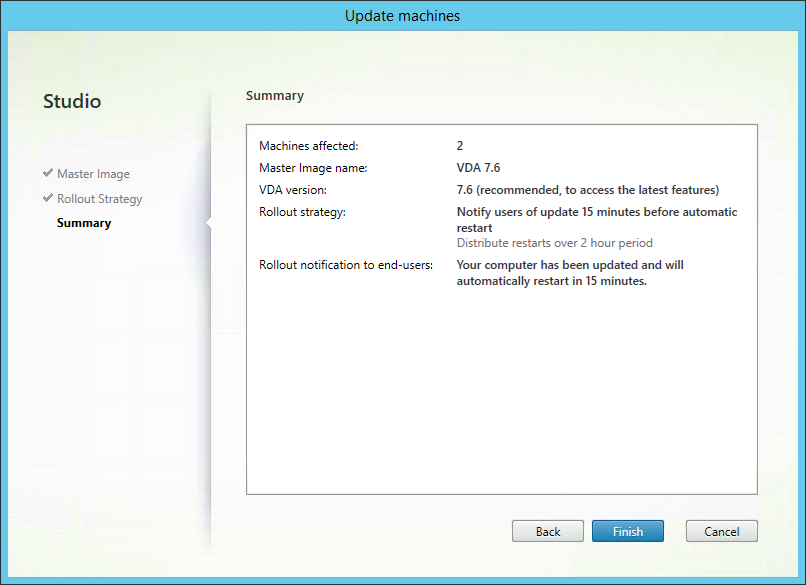
I’ll walk briefly through the wizards to show, in part, how the code relates to each step when updating a machine catalog via the Studio UI.

In this case, I’ve already created the machine catalog and updated my master image and created a snapshot. The hypervisor isn’t important because Citrix Studio abstracts this from the process when performing the update (I do need to be using the same infrastructure as the target catalog).

To find the snapshot to use, I’ve obtained the path to the master image and a specified snapshot via the Get-ChildItem command (on the path XDHyp:\HostingUnits<Storage Resource>). This is essentially a path/directory that I can parse - I’ve explicitly specified the master image and the snapshot to use. I need the path to the snapshot so that I can use that in the publish step for the image update.

Get-ChildItem "XDHyp:\HostingUnits\"

Selecting the master image snapshot

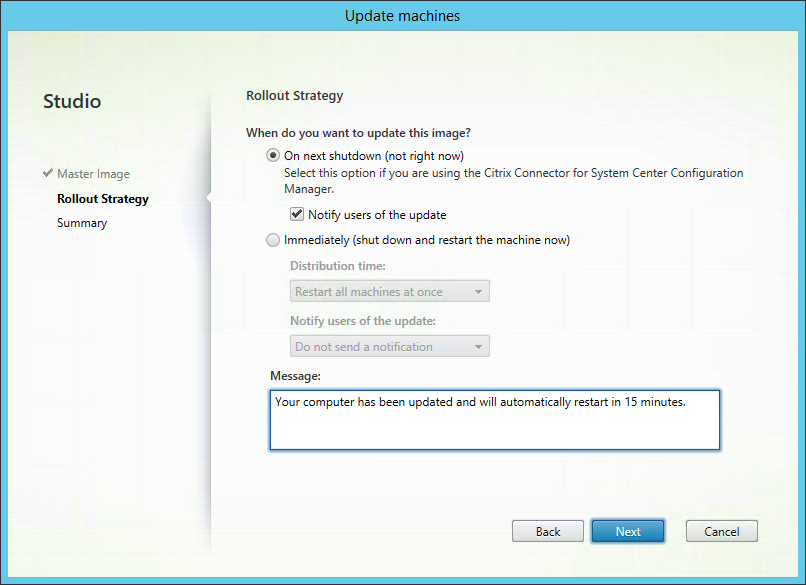
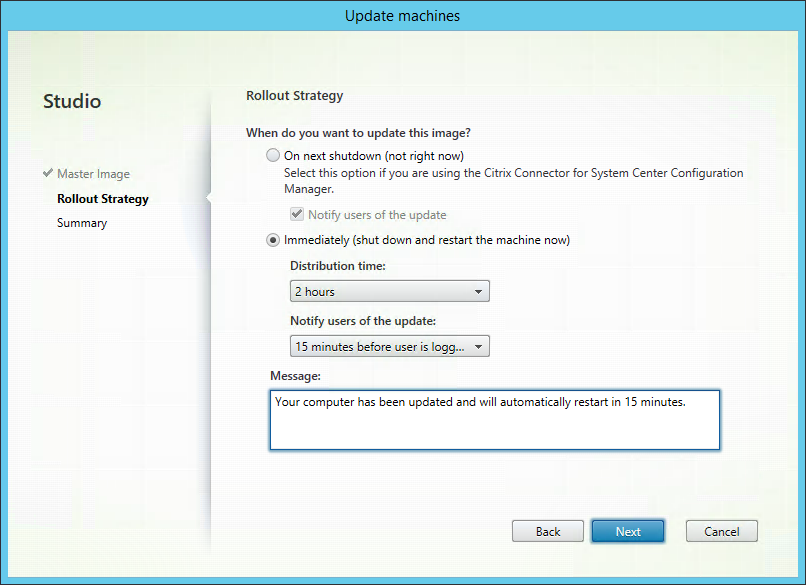
I can choose from a couple of rollout strategies for the image update - I can choose to update on next shutdown of the desktop, or update immediately (with a specified delay).

Rollout the image update on next reboot - Start-BrokerRebootCycle or Start-BrokerNaturalRebootCycle (still need to work this out)

Start-BrokerRebootCycle is used to control the the reboot cycle, but this is called at the end of the script to ensure the update process is completed first.

Start-BrokerRebootCycle -InputObject @(<Machine Catalog Name>) -RebootDuration 120 -WarningDuration 15 -WarningMessage <message> -WarningTitle <message>

Rollout

Publish-ProvMasterVmImage is used to publish the image. The process can then be monitored by getting updates for the process via Get-ProvTask. I’ve opted to show a progress bar while the update is on-going before initiating the desktop reboot.

Catalog update summary

There’s plenty that the wizard does to hide the complexity of setting up a catalog from the administrator. If you attempt the same via PowerShell, what goes on under the hood is laid bare.
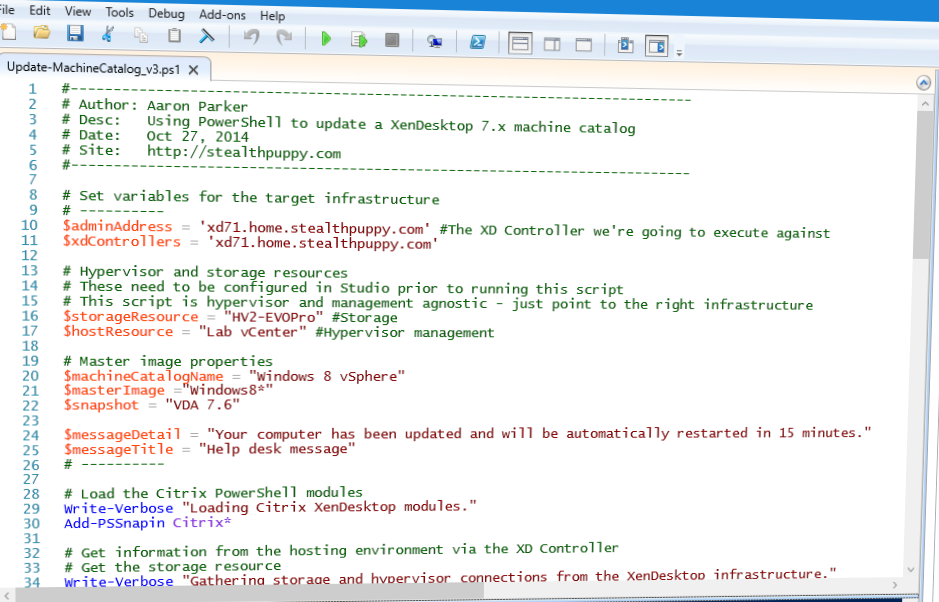
The Code

Below is the full code listing with comments inline that should provide some detail on the process the code follows. At this point the code provides some error checking for the most important steps. There are still some additional steps and error checking that could be integrated:

  • The code will get a specified snapshot from the target VM. I’ve done this to ensure I’m using the correct version of the image
  • Publish the image update to the catalog
  • Monitor the update process until completion
  • Start the desktop reboot cycle

At this stage, I haven’t added too much error checking, but an important step to add will be to check that the image update process was successful and rollback if it wasn’t.

#---------------------------------------------------------------------------
## Author: Aaron Parker
## Desc:   Using PowerShell to update a XenDesktop 7.x machine catalog 
## Date:   Oct 27, 2014
## Site:   http://stealthpuppy.com
#---------------------------------------------------------------------------

## Set variables for the target infrastructure
## ----------
$adminAddress = 'xd71.home.stealthpuppy.com' #The XD Controller we're going to execute against
$xdControllers = 'xd71.home.stealthpuppy.com'

## Hypervisor and storage resources
## These need to be configured in Studio prior to running this script
## This script is hypervisor and management agnostic - just point to the right infrastructure
$storageResource = "HV2-EVOPro" #Storage
$hostResource = "Lab vCenter" #Hypervisor management

## Master image properties
$machineCatalogName = "Windows 8 vSphere"
$masterImage ="Windows8*"
$snapshot = "VDA 7.6"

$messageDetail = "Your computer has been updated and will be automatically restarted in 15 minutes."
$messageTitle = "Help desk message"
## ----------

## Load the Citrix PowerShell modules
Write-Verbose "Loading Citrix XenDesktop modules."
Add-PSSnapin Citrix*

## Get information from the hosting environment via the XD Controller
## Get the storage resource
Write-Verbose "Gathering storage and hypervisor connections from the XenDesktop infrastructure."
$hostingUnit = Get-ChildItem -AdminAddress $adminAddress "XDHyp:\HostingUnits" | Where-Object { $_.PSChildName -like $storageResource } | Select-Object PSChildName, PsPath
## Get the hypervisor management resources
$hostConnection = Get-ChildItem -AdminAddress $adminAddress "XDHyp:\Connections" | Where-Object { $_.PSChildName -like $hostResource }

## Get the broker connection to the hypervisor management
## http://support.citrix.com/proddocs/topic/citrix-broker-admin-v2-xd75/get-brokerhypervisorconnection-xd75.html
$brokerHypConnection = Get-BrokerHypervisorConnection -AdminAddress $adminAddress -HypHypervisorConnectionUid $hostConnection.HypervisorConnectionUid

## Set a provisioning scheme for the update process
## http://support.citrix.com/proddocs/topic/citrix-machinecreation-admin-v2-xd75/set-provschememetadata-xd75.html
$ProvScheme = Set-ProvSchemeMetadata -AdminAddress $adminAddress -Name 'ImageManagementPrep_DoImagePreparation' -ProvisioningSchemeName $machineCatalogName -Value 'True'

## Get the master VM image from the same storage resource we're going to deploy to. Could pull this from another storage resource available to the host
Write-Verbose "Getting the snapshot details for the catalog: $machineCatalogName"
$VM = Get-ChildItem -AdminAddress $adminAddress "XDHyp:\HostingUnits\$storageResource" | Where-Object { $_.ObjectType -eq "VM" -and $_.PSChildName -like $masterImage }
## Get the snapshot details. This code will grab a specific snapshot, although you could grab the last in the list assuming it's the latest.
$VMSnapshots = Get-ChildItem -AdminAddress $adminAddress $VM.FullPath -Recurse -Include *.snapshot
$TargetSnapshot = $VMSnapshots | Where-Object { $_.FullName -eq "$snapshot.snapshot" }

## Publish the image update to the machine catalog
## http://support.citrix.com/proddocs/topic/citrix-machinecreation-admin-v2-xd75/publish-provmastervmimage-xd75.html
$PubTask = Publish-ProvMasterVmImage -AdminAddress $adminAddress -MasterImageVM $TargetSnapshot.FullPath -ProvisioningSchemeName $machineCatalogName -RunAsynchronously
$provTask = Get-ProvTask -AdminAddress $adminAddress -TaskId $PubTask

## Track progress of the image update
Write-Verbose "Tracking progress of the machine creation task."
$totalPercent = 0
While ( $provTask.Active -eq $True ) {
    Try { $totalPercent = If ( $provTask.TaskProgress ) { $provTask.TaskProgress } Else {0} } Catch { }

    Write-Progress -Activity "Provisioning image update" -Status "$totalPercent% Complete:" -percentcomplete $totalPercent
    Sleep 15
    $provTask = Get-ProvTask -AdminAddress $adminAddress -TaskId $PubTask
}

## Start the desktop reboot cycle to get the update to the actual desktops
## http://support.citrix.com/proddocs/topic/citrix-broker-admin-v2-xd75/start-brokerrebootcycle-xd75.html
Start-BrokerRebootCycle -AdminAddress $adminAddress -InputObject @($machineCatalogName) -RebootDuration 60 -WarningDuration 15 -WarningMessage $messageDetail -WarningTitle $messageTitle

Comments or feedback on bugs, better ways to do things or additional steps is welcome. the code is provided as-is, so ensure you test before using in a production environment.

Adding App-V Publishing Information to a XenDesktop Site with PowerShell

Adding App-V Publishing Information to a XenDesktop Site with PowerShell

Adding Microsoft App-V publishing information to a XenDesktop or XenApp 7.x site is very easy via the Citrix Studio UI, but what if you want to automate this process? Of course, you’ll need to reach for PowerShell.

What may not be widely known is that you can add additional App-V publishing configuration to a XenDesktop site beyond what you see in the UI. This allows you to set publishing information per delivery group. Useful for complex XenDesktop sites such as multi-tenant environments.

Creating the App-V publishing information with PowerShell is a multi step process. You’ll need to create the publishing information with New-CtxAppVServer and then apply the configuration with New-BrokerMachineConfiguration.

Applying this in practice however may ultimately require testing the App-V management and publishing servers and ensuring that the configuration does not already exist before adding it.

So to do that, I’ve written a function that will take the App-V Management and Publishing servers as parameters, ensure that they test OK and check that the configuration does not already exist before importing the configuration into the site.

This function is fairly basic and while it does do some error checking, it could probably go a little further to ensure the configuration is applied successfully.

Function Set-CtxAppvConfig {
    <#
        .SYNOPSIS
            Sets new App-V publishing information in a XenDesktop site.
 
        .DESCRIPTION
            This function can be used to set or add App-V publishing information in a XenDesktop or XenApp 7.x site.
 
        .PARAMETER AdminAddress
            Specifies a remote XenDesktop controller to apply the configuration against. If omitted, the local host will be used instead.
 
        .PARAMETER AppvMgmtSvr
            Specifies a remote XenDesktop controller to apply the configuration against. If omitted, the local host will be used instead.
 
        .PARAMETER AppvPubSvr
            Specifies a remote XenDesktop controller to apply the configuration against. If omitted, the local host will be used instead.
 
        .PARAMETER Description
            Specifies a remote XenDesktop controller to apply the configuration against. If omitted, the local host will be used instead.
 
        .EXAMPLE
            Set-CtxAppvConfig -AdminAddress 'xd71.home.stealthpuppy.com' -AppvMgmtSvr 'http://appv1:8080' -AppvPubSvr 'http://appv1:80' -Description 'Created by PowerShell'
 
        .NOTES
 
        .LINK
    #>
    param(
        [Parameter(Mandatory = $false, Position = 0, HelpMessage = "XenDesktop Controller address.")]
        [string]$AdminAddress = 'localhost',

        [Parameter(Mandatory = $true, Position = 1, HelpMessage = "Microsoft App-V Management Server address.")]
        [string]$AppvMgmtSvr = $(throw = "Please specify an App-V Management Server address."),

        [Parameter(Mandatory = $true, Position = 2, HelpMessage = "Microsoft App-V Publishing Server address.")]
        [string]$AppvPubSvr = $(throw = "Please specify an App-V Publishing Server address."),

        [Parameter(Mandatory = $true, Position = 2, HelpMessage = "App-V publishing configuration description.")]
        [string]$Description = $(throw = "Specify a description to apply to the App-V publishing information. Specify 'Created by Studio' to set the App-V publishing inforamtion viewed in Citrix Studio.")
    )

    Function Add-AppvConfig {
        # Add the AppV Server settings to the new specified settings
        Write-Verbose "Setting App-V Management Server to specified URI."
        #http://support.citrix.com/proddocs/topic/citrix-appv-admin-v1-xd71/new-ctxappvserver-xd71.html
        $newAppvConfig = New-CtxAppVServer -ManagementServer $AppvMgmtSvr -PublishingServer $AppvPubSvr

        # Applying configuration to the site
        Write-Verbose "Saving configuration to the site."
        #http://support.citrix.com/proddocs/topic/citrix-broker-admin-v2-xd75/new-brokermachineconfiguration-xd75.html
        $machineConfig = New-BrokerMachineConfiguration -AdminAddress $AdminAddress -ConfigurationSlotUid 3 -LeafName 1 -Description "Created by Studio" -Policy $newAppvConfig -Verbose
    }

    # Obtain FQDN from Management server URL
    $urlGroups = [regex]::Match($AppvMgmtSvr, '^(?&lt;protocol&gt;(http|https))://(?&lt;fqdn&gt;([^:]*))((:(?&lt;port&gt;\d+))?)').Groups

    # Test specified Management Server.
    Write-Verbose "Testing Management Server."
    If (Test-CtxAppVServer -AppVManagementServer $urlGroups["fqdn"].Value -ErrorAction SilentlyContinue -ErrorVariable $manError) {
        Write-Verbose "Management Server tested OK."

        # Test specified Publishing Server
        Write-Verbose "Testing Publishing Server."
        If (Test-CtxAppVServer -AppVPublishingServer $AppvPubSvr -ErrorAction SilentlyContinue -ErrorVariable $pubError) {
            Write-Verbose "Publishing Server tested OK."
            # Get any existing AppV configuration from the broker
            #http://support.citrix.com/proddocs/topic/citrix-broker-admin-v2-xd71/get-brokermachineconfiguration-xd71.html
            If ($Config) { Remove-Variable Config }
            $Config = Get-BrokerMachineConfiguration -AdminAddress $AdminAddress -Name AppV* -ErrorAction SilentlyContinue

            $cfgMatch = $False
            If ($Config) {
                ForEach ($cfg in $Config) {

                    # Grab the AppV configuration details
                    #http://support.citrix.com/proddocs/topic/citrix-appv-admin-v1-xd71/get-ctxappvserver-xd71.html
                    $appvConfig = Get-CtxAppVServer -ByteArray $cfg.Policy

                    # If the existing Management Server matches the specified Management Server
                    If (($appvConfig.ManagementServer -eq $AppvMgmtSvr) -and ($appvConfig.PublishingServer -eq $AppvPubSvr)) {
                        Write-Verbose "Specified config matches existing config."
                        $cfgMatch = $True
                    }
                }

                If (!($cfgMatch)) {
                    # Add config
                    Add-AppvConfig
                }
                Else {
                    Write-Verbose "App-V configuration already exists."
                }
            }
            Else {
                # Add config
                Add-AppvConfig
            }
        }
        Else {
            Write-Error "[Aborting] App-V Publishing Server test failed with: $pubError"
        }
    }
    Else {
        Write-Error "[Aborting] App-V Management Server test failed with: $manError"
    }
}

Please ensure that you test thoroughly before using in a production environment. Comments or feedback on bugs, better ways to do things or additional steps is welcome.

Note - a very big thanks to David Wagner at Citrix (and team) for assisting with working out how to write the App-V publishing information that you see in the Studio UI. This is done by applying the description “Created with Studio” to the publishing configuration (presumably only the first configuration that you apply with that description).

Does Horizon View RDS stack up against XenApp?

Is VMware Horizon View 6 RDS a viable replacement or competitor to Citrix XenApp? A competitor, most certainly. View RDS as a replacement for XenApp deserves further investigation and I recommend no assumptions be made as to the suitability of View RDS, especially if you are a current Citrix customer, or a VMware partner.

View Memory Stats on a Hyper-V Server

I’ve got a very simple setup in my home lab with a couple of machine running either Hyper-V or ESXi. I typically don’t have monitoring solutions running and manage each host directly, rather than part of a cluster or with SCVMM or vCenter. For Hyper-V, I try to manage it remotely via PowerShell as much as I can and so it’s handy to be able to see memory utilisation on the remote host to understand how much capacity I’ve got before powering on a VM. I’ve written a PowerShell function to return various memory stats:

  • Total RAM available in the host - using Get-VMHost.
  • Total memory in use by running VMs - by returning the running VMs and finding the current amount of RAM assigned to each VM with Get-VM. This works with dynamic memory.
  • Available memory to run additional VMs - using Get-Counter to gather the ‘\Memory\Available Bytes’ performance counter
  • How much memory is used by the system - this is calculated by adding what’s in use by VMs, to the available memory and subtracting the results from the physical RAM in the host. This is a rough calculation, but an interesting metric to view.

The function returns an array that includes each stat. Here’s an example of what the function returns. All values are in gigabytes and multiple hosts can be specified to gather details from.

PS C:\> Get-HvMem -ComputerName hv1


Name         : hv1
HostRAMGB    : 11.904224395752
VMInUseGB    : 7.12890625
SystemUsedGB : 1.46017837524414
AvailableGB  : 3.31513977050781

Here’s the code listing for the Get-HvMem function:

Function Get-HvMem {
    <#
        .SYNOPSIS
            Return Hyper-V host RAM details.
 
        .DESCRIPTION
            This function returns the total available RAM, RAM in use by VMs and the available RAM on a Hyper-V host.
 
        .PARAMETER ComputerName
            Specifies one or more Hyper-V hosts to retrieve stats from.
 
        .EXAMPLE
            Get-HvRAM -ComputerName hyperv1

        .NOTES
 
        .LINK
            /hyperv-memory-powershell
 
    #>
    param(
        [Parameter(Mandatory=$true, Position=0,HelpMessage="Hyper-V host.")]
        [string[]]$ComputerName = $(throw = "Please specify a remote Hyper-V host to gather memory details from.")
    )

    # Create an array to return
    $allStats = @()

    ForEach ( $computer in $ComputerName ) {

        # Create an array to contain this computer's metrics
        $a = @()

        # Get details for Hyper-V host
        $vmHost = Get-VMHost -ComputerName $computer

        If ($vmHost) {

            # Get total RAM consumed by running VMs.
            $total = 0
            Get-VM -ComputerName $computer | Where-Object { $_.State -eq "Running" } | Select-Object Name, MemoryAssigned | ForEach-Object { $total = $total + $_.MemoryAssigned }

            #Get available RAM via performance counters
            $Bytes = Get-Counter -ComputerName $computer -Counter "\Memory\Available Bytes"

            # Convert values to GB
            $availGB = ($Bytes[0].CounterSamples.CookedValue / 1GB)
            $hostGB = ($vmhost.MemoryCapacity / 1GB)
            $vmInUse = ($total / 1GB)

            # Construct an array of properties to return
            $item = New-Object PSObject

            # Add host name
            $item | Add-Member -type NoteProperty -Name 'Name' -Value $vmHost.Name

            # Host RAM in GB
            $item | Add-Member -type NoteProperty -Name 'HostRAMGB' -Value $hostGB

            # In use RAM in GB
            $item | Add-Member -type NoteProperty -Name 'VMInUseGB' -Value $vmInUse

            # System used in GB
            $item | Add-Member -type NoteProperty -Name 'SystemUsedGB' -Value ($hostGB - ($vmInUse + $availGB))

            # Available RAM in GB
            $item | Add-Member -type NoteProperty -Name 'AvailableGB' -Value $availGB
            $a += $item
        }

        # Add the current machine details to the array to return
        $allStats += $a
    }
    Return $allStats
}

Comments or feedback on bugs, better ways to do things or additional steps is welcome.

Creating a XenDesktop Delivery Group with PowerShell

My last article was on creating a XenDesktop machine catalog with PowerShell - in this article I’m going to create a Delivery Group which provides access to the virtual machines that a part of that catalog.

Like the last article, I’ve taken the PowerShell generated by Citrix Studio, banged my head against the wall a few times, and improved it to create the code presented in this article.

Linking the Code to the UI

To help explain the code, I’ll first run through the Create Delivery Group wizard and show how the code relates to options in the wizard and the Delivery Group properties.

Add-BrokerMachinesToDesktopGroup assigns virtual machines from a specified Machine Catalog to the new Delivery Group.

Selecting the Machine Catalog and the number of desktops - Add-BrokerMachinesToDesktopGroup -Catalog "Windows 8 x86" -Count 5

Selecting the Machine Catalog and the number of desktops - Add-BrokerMachinesToDesktopGroup -Catalog “Windows 8 x86” -Count 5

Specify the delivery type for this Delivery Group when using New-BrokerDesktopGroup.

Selecting the delivery type - New-BrokerDesktopGroup -DeliveryType 'DesktopsOnly'

Selecting the delivery type - New-BrokerDesktopGroup -DeliveryType ‘DesktopsOnly’

New-BrokerEntitlementPolicyRule is used to assign user or group accounts to the Delivery Group.

Assigning users to the Desktop Group - New-BrokerEntitlementPolicyRule -Name "Windows 8 x86_1" -IncludedUsers $brokerUsers -DesktopGroupUid 11

Assigning users to the Desktop Group - New-BrokerEntitlementPolicyRule -Name “Windows 8 x86_1” -IncludedUsers “HOME\Domain Users” -DesktopGroupUid 11

Add-BrokerMachineConfiguration adds StoreFront and UPM configurations to a Delivery Group. The function just adds a machine configuration - the configuration is setup separately. To avoid selecting a StoreFront server for the Delivery Group, don’t use this function.

Selecting a StoreFront server - Add-BrokerMachineConfiguration -DesktopGroup "Windows 8 x86" -InputObject @(1005)

Selecting a StoreFront server - Add-BrokerMachineConfiguration -DesktopGroup “Windows 8 x86” -InputObject @(1005)

When calling New-BrokerDesktopGroup, the Delivery Group name, display or published name and description is specified.

Group name, Display name and description - New-BrokerDesktopGroup -Name "Windows 8 x86" -PublishedName "Windows 8 x86" -Description "Windows 8 x86 with Office 2013, Pooled desktops"

Group name, Display name and description - New-BrokerDesktopGroup -Name “Windows 8 x86” -PublishedName “Windows 8 x86” -Description “Windows 8 x86 with Office 2013, Pooled desktops”*

The wizard does not expose all settings for the Delivery Group, so additional settings require opening the properties of the new group. These can be set during creation of the group when using PowerShell.

The same call to New-BrokerDesktopGroup is used to specify user settings including colour depth and time zone preferences.

Controlling various user settings - New-BrokerDesktopGroup -ColorDepth TwentyFourBit -TimeZone "AUS Eastern Standard Time" -SecureIcaRequired $False

Controlling various user settings - New-BrokerDesktopGroup -ColorDepth TwentyFourBit -TimeZone “AUS Eastern Standard Time” -SecureIcaRequired $False

New-BrokerDesktopGroup and New-BrokerPowerTimeScheme are both used to manage virtual machine power management settings. Setting or modifying the peak and off peak hours isn’t friendly either.

Virtual machine power management settings - New-BrokerPowerTimeScheme -DisplayName 'Weekdays' -DaysOfWeek 'Weekdays' -DesktopGroupUid 11; New-BrokerDesktopGroup -OffPeakDisconnectAction Suspend -OffPeakDisconnectTimeout 15

Virtual machine power management settings - New-BrokerPowerTimeScheme -DisplayName ‘Weekdays’ -DaysOfWeek ‘Weekdays’ -DesktopGroupUid 11; New-BrokerDesktopGroup -OffPeakDisconnectAction Suspend -OffPeakDisconnectTimeout 15

New-BrokerAccessPolicyRule modifies the access policies. This is called twice - once for connections through NetScaler Gateway and once for direct connections.

Modifying access policies - New-BrokerAccessPolicyRule -Name "Windows 8 x86_AG" -AllowedConnections 'ViaAG' -AllowedProtocols @('HDX','RDP') -DesktopGroupUid 11 -Enabled $True -IncludedSmartAccessFilterEnabled $True -IncludedSmartAccessTags @() -IncludedUserFilterEnabled $True

Modifying access policies - New-BrokerAccessPolicyRule -Name “Windows 8 x86_AG” -AllowedConnections ‘ViaAG’ -AllowedProtocols @(‘HDX’,’RDP’) -DesktopGroupUid 11 -Enabled $True -IncludedSmartAccessFilterEnabled $True -IncludedSmartAccessTags @() -IncludedUserFilterEnabled $True

Creating the Delivery Group is relatively straight-forward; however there are some additional steps, such as creating a StoreFront server and working out how to manage peak and off peak times, that require a bit more investigation.

The Code

Below is the full code listing with comments inline that should provide some detail on the process the code follows. At this point the code provides some error checking for the most important steps. There are still some additional steps and error checking that could be integrated into the code.

#---------------------------------------------------------------------------
# Author: Aaron Parker
# Desc:   Using PowerShell to create a XenDesktop 7.x Delivery Group
# Date:   Aug 23, 2014
# Site:   http://stealthpuppy.com
#---------------------------------------------------------------------------
# 

# Set variables for the target infrastructure
# ----------
$adminAddress = 'xd71.home.stealthpuppy.com' #The XD Controller we're going to execute against
$xdControllers = 'xd71.home.stealthpuppy.com'

# Desktop Group properties
$desktopGroupName = "Windows 8 desktops"
$desktopGroupPublishedName = "Windows 8 desktops"
$desktopGroupDesc = "Windows 8 x86 with Office 2013, Pooled desktops"
$colorDepth = 'TwentyFourBit'
$deliveryType = 'DesktopsOnly'
$desktopKind = 'Shared'
$sessionSupport = "SingleSession" #Also: MultiSession
$functionalLevel = 'L7'
$timeZone = 'AUS Eastern Standard Time'
$offPeakBuffer = 10
$peakBuffer = 10
$assignedGroup = "HOME\Domain Users"

#Machine Catalog
$machineCatalogName = "Windows 8 x86"
# ----------

# Change to SilentlyContinue to avoid verbose output
$VerbosePreference = "Continue"

# Create the Desktop Group
# http://support.citrix.com/proddocs/topic/citrix-broker-admin-v2-xd75/new-brokerdesktopgroup-xd75.html
If (!(Get-BrokerDesktopGroup -Name $desktopGroupName -ErrorAction SilentlyContinue)) {
    Write-Verbose "Creating new Desktop Group: $desktopGroupName"
    $desktopGroup = New-BrokerDesktopGroup -ErrorAction SilentlyContinue -AdminAddress $adminAddress -Name $desktopGroupName -DesktopKind $desktopKind -DeliveryType $deliveryType -Description $desktopGroupPublishedName -PublishedName $desktopGroupPublishedName  -MinimumFunctionalLevel $functionalLevel -ColorDepth $colorDepth -SessionSupport $sessionSupport -ShutdownDesktopsAfterUse $True -TimeZone $timeZone -InMaintenanceMode $False -IsRemotePC $False -OffPeakBufferSizePercent $offPeakBuffer -PeakBufferSizePercent $peakBuffer -SecureIcaRequired $False -TurnOnAddedMachine $False -OffPeakDisconnectAction Suspend -OffPeakDisconnectTimeout 15 -Scope @() 
}

# At this point, we have a Desktop Group, but no users or desktops assigned to it, no power management etc.
# Open the properties of the new Desktop Group to see what's missing.

# If creation of the desktop group was successful, continue modifying its properties
If ($desktopGroup) {

    # Add a machine configuration to the new desktop group; This line adds an existing StoreFront server to the desktop group
    # Where does Input Object 1005 come from?
    # http://support.citrix.com/proddocs/topic/citrix-broker-admin-v2-xd75/add-brokermachineconfiguration-xd75.html
    # Write-Verbose "Adding machine configuration to the Desktop Group: $desktopGroupName"
    # Add-BrokerMachineConfiguration -AdminAddress $adminAddress -DesktopGroup $desktopGroup -InputObject @(1005)

    # Add machines to the new desktop group. Uses the number of machines available in the target machine catalog
    # http://support.citrix.com/proddocs/topic/citrix-broker-admin-v2-xd75/add-brokermachinestodesktopgroup-xd75.html
    Write-Verbose "Getting details for the Machine Catalog: $machineCatalogName"
    $machineCatalog = Get-BrokerCatalog -AdminAddress $adminAddress -Name $machineCatalogName
    Write-Verbose "Adding $machineCatalog.UnassignedCount machines to the Desktop Group: $desktopGroupName"
    $machinesCount = Add-BrokerMachinesToDesktopGroup -AdminAddress $adminAddress -Catalog $machineCatalog -Count $machineCatalog.UnassignedCount -DesktopGroup $desktopGroup

    # Create a new broker user/group object if it doesn't already exist
    # http://support.citrix.com/proddocs/topic/citrix-broker-admin-v2-xd75/new-brokeruser-xd75.html
    Write-Verbose "Creating user/group object in the broker for $assignedGroup"
    If (!(Get-BrokerUser -AdminAddress $adminAddress -Name $assignedGroup -ErrorAction SilentlyContinue)) {
        $brokerUsers = New-BrokerUser -AdminAddress $adminAddress -Name $assignedGroup
    } Else {
        $brokerUsers = Get-BrokerUser -AdminAddress $adminAddress -Name $assignedGroup
    }

    # Create an entitlement policy for the new desktop group. Assigned users to the desktop group
    # First check that we have an entitlement name available. Increment until we do.
    $Num = 1
    Do {
        # http://support.citrix.com/proddocs/topic/citrix-broker-admin-v2-xd75/test-brokerentitlementpolicyrulenameavailable-xd75.html
        $Test = Test-BrokerEntitlementPolicyRuleNameAvailable -AdminAddress $adminAddress -Name @($desktopGroupName + "_" + $Num.ToString()) -ErrorAction SilentlyContinue
        If ($Test.Available -eq $False) { $Num = $Num + 1 }
    } While ($Test.Available -eq $False)
    #http://support.citrix.com/proddocs/topic/citrix-broker-admin-v2-xd75/new-brokerentitlementpolicyrule-xd75.html
    Write-Verbose "Assigning $brokerUsers.Name to Desktop Catalog: $machineCatalogName"
    $EntPolicyRule = New-BrokerEntitlementPolicyRule -AdminAddress $adminAddress  -Name ($desktopGroupName + "_" + $Num.ToString()) -IncludedUsers $brokerUsers -DesktopGroupUid $desktopGroup.Uid -Enabled $True -IncludedUserFilterEnabled $False

    # Check whether access rules exist and then create rules for direct access and via Access Gateway
    # http://support.citrix.com/proddocs/topic/citrix-broker-admin-v2-xd75/new-brokeraccesspolicyrule-xd75.html
    $accessPolicyRule = $desktopGroupName + "_Direct"
    If (Test-BrokerAccessPolicyRuleNameAvailable -AdminAddress $adminAddress -Name @($accessPolicyRule) -ErrorAction SilentlyContinue) {
        Write-Verbose "Allowing direct access rule to the Desktop Catalog: $machineCatalogName"
        New-BrokerAccessPolicyRule -AdminAddress $adminAddress -Name $accessPolicyRule  -IncludedUsers @($brokerUsers.Name) -AllowedConnections 'NotViaAG' -AllowedProtocols @('HDX','RDP') -AllowRestart $True -DesktopGroupUid $desktopGroup.Uid -Enabled $True -IncludedSmartAccessFilterEnabled $True -IncludedUserFilterEnabled $True
    } Else {
        Write-Error "Failed to add direct access rule $accessPolicyRule. It already exists."
    }
    $accessPolicyRule = $desktopGroupName + "_AG"
    If (Test-BrokerAccessPolicyRuleNameAvailable -AdminAddress $adminAddress -Name @($accessPolicyRule) -ErrorAction SilentlyContinue) {
        Write-Verbose "Allowing access via Access Gateway rule to the Desktop Catalog: $machineCatalogName"
        New-BrokerAccessPolicyRule -AdminAddress $adminAddress -Name $accessPolicyRule -IncludedUsers @($brokerUsers.Name) -AllowedConnections 'ViaAG' -AllowedProtocols @('HDX','RDP') -AllowRestart $True -DesktopGroupUid $desktopGroup.Uid -Enabled $True -IncludedSmartAccessFilterEnabled $True -IncludedSmartAccessTags @() -IncludedUserFilterEnabled $True
    } Else {
        Write-Error "Failed to add Access Gateway rule $accessPolicyRule. It already exists."
    }

    # Create weekday and weekend access rules
    # http://support.citrix.com/proddocs/topic/citrix-broker-admin-v2-xd75/new-brokerpowertimescheme-xd75.html
    $powerTimeScheme = "Windows 8 Pooled Desktop_Weekdays"
    If (Test-BrokerPowerTimeSchemeNameAvailable -AdminAddress $adminAddress -Name @($powerTimeScheme) -ErrorAction SilentlyContinue) {
        Write-Verbose "Adding new power scheme $powerTimeScheme"
        New-BrokerPowerTimeScheme -AdminAddress $adminAddress -DisplayName 'Weekdays' -Name $powerTimeScheme -DaysOfWeek 'Weekdays' -DesktopGroupUid $desktopGroup.Uid -PeakHours @($False,$False,$False,$False,$False,$False,$False,$True,$True,$True,$True,$True,$True,$True,$True,$True,$True,$True,$True,$False,$False,$False,$False,$False) -PoolSize @(0,0,0,0,0,0,0,1,1,1,1,1,1,1,1,1,1,1,1,0,0,0,0,0)
    } Else {
        Write-Error "Failed to add power scheme rule $powerTimeScheme. It already exists."
    }
    $powerTimeScheme = "Windows 8 Pooled Desktop_Weekend"
    If (Test-BrokerPowerTimeSchemeNameAvailable -AdminAddress $adminAddress -Name @($powerTimeScheme) -ErrorAction SilentlyContinue) {
        Write-Verbose "Adding new power scheme $powerTimeScheme"
        New-BrokerPowerTimeScheme -AdminAddress $adminAddress -DisplayName 'Weekend' -Name $powerTimeScheme -DaysOfWeek 'Weekend' -DesktopGroupUid $desktopGroup.Uid -PeakHours @($False,$False,$False,$False,$False,$False,$False,$True,$True,$True,$True,$True,$True,$True,$True,$True,$True,$True,$True,$False,$False,$False,$False,$False) -PoolSize @(0,0,0,0,0,0,0,0,0,0,0,0,0,0,0,0,0,0,0,0,0,0,0,0)
    } Else {
        Write-Error "Failed to add power scheme rule $powerTimeScheme. It already exists."
    }

} #End If DesktopGroup

Comments or feedback on bugs, better ways to do things or additional steps is welcome.

Pagination