Virtualising Apple Safari 5

Safari 5.x with Microsoft Application Virtualization; however the same basic steps should apply to any application virtualisation product.
Virtualising Apple Safari is a two step process:
- Extract the setup files from the download so that we can perform a custom installation of Safari
- Capture the Safari 5 package and customise it for execution
Prerequisites
Other than Windows XP Service Pack 2 or above, there are no specific prerequisites for installing Safari.
Creating a custom installation of Safari
The default installation of Safari will install Apple Software Update so it’s important to prevent this from installing during sequencing so that the package is not automatically updated once deployed. Bonjour is also installed; however this is optional.
There are a few ways to extract the Safari installer, but I find this process is simplest - Download the Safari installer and execute it, but do not step through the installation. The setup files will be extracted to your Temp folder (%TEMP%), so grab a copy from there. The following files will be extracted:
- AppleApplicationSupport.msi
- AppleSoftwareUpdate.msi
- Bonjour.msi
- Bonjour64.msi
- Safari.msi
- SetupAdmin.exe
We don’t need AppleSoftwareUpdate.msi because automatic updates for this package will be disabled and we also don’t need SetupAdmin.exe. Using the remaining files, we can script an installation of Safari and its’ dependant components. The following script listing will automate the installation of Safari for sequencing with App-V:
@ECHO OFF
START /WAIT MSIEXEC /I AppleApplicationSupport.msi ALLUSERS=TRUE REBOOT=SUPPRESS /QB
IF "%PROCESSOR_ARCHITECTURE%"=="x86" START /WAIT MSIEXEC /I Bonjour.msi ALLUSERS=TRUE REBOOT=SUPPRESS /QB
IF "%PROCESSOR_ARCHITECTURE%"=="AMD64" START /WAIT MSIEXEC /I Bonjour64.msi ALLUSERS=TRUE REBOOT=SUPPRESS /QB
START /WAIT Safari.MSI SCHEDULE\_ASUW=0 DESKTOP\_SHORTCUTS=0 INSTALLDIR=Q:\SAFARI5x.000\Safari ALLUSERS=TRUE REBOOT=SUPPRESS /QB
Virtualising (or Sequencing) Safari
Capturing the Safari package is very simple - no exclusions were added and the following steps should produce a successful package:
Start monitoring and install Safari using the sample script listed above
Before stopping the monitoring process, run Safari at least once
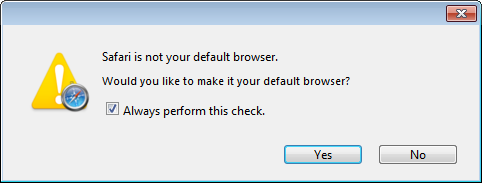
Safari will prompt you to make it the default browser, be sure answer Yes to this dialog box so that the registry keys that are set are captured by the Sequencer. This will ensure that those keys are not written to the real registry if the user attempts to set Safari as the default browser at execution time. If they were to do this, then Windows would be unable to launch the default browser (as it is now inside the bubble).
Configure options as you need them, such as displaying the status bar, changing tab options etc
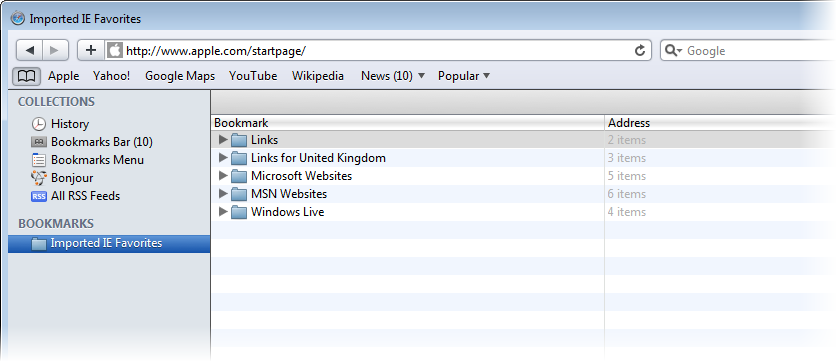
Finally, delete the imported Internet Explorer Favourites (unless you specifically want to keep them):
- Stop monitoring and move onto the detected applications. Two shortcuts will be listed Safari and About Bonjour. Remove About Bonjour, move onto creating FB1 and save the package.
Conclusion
Safari 5 will virtualise quite easily and you could combine it with QuickTime, as well as other plug-ins, into a single package. During testing, I should note that it loaded the installed version of Flash without having to bundle it into the same package.