Validate UAT Images with Azure Pipelines and Pester

Automated validation of VDI images for user acceptance testing with Azure Pipelines and self-hosted agents running Pester to perform automated tests with Evergreen.
As with any desktop environment, virtual desktops undergo regular change - monthly OS and application updates, new applications, and configurations all add to the variation. Change must be managed and should be well tested to ensure business services are not impacted with a new or updated image.
Pooled virtual desktops that are deployed from a gold image are useful for managing change at scale - the user environment is separate from the desktop and users can connect to any available desktop in a pool, so all virtual machines must run the same image.
The gold image build and change process can be automated on any platform and version of Windows, but automation can be a time consuming process. Investing in an image automation process will save your bacon when it counts.
A management and validation process is required to manage an image and this process will look similar to this:
BUILD > VALIDATE > USER ACCEPTANCE TESTING > DEPLOY
When a gold image is updated and deployed, most organisations will rely on manual user acceptance testing before promoting that image into production. Adding automated testing in the VALIDATE phase ensures you can capture things users won’t, or speed the mundane task of manually validating your images.
There are several commercial solutions that can automate application testing (for example, Rimo3), but you may want to augment these with additional valiatdation tests. For example, testing that your image includes the intended applications, application versions, files, registry settings or service status.
Pester + Azure Pipelines
With Pester and Azure Pipelines, we can create an image test framework that runs on a target virtual machine and generates reports to track the results. This approach uses a standard and well supported test framework, along with Azure Pipelines which is available in most enterprises (although, you could replace Azure Pipelines with just about any CI/CD service).
Here’s a look at what we’re going to build:

Azure Pipelines result with 100% of tests passed.
Building this solution will involve a few components:
- PowerShell and Pester, the testing framework in which we can write our tests
- Evergreen to provide application version numbers - regardless of how you install applications, Evergreen enables you to query an image to determine whether it’s running the latest version of an application
- JSON to define our tests so that we don’t have to hard code all tests in Pester
- Azure DevOps to store the tests and code
- Azure Pipelines and self-hosted agents to run tests against our UAT images
Note that in this example, I’m using Azure Virtual Desktop and Nerdio Manager to create images and run session hosts; however, this approach will work with any VDI solution including those deployed on-premises or in a public cloud platform.
Testing with Pester
Single Application Test
Pester can be used to perform an application configuration test. Here’s a simple example of using Pester to ensure that the default home page for Microsoft Edge has been set in the image.
Describe "Microsoft Edge" {
    Context "Application preferences" {
        It "Should have written the correct content to master_preferences" {
            (Get-Content -Path "${Env:ProgramFiles(x86)}\Microsoft\Edge\Application\master_preferences" | ConvertFrom-Json).homepage | Should -BeExactly "https://www.microsoft365.com"
        }
    }
}
This will generate a pass / fail result allowing us to determine whether the image has the correct configuration for Edge. If it fails, we know our image isn’t ready for UAT and can’t be pushed into production.
Additional tests can be written just like this example. Storing application tests in one Pester file per application can be a way to ensure those tests are highly portable between image configurations.
Multiple Application Tests
Our tests will be more scalable if a single script can take input that defines tests for multiple applications. We can scale out our test results for each application without having to write additional code.
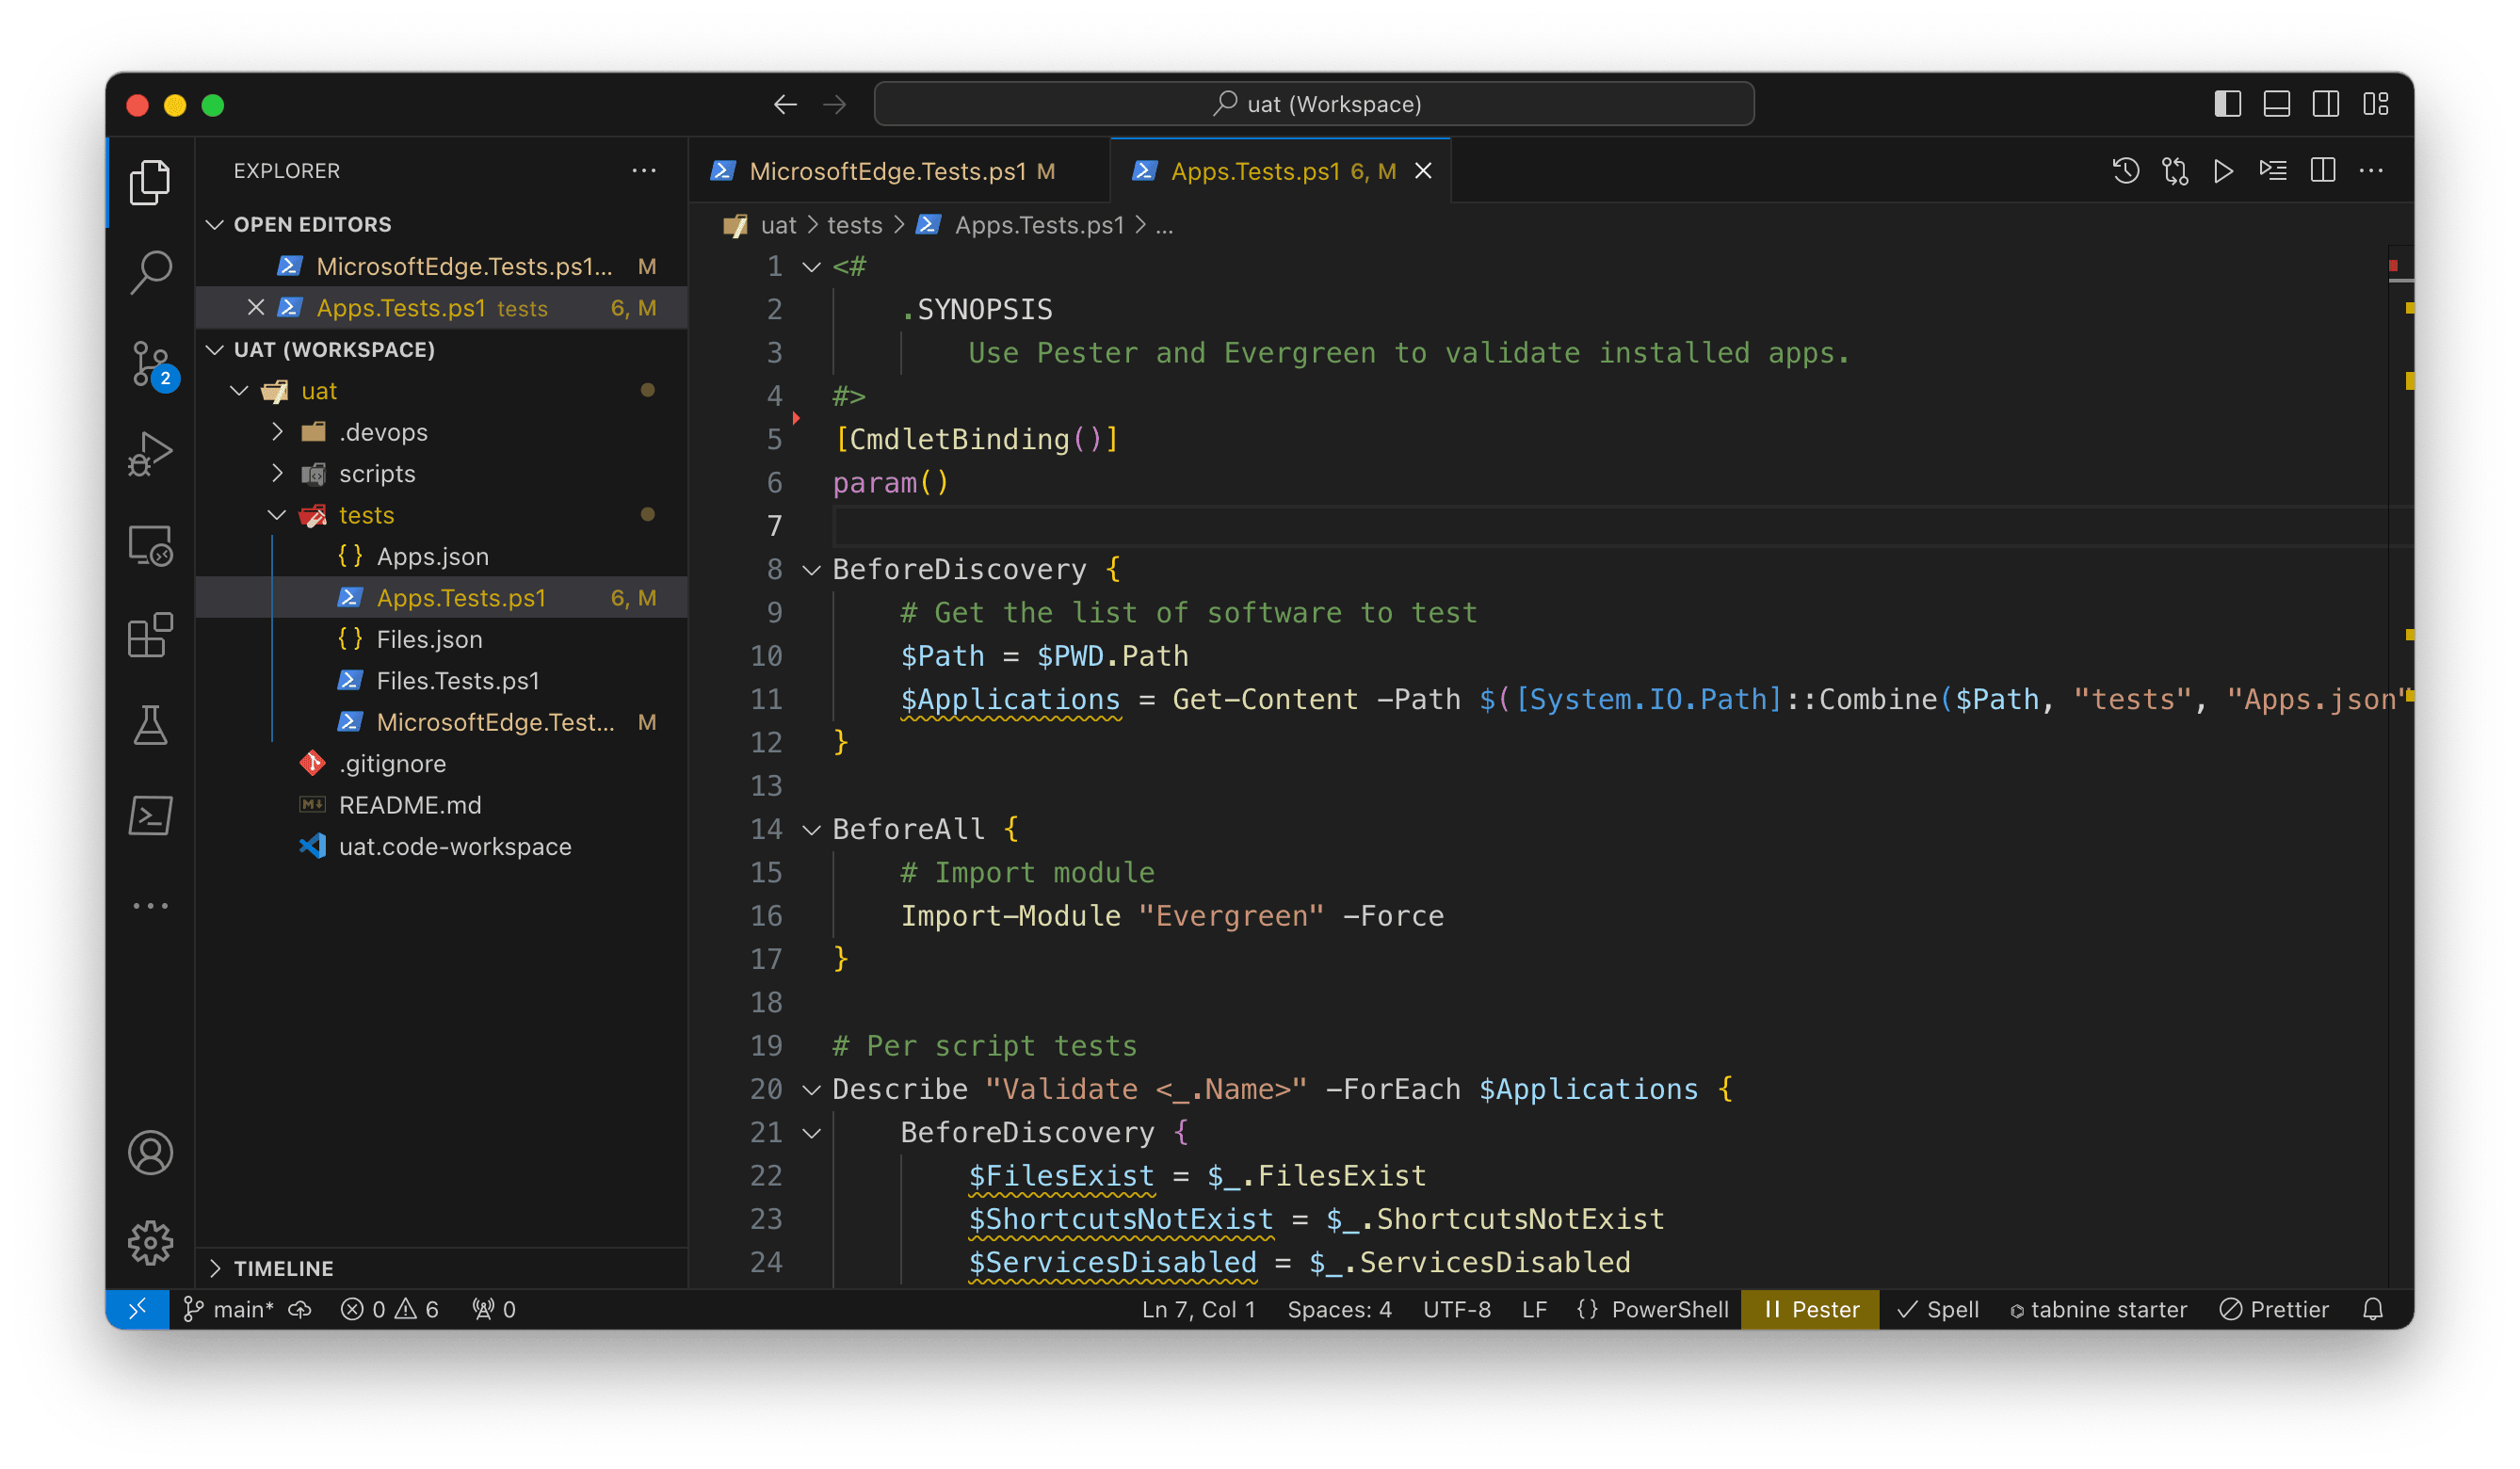
Pester file to run tests against a set of applications.
For example, here’s a Pester block that takes input to test various properties of an application:
Context "Application configuration tests" {
    It "Should be the current version or better" {
        [System.Version]$Installed.Version | Should -BeGreaterOrEqual ([System.Version]$Latest.Version)
    }

    It "Should have application file installed: <_>" -ForEach $FilesExist {
        $_ | Should -Exist
    }

    It "Should have shortcut deleted or removed: <_>" -ForEach $ShortcutsNotExist {
        $_ | Should -Not -Exist
    }

    It "Should have the service disabled: <_>" -ForEach $ServicesDisabled {
        (Get-Service -Name $_).StartType | Should -Be "Disabled"
    }
}
This block does a few things:
- Compares the installed version of the application against the latest version returned by Evergreen
- Tests that an array of files exists (i.e. key files exist in the expected locations)
- Tests that an array of shortcuts do not exist (to test that an install script has removed shortcuts)
- Tests that an array of services has been disabled (some applications include services that are recommended to be disabled in VDI images)
Input File
The Pester script takes input via a JSON file that describes the tests for applications in our image. The script and the input file could be extended to test practically anything in the image. The example input file below lists tests for 3 applications to determine that the application is installed, is current, has files in the expected directories, and services in a disabled state:
[
    {
        "Name": "MicrosoftFSLogixApps",
        "Filter": "Get-EvergreenApp -Name \"MicrosoftFSLogixApps\" | Where-Object { $_.Channel -eq \"Production\" } | Select-Object -First 1",
        "Installed": "Microsoft FSLogix Apps",
        "FilesExist": [
            "C:\\Program Files\\FSLogix\\Apps\\frx.exe",
            "C:\\Program Files\\FSLogix\\Apps\\ConfigurationTool.exe",
            "C:\\Program Files\\FSLogix\\Apps\\frxcontext.exe",
            "C:\\Program Files\\FSLogix\\Apps\\frxshell.exe"
        ],
        "ShortcutsNotExist": [
            "C:\\ProgramData\\Microsoft\\Windows\\Start Menu\\FSLogix\\FSLogix Apps Online Help.lnk"
        ],
        "ServicesDisabled": []
    },
    {
        "Name": "MicrosoftEdge",
        "Filter": "Get-EvergreenApp -Name \"MicrosoftEdge\" | Where-Object { $_.Architecture -eq \"x64\" -and $_.Channel -eq \"Stable\" -and $_.Release -eq \"Enterprise\" } | Sort-Object -Property \"Version\" -Descending | Select-Object -First 1",
        "Installed": "(^Microsoft Edge$)",
        "FilesExist": [
            "C:\\Program Files (x86)\\Microsoft\\Edge\\Application\\master_preferences"
        ],
        "ShortcutsNotExist": [
            "C:\\Users\\Public\\Desktop\\Microsoft Edge*.lnk"
        ],
        "ServicesDisabled": []
    },
    {
        "Name": "AdobeAcrobatReaderDC",
        "Filter": "Get-EvergreenApp -Name \"AdobeAcrobatReaderDC\" | Where-Object { $_.Language -eq \"MUI\" -and $_.Architecture -eq \"x64\" } | Select-Object -First 1",
        "Installed": "Adobe Acrobat.*64-bit",
        "FilesExist": [
            "C:\\Program Files\\Adobe\\Acrobat DC\\Acrobat\\Acrobat.exe",
            "C:\\Program Files\\Adobe\\Acrobat DC\\Acrobat\\AdobeCollabSync.exe"
        ],
        "ShortcutsNotExist": [],
        "ServicesDisabled": [
            "AdobeARMservice"
        ]
    }
]
Azure Pipelines
Azure Pipelines will run the tests against our target image via the Pipelines agent. To run our tests, we need two things - a pipeline, and an agent pool with self-hosted agents.
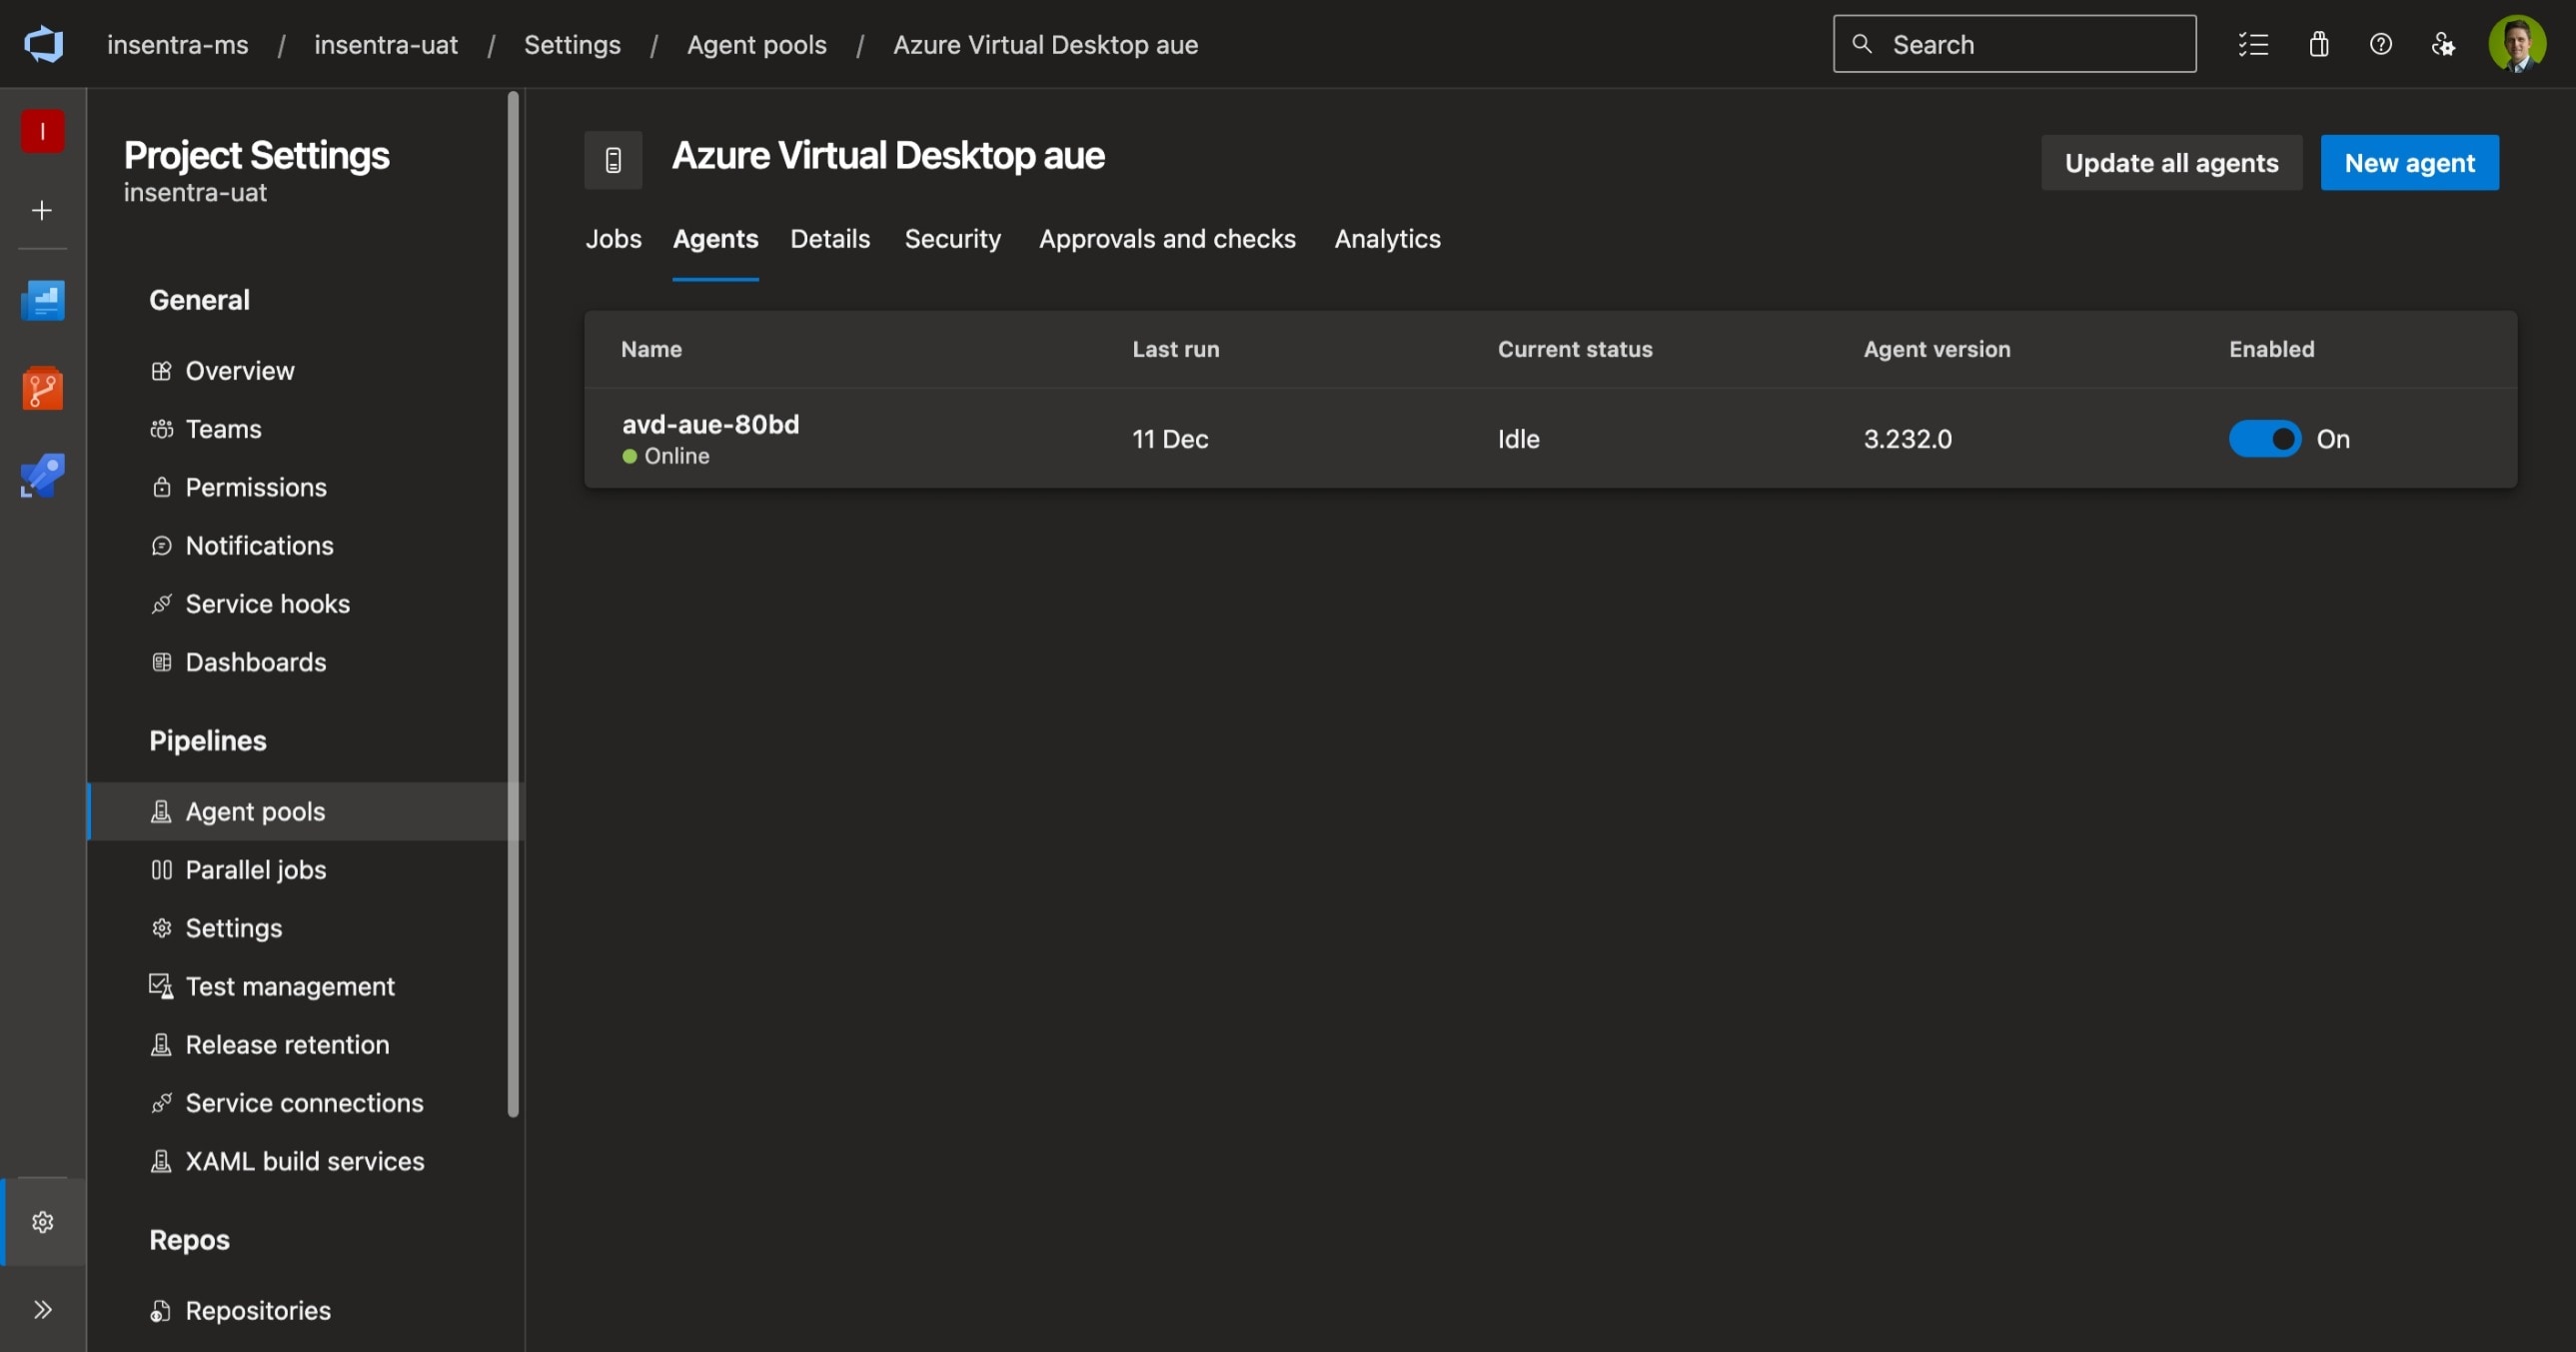
An Azure Virtual Desktop session host as a self-hosted agent for Azure Pipelines.
Agent Pool
I won’t cover creating an agent pool in detail here, instead refer to the documentation - Create and manage agent pools. The agent pool name is important though as it needs to be referred to in the pipeline file and the agent install script.
Pipeline
The pipeline configuration defines how the pipeline will run and post results back to DevOps for reporting. Below is a code listing of the pipeline file which does the following:
- Install Pester - note that Evergreen is also required, so you will need to add that to the list of installed modules, if Evergreen is not already installed into the image
- Run the tests stored in the
testsdirectory - Post the test results back to DevOps for reporting - this is displayed as the pass / fail status
- Gather a list of the installed applications and post that back to DevOps as well. This information will enable you to track application versions across images
pool: 'Azure Virtual Desktop aue'

steps:
- powershell: |
    $params = @{
      Name               = "Pester"
      SkipPublisherCheck = $true
      Force              = $true
      ErrorAction        = "Stop"
    }
    Install-Module @params
  name: pester
  displayName: 'Install Pester'
  workingDirectory: $(build.sourcesDirectory)
  errorActionPreference: continue
  continueOnError: false

- powershell: |
    Import-Module -Name "Pester" -Force -ErrorAction "Stop"
    $Config = New-PesterConfiguration
    $Config.Run.Path = "$(build.sourcesDirectory)\tests"
    $Config.Run.PassThru = $true
    $Config.TestResult.Enabled = $true
    $Config.TestResult.OutputFormat = "NUnitXml"
    $Config.TestResult.OutputPath = "$(build.sourcesDirectory)\TestResults.xml"
    $Config.Output.Verbosity = "Detailed"
    Invoke-Pester -Configuration $Config
  name: test
  displayName: 'Validate installed apps'
  workingDirectory: $(build.sourcesDirectory)
  errorActionPreference: continue
  continueOnError: true

- publish: "$(build.sourcesDirectory)\\InstalledApplications.csv"
  artifact: InstalledApplications
  continueOnError: true

- publish: "$(build.sourcesDirectory)\\TestResults.xml"
  artifact: TestResults
  continueOnError: true

- task: PublishTestResults@2
  inputs:
    testResultsFormat: "NUnit"
    testResultsFiles: "$(build.sourcesDirectory)\\TestResults.xml"
    failTaskOnFailedTests: true
    testRunTitle: "Publish Pester results"
Installing the Azure Pipelines agent
The Azure Pipelines agent is required to add a virtual machine as a self-hosted agent. The Azure Pipelines agent should not be built into your gold image - it should be installed into a target session host after it’s been deployed.
In my Azure Virtual Desktop environment, Nerdio Manager is used to create images, deploy session hosts, and manage scaling. Nerdio Manager Scripted Actions can be run when a session host is created. This enables us to install the Azure Pipelines agent on session hosts in a UAT host pool when the session host is created.
Nerdio Manager also makes it simple to pass secure strings into the agent install script at runtime. The install script uses Evergreen to find the latest version of the Azure Pipelines agent, download, unpack and install the agent, including creating a local user account required by the agent and setting Azure DevOps settings.
The install script requires the following variables to be set in Scripted Actions Global Secure Variables
DevOpsUrl- the URL to our DevOps organisationDevOpsPat- the Personal Access Token used to authenticate to Azure DevOpsDevOpsPool- the agent pool that the self-hosted agent will register withDevOpsUser- the local user account name the install script will create. This account will be added to the local administrators group on the target session host; therefore, I recommend you do not deploy this to production workloadsDevOpsPassword- the password for the local user account
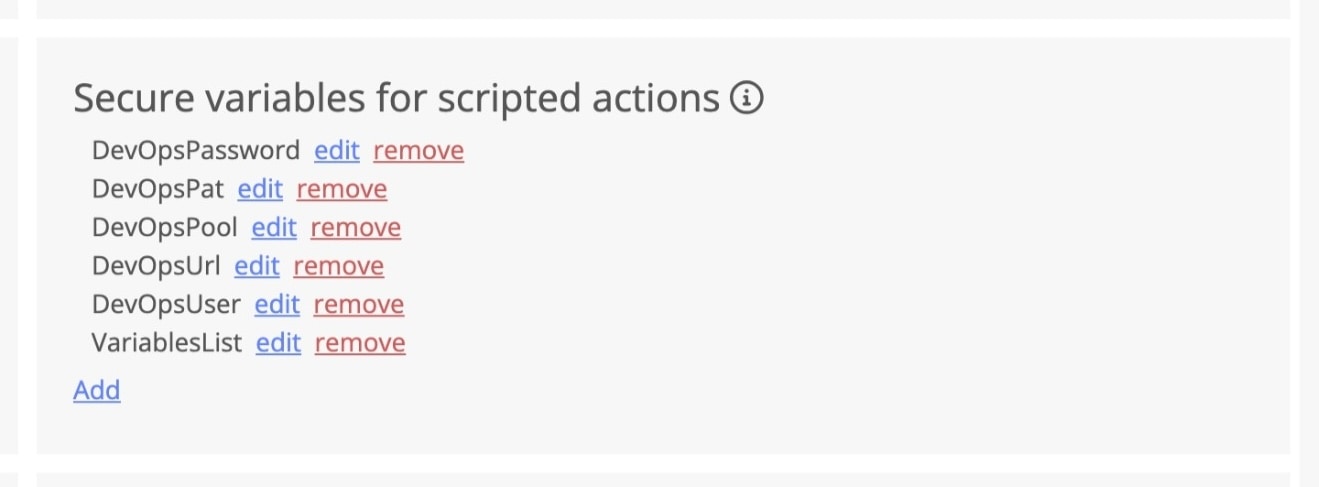
Nerdio Manager Secure Variables for the Azure Pipelines agent.
The block below lists the code for the installing the Azure Pipelines agent. This uses Evergreen to find the latest version and download into the session host:
#description: Installs the Microsoft Azure Pipelines agent to enable automated testing via Azure Pipelines. Do not run on production session hosts.
#execution mode: Combined
#tags: Evergreen, Testing, DevOps

# Check that the required variables have been set in Nerdio Manager
foreach ($Value in "DevOpsUrl", "DevOpsPat", "DevOpsPool", "DevOpsUser", "DevOpsPassword") {
    if ($null -eq $SecureVars.$Value) { throw "$Value is null" }
}

# Download and extract
[System.String] $Path = "$Env:SystemDrive\agents"
New-Item -Path $Path -ItemType "Directory" -Force -ErrorAction "SilentlyContinue" | Out-Null
Import-Module -Name "Evergreen" -Force
$App = Get-EvergreenApp -Name "MicrosoftAzurePipelinesAgent" | Where-Object { $_.Architecture -eq "x64" } | Select-Object -First 1
$OutFile = Save-EvergreenApp -InputObject $App -CustomPath $Env:Temp -WarningAction "SilentlyContinue"
Expand-Archive -Path $OutFile.FullName -DestinationPath $Path -Force
Push-Location -Path $Path

# Create the local account that the DevOps Pipelines agent service will run under
$params = @{
    Name                     = $SecureVars.DevOpsUser
    Password                 = (ConvertTo-SecureString -String $SecureVars.DevOpsPassword -AsPlainText -Force)
    Description              = "Azure Pipelines agent service for elevated exec."
    UserMayNotChangePassword = $true
    Confirm                  = $false
}
New-LocalUser @params
Add-LocalGroupMember -Group "Administrators" -Member $SecureVars.DevOpsUser

# Agent install options
$Options = "--unattended
        --url `"$($SecureVars.DevOpsUrl)`"
        --auth pat
        --token `"$($SecureVars.DevOpsPat)`"
        --pool `"$($SecureVars.DevOpsPool)`"
        --agent $Env:COMPUTERNAME
        --runAsService
        --windowsLogonAccount `"$($SecureVars.DevOpsUser)`"
        --windowsLogonPassword `"$($SecureVars.DevOpsPassword)`"
        --replace"
$params = @{
    FilePath     = "$Path\config.cmd"
    ArgumentList = $($Options -replace "\s+", " ")
    Wait         = $true
    NoNewWindow  = $true
    PassThru     = $true
}
Start-Process @params
This script should be imported into Nerdio Manager as a scripted action, and added to the VM Deployment settings on the host pool, so that the agent is installed when a session host is deployed.
Running the Pipeline
When you have a new version of a gold image, deploy the image to a UAT host pool, then manually run the Azure Pipeline to validate the image.
Right now, it’s a manual process to start the pipeline because we don’t have a self-hosted agent running until a new image has been deployed. With some additional configuration this could be automated so the pipeline kicks off when a new image is deployed. The pipeline could be run via an API call to Azure DevOps when an a new session host is deployed via some external orchestration host.

Manually starting the pipeline on a new image.
Results
A pipeline run only takes a few seconds and the results can be tracked across runs. Update your retention settings to retain reports for longer.
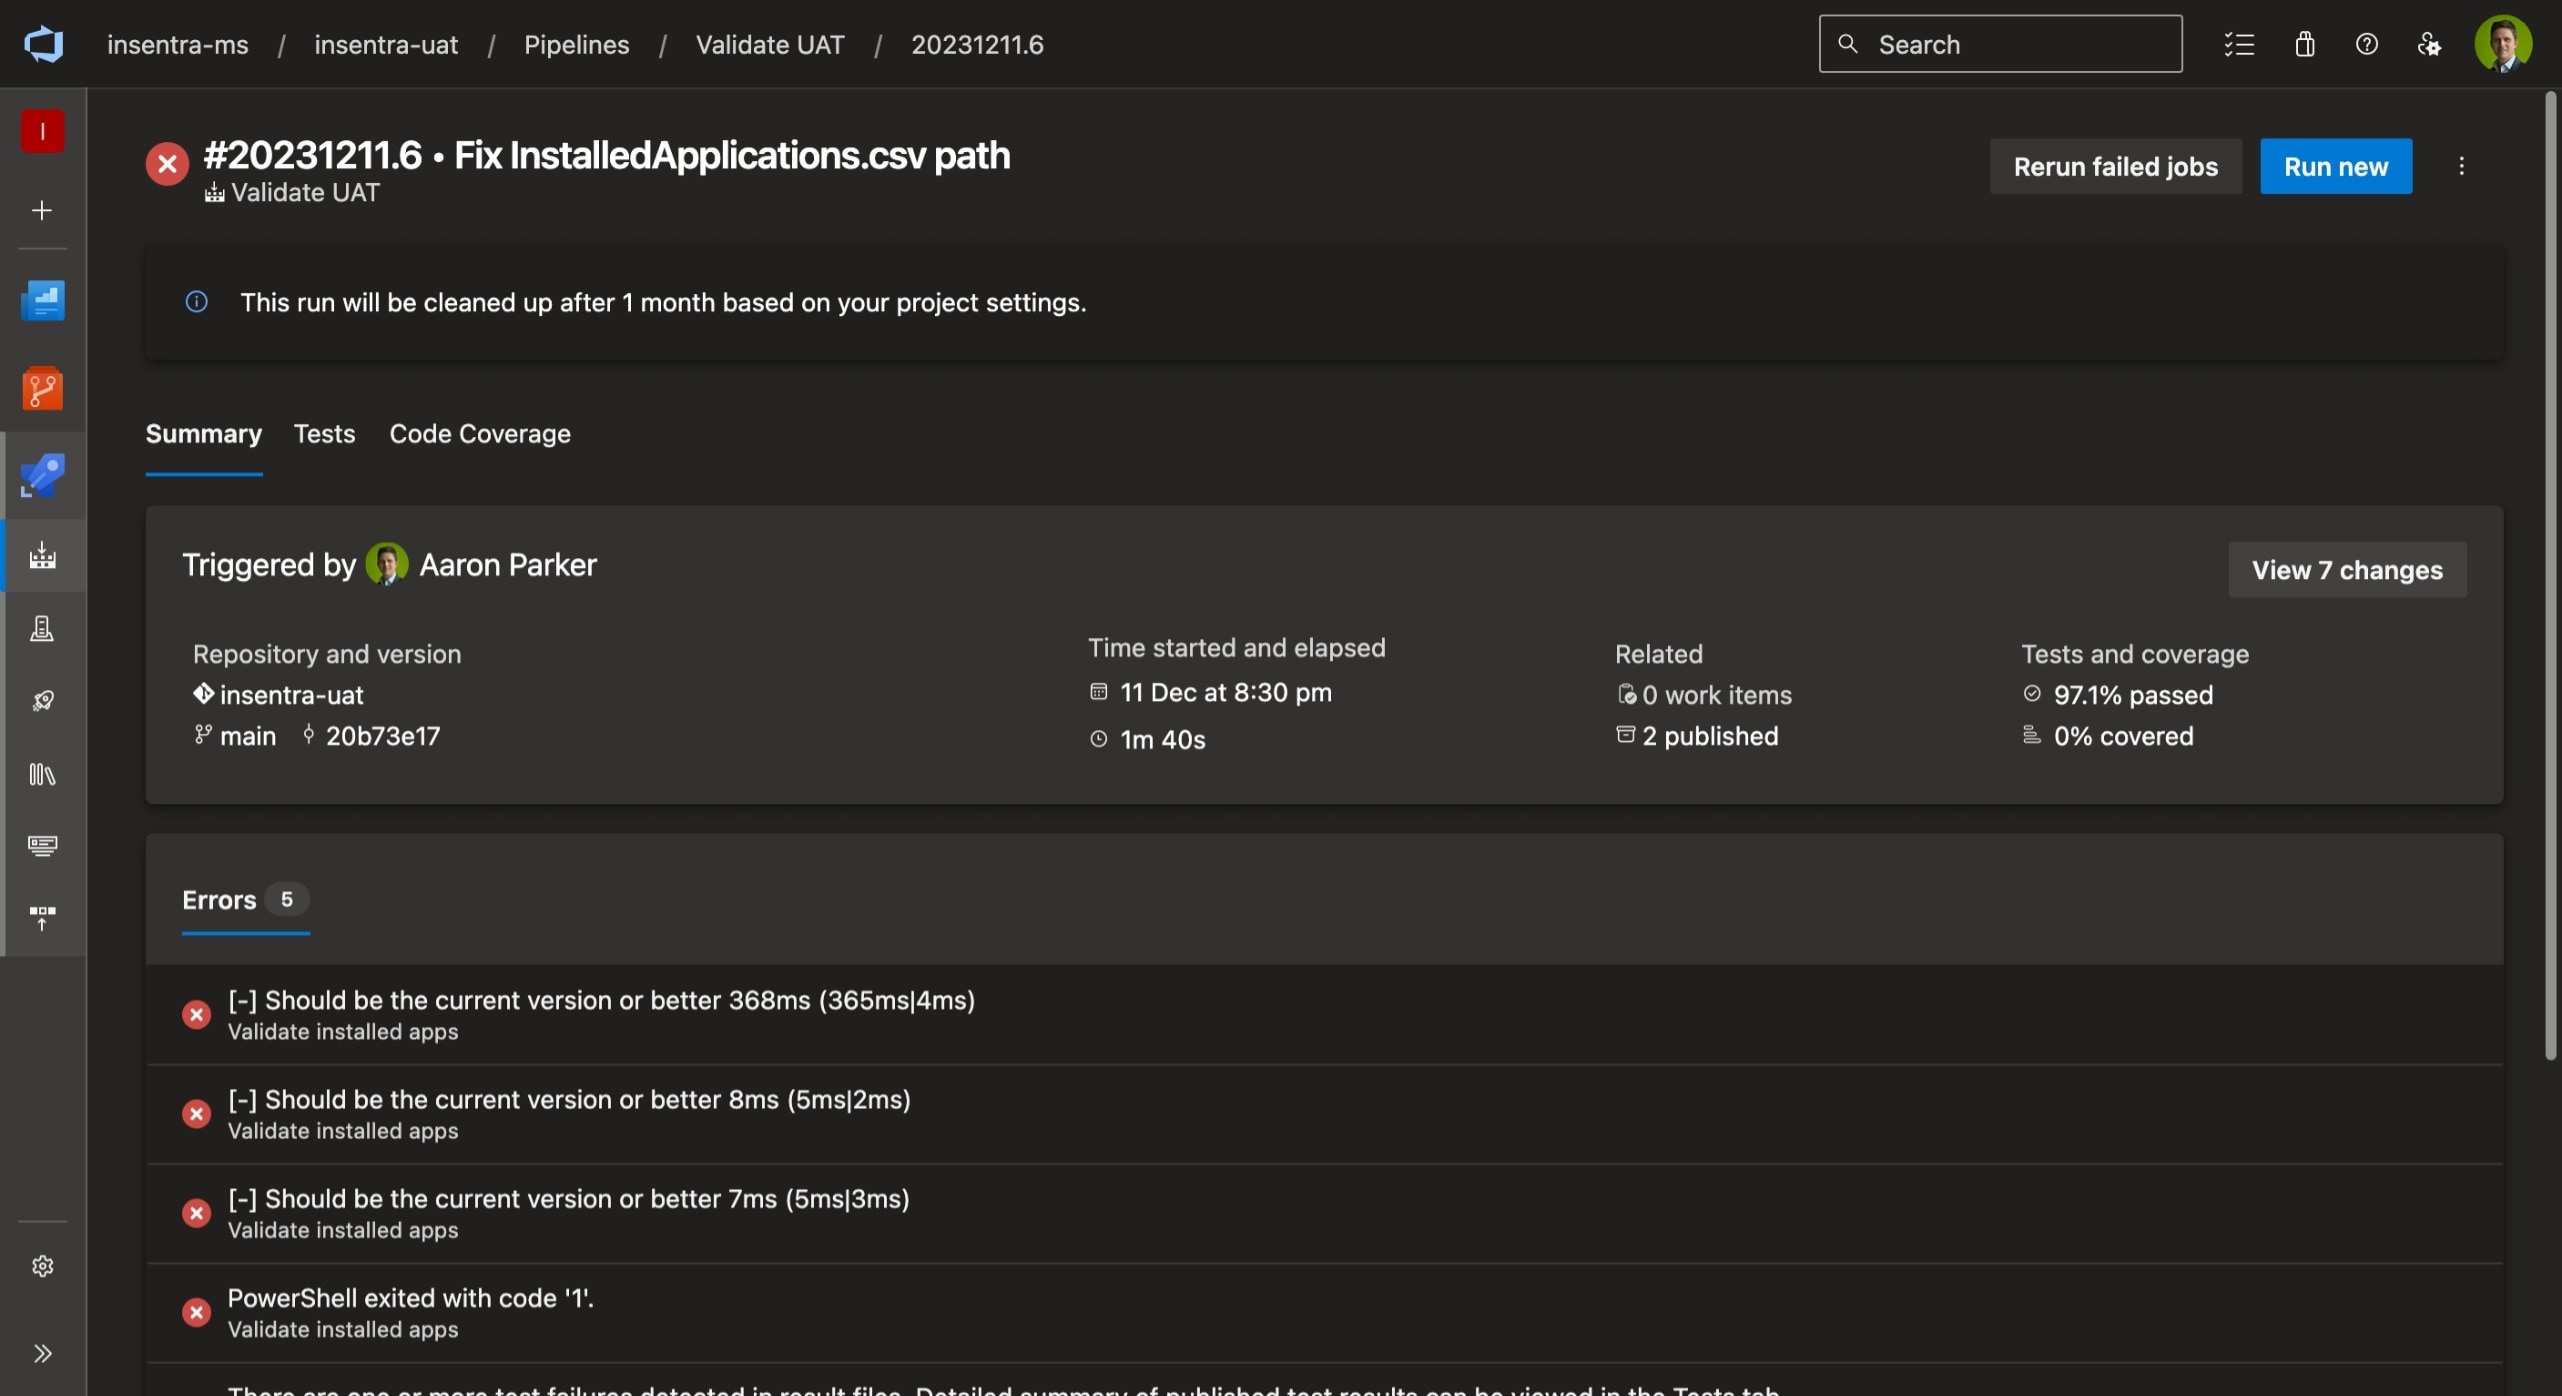
Azure Pipelines result showing passed and failed tests.
Artifacts are stored on the pipeline run - InstalledApplications.csv will help keep track of installed applications and versions.
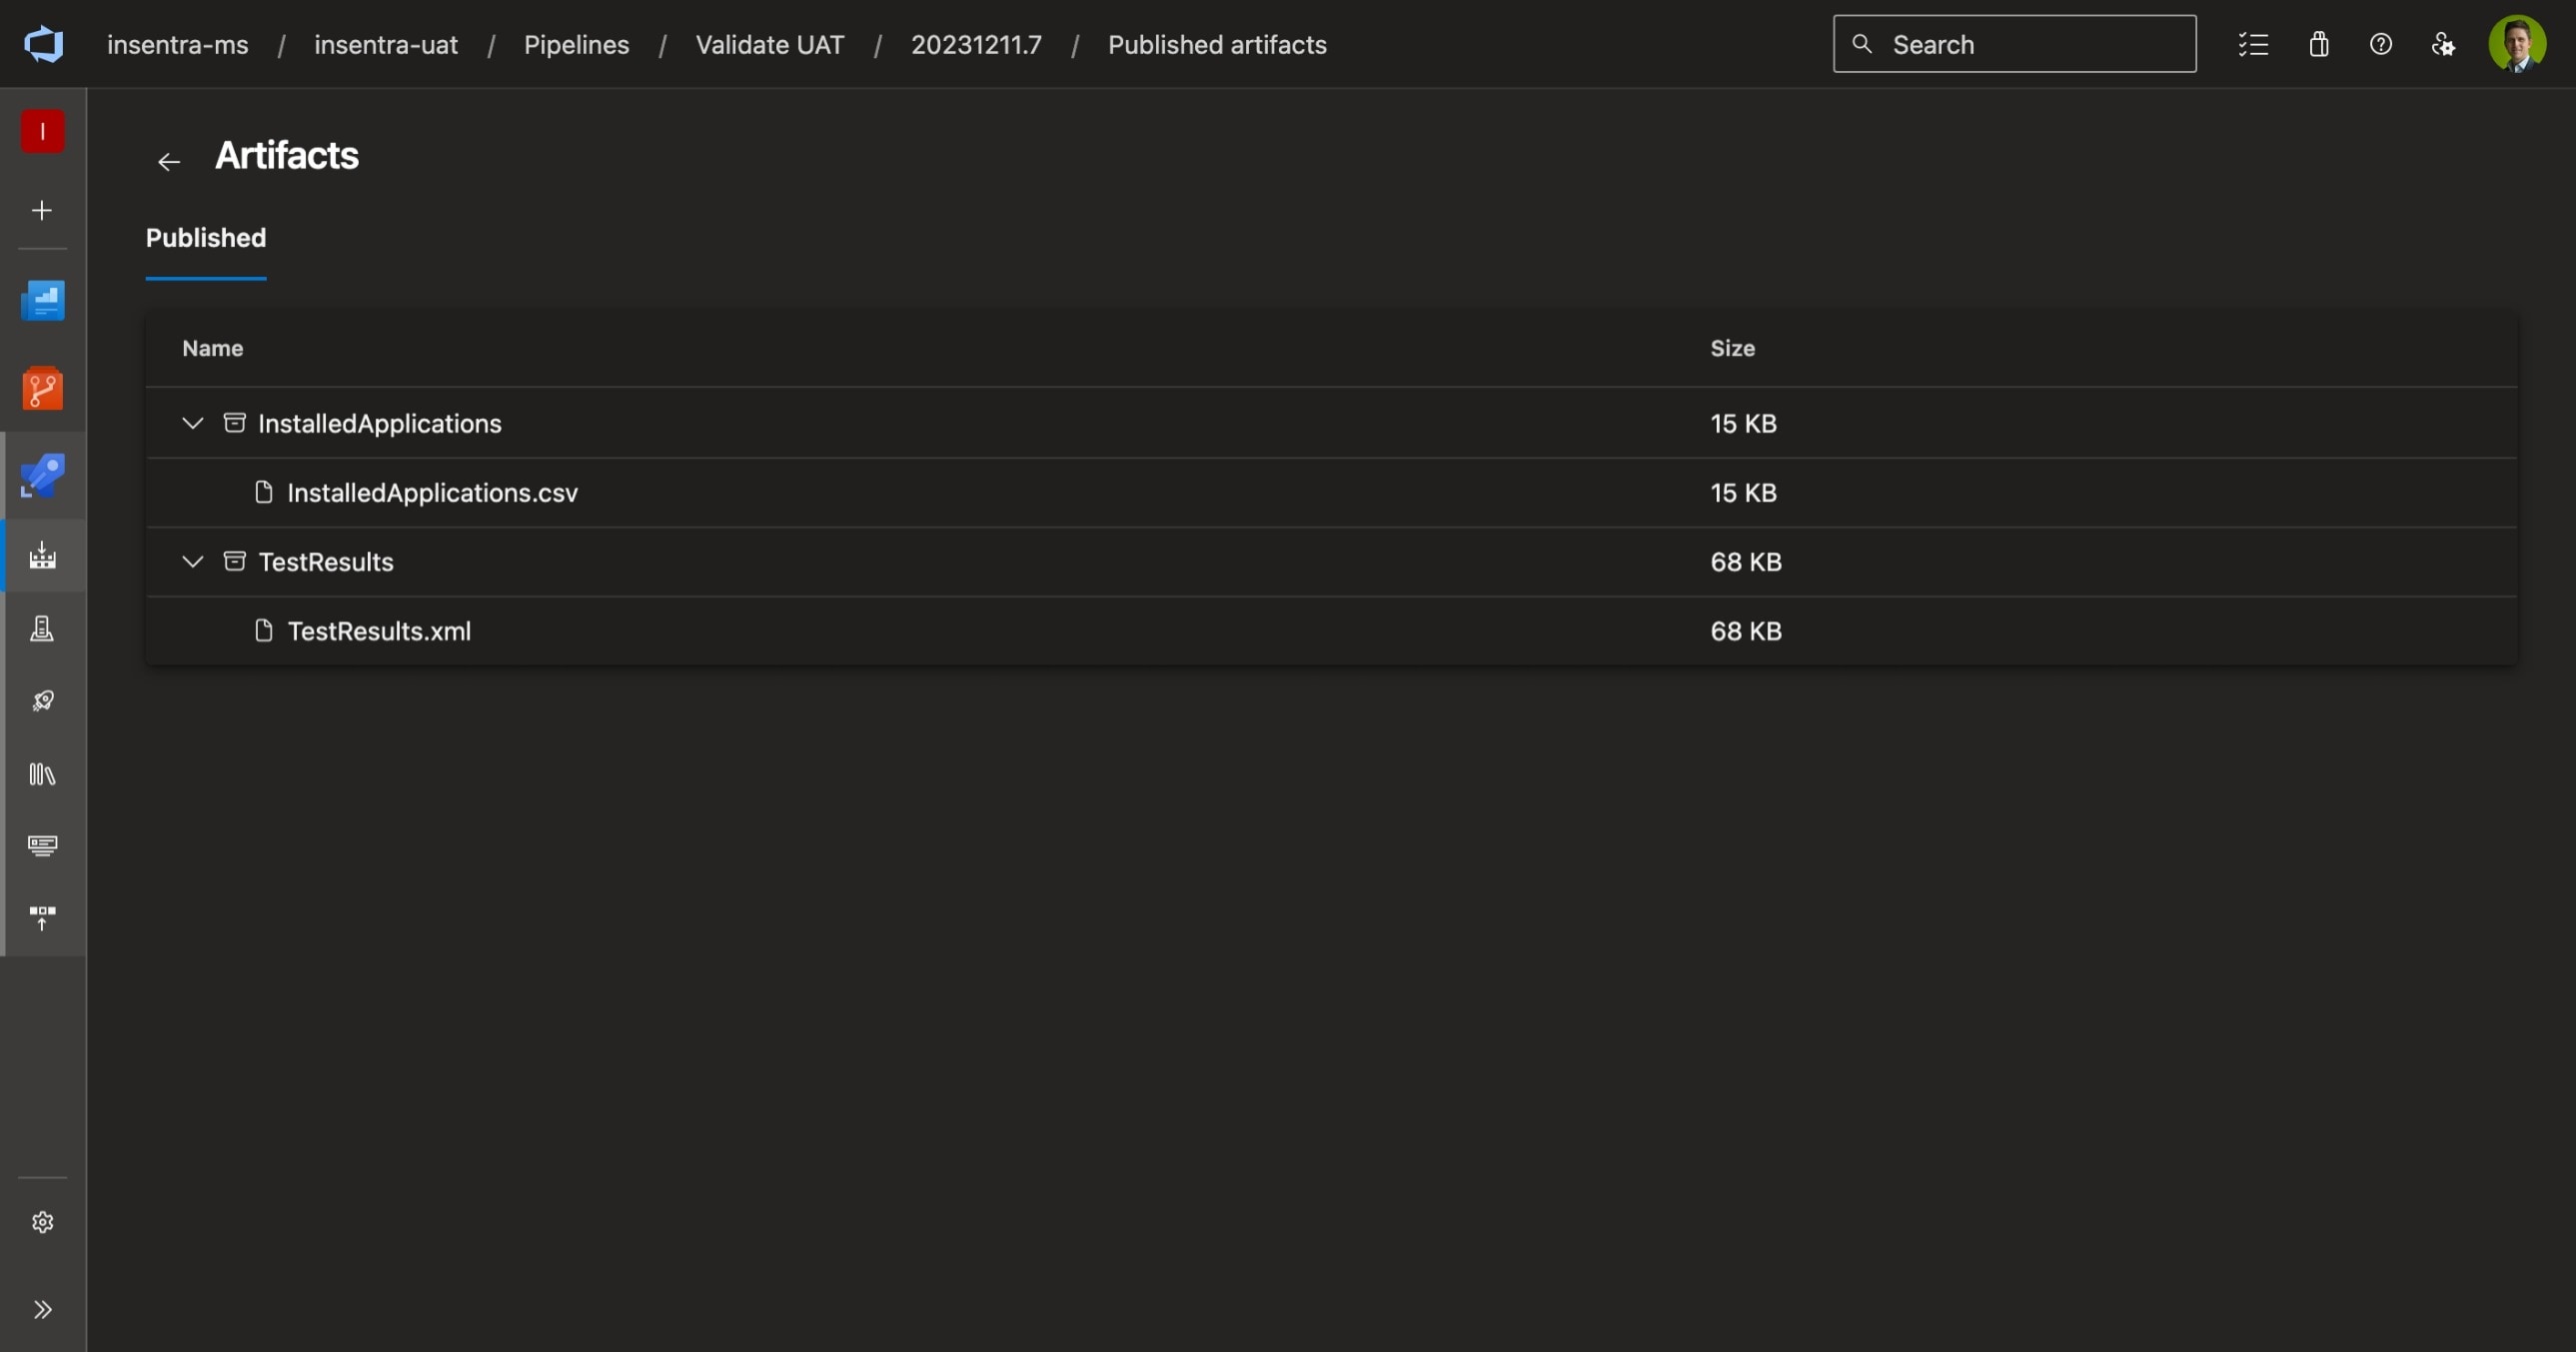
Artifacts stored on the pipeline.
Getting Started
In this article, I’ve assumed you have an understanding of PowerShell, Pester, and Azure DevOps / Pipelines. If any of the concepts aren’t clear, comment below, and I’ll might be able to expand on some details in future articles.
To get the most out of this approach, I highly recommended that you are also automating the build of new gold images. The framework outlined in this article could also be run at the end of an automated build; however, even if you are manually building images, this approach can assist in validation.
To get started with this test and validation solution, you can fork the code in my vdi-uat repository here: https://github.com/aaronparker/vdi-uat.