Sequencing Google Chrome 15
- What you lose by virtualizing Chrome
- Managing the Chrome profile – virtualize or not?
- Chrome features to disable
- Configuring Chrome Defaults
- Sequencing Platform
- Sequencer Configuration
- Sequencing Chrome
- Shortcuts
- First Run Tasks and Primary Feature Block
- Finally
Here’s how to successfully sequence Google Chrome 15; however the same approach should work for Chrome 13, 14 and 16 and maybe even some other versions.
What you lose by virtualizing Chrome
Virtualizing Chrome with App-V will isolate the application from the OS, so the following features will not be available once Chrome has been sequenced:
- Chrome Jump Lists in the Start Menu and Taskbar
- The ability set the browser as default
- The Chrome sandbox (maybe)
Note: Note that disabling the sandbox will reduce the browser security. This is not recommended and as such, I actually do not recommend virtualizing Chrome, if it is to be your regular browser.
Managing the Chrome profile – virtualize or not?
Chrome stores preferences, extensions and other user datain:
%LOCALAPPDATA%\Google\Chrome\User Data\Default(preferences, bookmarks etc. and browser cache)
I don’t know why Google has chosen this location by default, however I suspect that it may be to encourage users to sign up for a Google account to enable the native syncing features of the browser. The Chrome User Data folder can become very large and that’s without the Cache folder. You could potentially hit the limit of the user PKG file size.
Whether you the Chrome user profile in the package will depend on your specific deployment requirements; however my recommendation is to use this sync feature and leave the User Data outside of the App-V package.
There are a couple of reasons why this approach is a good idea:
- Some of the configuration files within the Chrome profile include hard-codes paths – challenging if your App-V virtual drive changes between clients
- Virtualizing the profile increases the complexity of upgrading Chrome packages especially challenging given how often the browser is updated. By storing the Chrome profile on the real file system, Chrome can be deployed via completely unrelated packages – no need to create upgrade versions
By not virtualizing the user profile you will gain some flexibility with your Chrome deployment.
However, if you absolutely must place the Chrome profile in the virtual environment, then here’s a couple of approaches to including the User Data folder in the App-V package:
- Use the -user-data-dir and -disk-cache-dir command line parameters to specify an alternate location for the User Data and Cache folders
- Remove the exclusions for the Local AppData location from the Sequencer before sequencing
For the first approach, add the parameters to the command line, placing the User Data folder in the roaming portion of the profile and the browser cache in the local portion:
chrome -user-data-dir=%AppData%\Google\Chrome\User Data -disk-cache-dir=%LocalAppData%\Google\Chrome\User Data
The second approach doesn’t require any command line parameters, but it will require modifying the default Sequencer exclusions and some scripting:
- Remove the default exclusions of
%CSIDL_LOCAL_APPDATA%and%CSIDL_PROFILE%\Local Settings - Add an exclusion for
%CSIDL_LOCAL_APPDATA%\Google\Chrome\User Data\Default\Cacheor%CSIDL_PROFILE%\Local Settings\Google\Chrome\User Data\Default\Cache, depending on the operating system you are sequencing on - Post sequencing, set the folder to Merge with Local and add a pre-launch script that creates the Cache folder outside of the virtual environment
The first approach would be the easiest way to go.
Chrome features to disable
There are a couple of features that should be disabled when running Chrome under App-V:
- Browser auto updates. Chrome updates should be delivered via new App-V packages
- Default browser check. Once Chrome is isolated from the OS, the user won’t be able to make it the default browser
Disabling browser auto updates on Windows requires setting a policy. This can be done via Group Policy, delivered post sequence, or placing the policy directly into the package. To deliver the setting via Group Policy, ensure that the Policies key is not captured in the package.
To set the policy during sequencing, run the following command:
REG ADD HKLM\SOFTWARE\Policies\Google\Update /v AutoUpdateCheckPeriodMinutes /d 0 /t REG_SZ /f
Google Update should also be excluded from the package, which I discuss below. The default browser check can be disabled with a couple of approaches including the master preferences file.
Configuring Chrome Defaults
If a Chrome profile is not virtualized within the package any options set during the monitoring phase won’t be captured. Fortunately Chrome can be configured with defaults for any new profile so that it will contain your required configuration options. Google has made it simple to deploy custom default settings and preferences – by adding a preference file to the same folder where Chrome is installed, Chrome will use these master preferences for any new user who runs Chrome.
For information on what these master preferences are, see the Chromium administrators documentation on master preferences. I’ve included a sample master_preferences file in which I have set several defaults including removing the default browser check, preventing Google from adding a shortcut to the user’s desktop on first run and setting a home page.
Remove the .txt file extension to use
Sequencing Platform
I have sequenced Google Chrome 15.0.874.106 on a clean Windows 7 SP1 x86 VM with all current updates and no other applications other than the App-V Sequencer. I’ve configured a Q: drive using a second vDisk. I’ve used a VFS install because installing Chrome to the Q: drive isn’t an option, unless you want to move the application manually.
Sequencer Configuration
Before Sequencing, add the following exclusions:
- \REGISTRY\USER\%SFT_SID%\Software\Microsoft\Windows\CurrentVersion\Internet Settings
- %CSIDL_COMMON_APPDATA%\Microsoft\RAC
- %CSIDL_WINDOWS%\Microsoft.NET
- %CSIDL_WINDOWS%\Installer
- %CSIDL_PROGRAM_FILES%\Google\Update
- %CSIDL_WINDOWS%\Tasks
The last two exclusions will prevent Google Update related binaries from being captured. Additionally disable the option to “Allow Virtualization of Services” to prevent the capture of the Google Update services.
I have included these options in a Package Template for Chrome that you can download here:
Sequencing Chrome
Download the Google Chrome Enterprise (or MSI) installer. Sequencing Chrome will require the following steps:
- Install Chrome using the Windows Installer file
- Delete the cached copy of the Chrome installer, which won’t be required once delivered with App-V
- Move chrome.exe to the same folder as the current version’s binaries (or vice-versa).
With the default folder structure, Chrome will execute during sequencing, but won’t execute once delivered to a client. The debug.log file will contain entries similar to this:
[1106/180706:ERROR:client_util.cc(231)\] Could not get Chrome DLL version.
[1106/180706:ERROR:client_util.cc(268)] Could not find exported function RelaunchChromeBrowserWithNewCommandLineIfNeeded
- Copy the master_preferences file to the same location as chrome.exe to configure user profile defaults
- Disable browser auto updates
- Prevent the Sequencer from deleting the Chrome application folder once the monitoring phase is finished. To see why the Sequencer may process a reboot task that deletes the Chrome install folder read this article: The Case of the Disappearing Application during Sequencing.
Automating this process as much as possible will create a cleaner package and make it faster to re-create a new Chrome package if required. Here’s an example script that will perform the tasks above:
START /WAIT GoogleChromeStandaloneEnterprise.MSI ALLUSERS=TRUE /QB-
RD /Q /S "%ProgramFiles%\Google\Chrome\Application\15.0.874.106\Installer"
ROBOCOPY "%ProgramFiles%\Google\Chrome\Application\15.0.874.106" "%ProgramFiles%\Google\Chrome\Application" /mov /e
COPY master_preferences "%ProgramFiles%\Google\Chrome\Application\master_preferences
REG ADD HKLM\SOFTWARE\Policies\Google\Update /v AutoUpdateCheckPeriodMinutes /d 0 /t REG_SZ /f
REG ADD "HKLM\System\CurrentControlSet\Control\Session Manager" /v PendingFileRenameOperations /d "" /t REG_MULTI_SZ /f
Shortcuts
For Chrome to run successfully under App-V there are a few additional command line parameters that will need to be added to the Chrome shortcut at the configure applications stage:
- -disable-custom-jumplist: Disables the Windows 7 Jump List, which doesn’t work once Chrome is virtualized any way
- -no-default-browser-check: A further flag to prevent the browser from prompting the user to set it as default
- -in-process-plugins: Run plugins inside the renderer process. May be optional, but has been required in the past when virtualizing Chrome
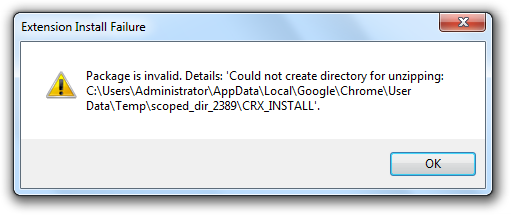
- -no-sandbox: Not required; however I have found that extensions do not install if this parameter has not been added
For the full list of command-line parameters for Chrome and Chromium see this page: List of Chromium Command Line Switches
With the sandbox running, you will see an error similar to this when attempting to add an extension:
Note: Note that disabling the sandbox will reduce the browser security. I recommend testing the browser functionality and see if you can get away without disabling the sandbox.
The browser will notify you when the sandbox is disabled:

First Run Tasks and Primary Feature Block
If the steps above have been followed for exclusions, installation and configuration of Chrome, there will be no first run tasks to complete. Additionally the resultant package will be reasonably small so there is no need to create the Primary Feature Block. Because you don’t need to complete first run tasks or create the Primary Feature Block, you could automate the entire end-to-end process of creating a Chrome package using the App-V Sequencer command-line interface.
Finally
Save your package and deploy. With compression enabled, the package should be around 36Mb.