Sequencing Apple iTunes 10
- What you lose by virtualizing iTunes
- iTunes Components
- Prepare the Sequencing VM
- What to do about AppData
- Before Sequencing – Create the AppData folders
- Installing iTunes
- Automating the iTunes install
- Sequencer Exclusions
- Sequencing iTunes
- Post-Sequencing
- Running iTunes
Here’s a nut I’ve been trying to crack for some time – successfully virtualizing Apple iTunes with App-V. I think a combination of iTunes 10 and App-V 4.6 SP1 did the trick. Here’s how to do it.
What you lose by virtualizing iTunes
Because virtualizing iTunes with App-V will isolate the application from the OS, the following features will not be available once iTunes has been sequenced:
- The iTunes Jump List
- The iTunes toolbar integration into the Taskbar
- Windows Firewall exclusions (manual changes will be required to support media sharing)
iTunes Components
To start at the beginning requires taking a look at the components of iTunes. Note that iTunes comes in 32-bit and 64-bit versions, so be sure to download and sequence the correct version for your target platform. I tested this sequence using iTunes 10.3.1 x86 on 32-bit Windows; however the same approach will apply for the 64-bit version and future versions of 10.x.
Extracting the iTunes installer results in several files:
- AppleSoftwareUpdate.msi – Software Update is used to download and Apple software and updates
- SetupAdmin.exe – the setup wrapper application
- AppleApplicationSupport.msi – all Apple applications on Windows require this as a dependency
- AppleMobileDeviceSupport.msi – required for Apple mobile device support (iPhone, iPad etc.). This installer includes the drivers for Apple’s devices
- QuickTime.msi – iTunes uses QuickTime for video codec support
- Bonjour.msi - iTunes uses Bonjour to find shared music libraries, to find AirPort Express devices for streaming music to, and to find Apple TVs
- iTunes.msi – the iTunes installer itself
It is important that Apple Software Update is not included in the App-V package – allowing the applications in the package to update will at best fail and at worst, most likely bloat the package if it were allowed to run after deployment. Before copying the iTunes setup files into your sequencing VM, delete AppleSoftwareUpdate.msi and SetupAdmin.exe. This will prevent the iTunes installer from automatically installing Software Update during sequencing.
Prepare the Sequencing VM
I have successfully created an iTunes package using a virtual machine running 32-bit Windows 7 SP1 with Internet Explorer 9 and all current updates.
I used a VFS install, so I have configured a second virtual hard disk to host the Q: drive to avoid this bug. If you would prefer a MNT install, just add the INSTALLDIR to the command line for each Windows Installer file.
Before starting the Sequencer, three steps must be completed:
- Install Apple Application Support – this is required because the Apple Mobile Device service will not start without it.
- Install Apple Mobile Device Support – this is required to be installed outside of the package because it contains the mobile device drivers
- Create an iTunes folder structure in the user profile under %AppData%
These same steps will need to be followed on the App-V client computer that will run iTunes. Fortunately Apple Application Support and the Mobile Device Support come as Windows Installer files, so they will be easy to deploy.
What to do about AppData
iTunes is a excellent example of an application written by developers who appear to have absolutely no idea about how Windows profiles work. Take a look at the size of the AppData\Roaming\Apple Computer folder in my profile on an existing computer with iTunes installed:
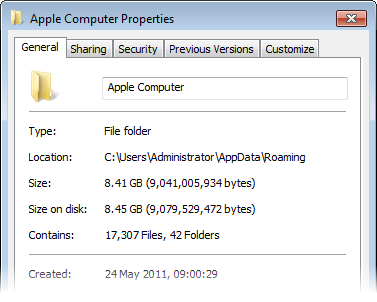
With logs, a back-up of two devices and two copies of iOS 4.3.3 (one for an iPhone and one for an iPad), this folder is a whopping 8.41 GB and contains over 17000 files. Just imagine enabling Roaming Profiles with that in your profile – that’s a lot of coffee waiting for logon to complete.
To be fair, I don’t think that iTunes was intended to be used in an environment with Roaming Profiles; but the amount of data that iTunes stores in this location highlights one of the challenges we face when developers make questionable decisions.
There are two ways of getting around this problem:
- Do not virtualize the user profile at all – iTunes will create the AppData folder structure in the user profile at launch just like it would for any new user account
- Virtualize only those portions of the user profile that contain iTunes preferences – you might like to take this approach if you want to preconfigure iTunes
In this article I will demonstrate how to take approach number 2. If you would prefer approach 1, ensure that %CSIDL_APPDATA% has been added to the exclusions list before sequencing.
Before Sequencing – Create the AppData folders
To work around the large amount of data that iTunes stores in the profile, create the following folders before sequencing:
- %AppData%\Apple Computer\iTunes\iPad Software Updates
- %AppData%\Apple Computer\iTunes\iPad Updater Logs
- %AppData%\Apple Computer\iTunes\iPhone Carrier Support
- %AppData%\Apple Computer\iTunes\iPhone Software Updates
- %AppData%\Apple Computer\iTunes\iPhone Updater Logs
- %AppData%\Apple Computer\iTunes\iPod Software Updates
- %AppData%\Apple Computer\iTunes\iPod Updater Logs
- %AppData%\Apple Computer\WebKit
- %AppData%\Apple Computer\iTunes\Apple Mobile Device Sync Diagnostics Logs
- %AppData%\Apple Computer\Logs
- %AppData%\Apple Computer\MobileSync
- %AppData%\Apple Computer\SyncServices\Local
By creating these folder before sequencing will make it simpler to set Merge with Local attributes on the captured folders. The paths above will then also be excluded from the package and must be created on the App-V client computer at runtime.
Installing iTunes
[Update July 2012]: QuickTime is not longer included with the iTunes installer. If you using a recent version of iTunes, disregard the QuickTime components of this article.
Sequencing is as simple as capturing the installation of the following files and configuring iTunes the way we want:
- Bonjour.msi
- iTunes.msi
- QuickTime.msi
However, iTunes and QuickTime store preferences in less than ideal locations. Here are the default locations for those preferences:
- Most iTunes preferences are stored here:
%AppData%\Apple Computer\iTunes\iTunesPrefs.xml - Some computer specific preferences are stored here:
%LocalAppData%\Apple Computer\iTunes\iTunesPrefs.xml - QuickTime preferences are stored here:
%LocalAppData%Low\Apple Computer\QuickTime\QuickTime.qtp - QuickTime Player preferences are stored here:
%LocalAppData%\Apple Computer\QuickTime\QTPlayerSession.xml
Ideally these would all be located under %AppData%. Unfortunately the only preference file that we can move is for QuickTime (%LocalAppData%Low\Apple Computer\QuickTime\QuickTime.qtp).
To change the QuickTime preferences location, change the path under the following Registry value:
- HKCU\Software\Apple Computer, Inc.\QuickTime\LocalUserPreferences\FolderPath
I do not recommend attempting to include the %LocalAppData% or %LocalAppData%Low locations as these end up containing cache files which we need to avoid capturing to keep the package size to a minimum.
Automating the iTunes install
There’s no reason why you couldn’t install and configure QuickTime and iTunes during sequencing manually; however I think that scripting the process as much as possible will help create a more successful package. I have a script that performs the following:
- Installs QuickTime and iTunes with updates and desktop shortcuts disabled
- Installs Bonjour
- Perform some clean-up actions including removing unneeded shortcuts
- Changes the QuickTime configuration file location to %AppData% (instead of the AppData\LocalLow folder)
- Copy in a pre-configured QuickTime configuration file
- Create the folders in %AppData% that we want to capture in the package
- Start QuickTime Player and then iTunes to provide an opportunity to configure each application (first-run tasks)
You can download the script here:
Place the script into the same folder as the iTunes Windows Installer files as it will attempt to run the MSI files from the same location.
Sequencer Exclusions
There are a number of locations that we need to exclude from capture during sequencing:
- %CSIDL_APPDATA%\Apple Computer\iTunes\iPad Software Updates
- %CSIDL_APPDATA%\Apple Computer\iTunes\iPad Updater Logs
- %CSIDL_APPDATA%\Apple Computer\iTunes\iPhone Carrier Support
- %CSIDL_APPDATA%\Apple Computer\iTunes\iPhone Software Updates
- %CSIDL_APPDATA%\Apple Computer\iTunes\iPhone Updater Logs
- %CSIDL_APPDATA%\Apple Computer\iTunes\Apple Mobile Device Sync Diagnostics Logs
- %CSIDL_APPDATA%\Apple Computer\Logs
- %CSIDL_APPDATA%\Apple Computer\MobileSync
- %CSIDL_APPDATA%\Apple Computer\SyncServices
- \REGISTRY\USER\%SFT_SID%\Software\Microsoft\Windows\CurrentVersion\Internet Settings
- \REGISTRY\USER\%SFT_SID%_Classes\Local Settings\Software\Microsoft\Windows\Shell
- %CSIDL_PROFILE%\Music
I have included these in a Package Template for iTunes that you can download from here:
Sequencing iTunes
To sequence iTunes, follow the basic outline here:
Start the Sequencer and create a new package from the iTunes template available above
Create a Standard Application package
Package installer – select either the iTunes scripted install command listed above or C:\Windows\System32\cmd.exe
Add a package name – I have used Apple iTunes 10 x86
Start the installation. You can run iTunes and QuickTime during this step to perform first run tasks.
First Run tasks
- QuickTime – follow the recommendations for configuration in this article: Virtualising Apple QuickTime 7.x
- iTunes – iTunes will prompt to make itself the default for media files – set this if required and be sure to disable the option ‘Warn me if iTunes is not the default player for audio files’
- Customize shortcuts
- Remove the About Bonjour & PictureViewer shortcuts (I recommend removing all shortcuts, leaving only QuickTime and iTunes)
- Remove QuickTime shortcut unless required
- Place all shortcuts under \Programs\iTunes in the Start Menu
- Primary Feature block
- Run iTunes, you may have to force exit of child processes if required
- No need to run QuickTime Player unless required
Post-Sequencing
There are a few post-sequencing tasks to perform:
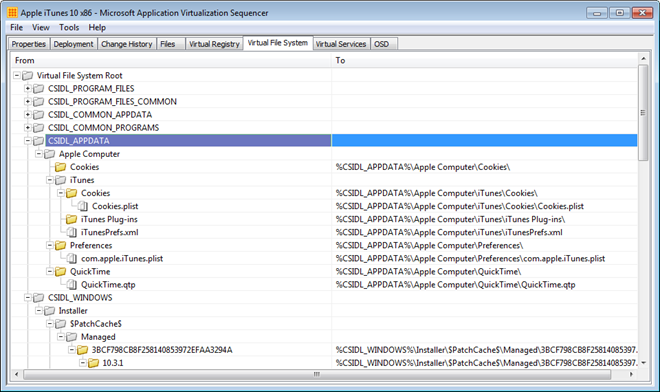
AppData: Check that Merge with Local has been applied to folders captured in AppData correctly. The image below shows the Apple Computer and Apple Computer\iTunes folders have been set to Merge with Local. If the pre-sequence steps that create the AppData folder structure are followed (or you are excluding AppData), then no manual action should be required.
Add a script to the iTunes OSD file to create the AppData folder structure that should exist on the real file system:
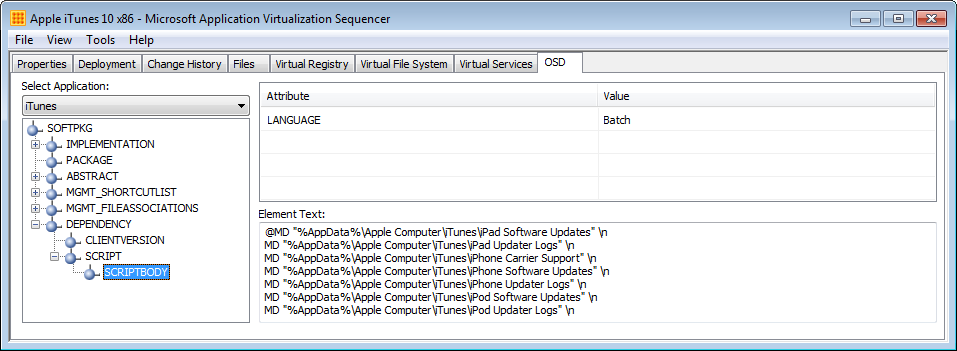
For an example of what to add to the OSD file, download the example here:
iPod Service: Set the iPod Service to Automatic. This will ensure that the service is ready as soon as iTunes starts.
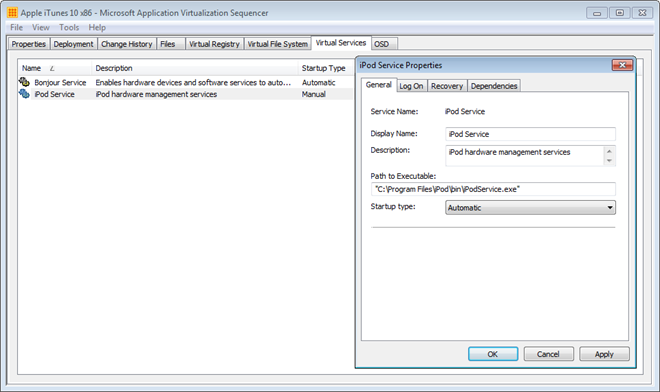
Child Processes: when iTunes launches, several processes with also be started – AppleMobileDeviceHelper.exe, distnoted.exe (both installed instead of in the iTunes package), iPodService.exe and mDNSResponder.exe (The iPod and Bonjour services respectively).

On occasion these processes may remain running after iTunes has exited, if this is the case (and you may have already seen this behaviour when building the Primary Feature block) set TERMINATECHILDREN to True in the iTunes OSD.
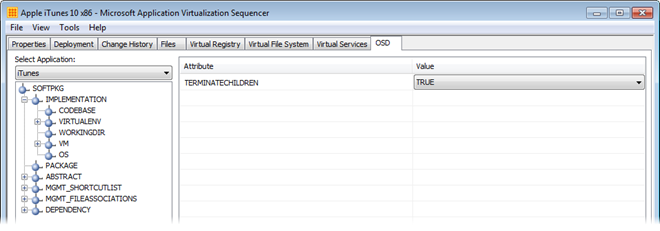
Compression: The package should weigh in at around 290Mb, so depending on your deployment method you could compress it to save bandwidth.
Running iTunes
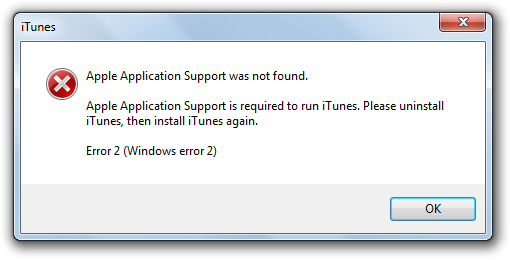
Deploying the iTunes package will require the deployment of Apple Application Support and Apple Mobile Device Support to the client computers first. Without Apple Application Support the following will be the result of launching iTunes:
While I’ve been able to test iTunes successfully running on an App-V Client, there appears (at this stage at least) to be only one issue – when plugging in a mobile device, the following error is displayed, twice:
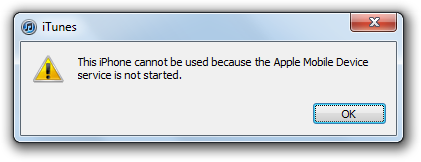
Although iTunes reports this error and I can confirm that the service is started (it’s running natively, not within the package), once acknowledged device sync works anyway. I’ve tested with LOCALINTERACTIONALLOWED which hasn’t helped. I’ll update this post if I find a solution.
Last, but not least, for media sharing to work, firewall exceptions will be required for the following processes:
- iTunes -
Q:\Apple iTunes 10 x86\VFS\CSIDL\_PROGRAM\_FILES\iTunes\iTunes.exe - Bonjour service -
Q:\Apple iTunes 10 x86\VFS\CSIDL\_PROGRAM\_FILES\Bonjour\mDNSResponder.exe
The path to the processes may change depending where you install iTunes and dependent components.
