Machine Creation Services Capacity Sizing on Hyper-V
- Gold image
- MCS Machine Catalogs
- Virtual Machine Sizing on Hyper-V
- Recommendations
- Calculating Capacity
- Conclusion
To understand sizing Machine Creation Services on Hyper-V, we should first look at how XenDesktop creates virtual machines across the various deployment choices. XenDesktop 7.9 and 7.11 have introduced new features to MCS that will require additional consideration for storage requirements over previous versions.
In this article, I’ll cover the deployment options at a high level, including:
- Delta Clones - this has been the traditional deployment approach for MCS, where virtual machines reference a base image and store changes in a delta disk. In Hyper-V parlance, this is referred to as a differencing disk. Delta clones work for XenApp, pooled and dedicated clone VMs
- Delta Clones with Storage Optimisation - this is the new default option for MCS deployments since XenDesktop 7.9. IO optimisation enables a cache in RAM with overflow to disk
- Full Clones - new in XenDesktop 7.11 is the ability to deploy full clones from a gold image and rely on the storage platform to provide optimisation
To keep this size exercise simple, I have used a single data store that contains both my gold image and the Machine Catalogs. The environment is based on Windows Server 2016 and System Center Virtual Machine Manager 2016. Note that Hyper-V allows for modifying the paths for virtual machines (config files), virtual hard disks and Smart Paging files, so the folder structure shown in my environment in the screenshots below may differ to yours.
Gold image
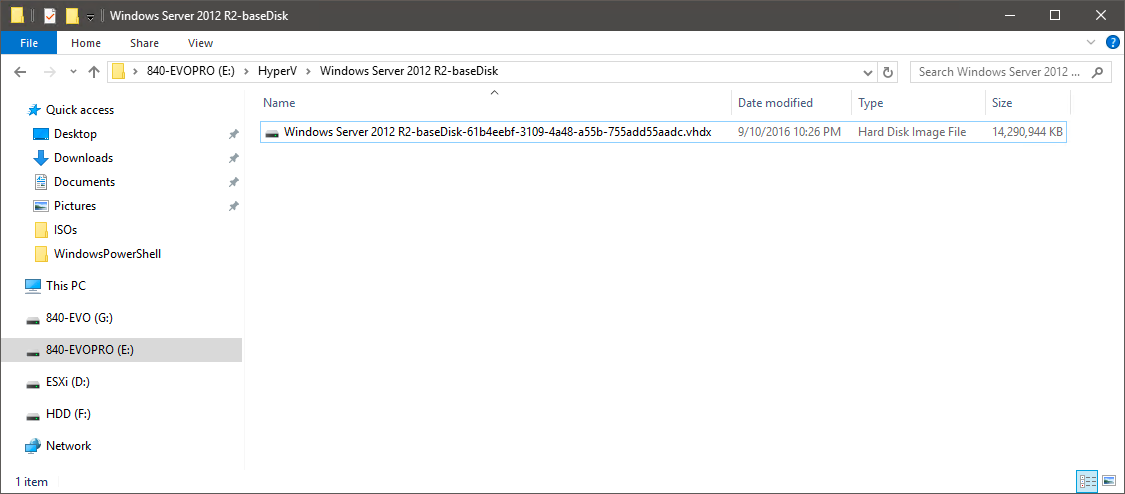
The gold image is Windows Server 2012 R2 or 2016 with a set of applications including Office. Initially, the image has two snapshots (or checkpoints) created in the process of provisioning and updating the image. Thus the image consists of:
- Virtual disk of 13.63GB - this is the image as I’ve built it including Windows, applications, and the XenDesktop 7.9 VDA. This is using a thin-provisioned (or dynamic) disk with the default size of 127GB
- Snapshot 1 of 4MB - the initial snapshot taken before creating the Machine Catalog. 4MB is the default size for new snapshots on Hyper-V
- Snapshot 2 of 8.63GB - an update that included installing the 7.11 VDA. This sizeable given the changes in this snapshot include only a months’ worth of Windows updates (at around 90Mb) and an upgrade from the VDA 7.9 to 7.11.
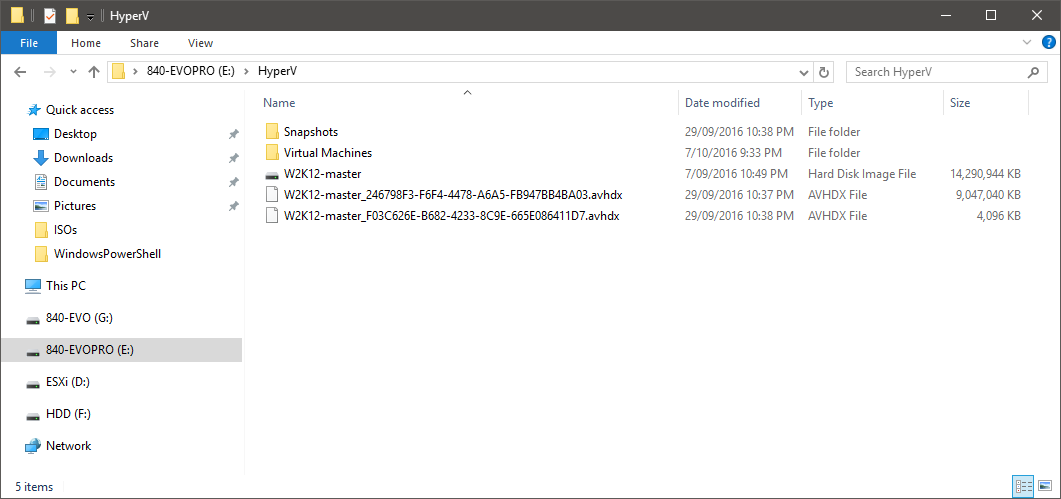
MCS gold image on Hyper-V with 2 snapshots
Note the time stamps of the snapshots here - when creating a snapshot via Virtual Machine Manager the previous snapshot is touched and the update in time stamp on the new 4MB snapshot.
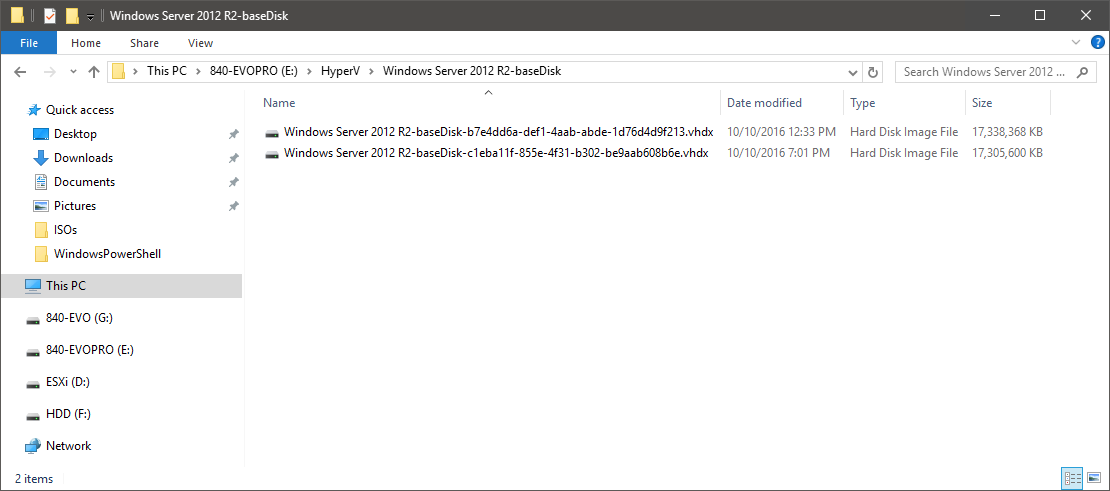
Each virtual machine has a corresponding configuration file and runtime state file, although these won’t have a noticeable effect on overall storage capacity consumed.
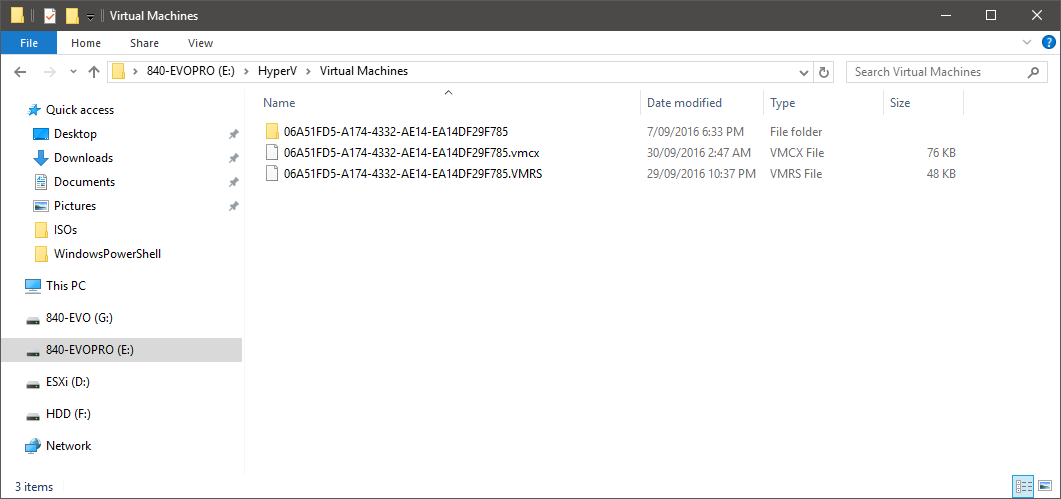
Virtual Machines folder for the MCS gold image on Hyper-V
Additional versions of these files are created per snapshot so that changes to the VM hardware are tracked.
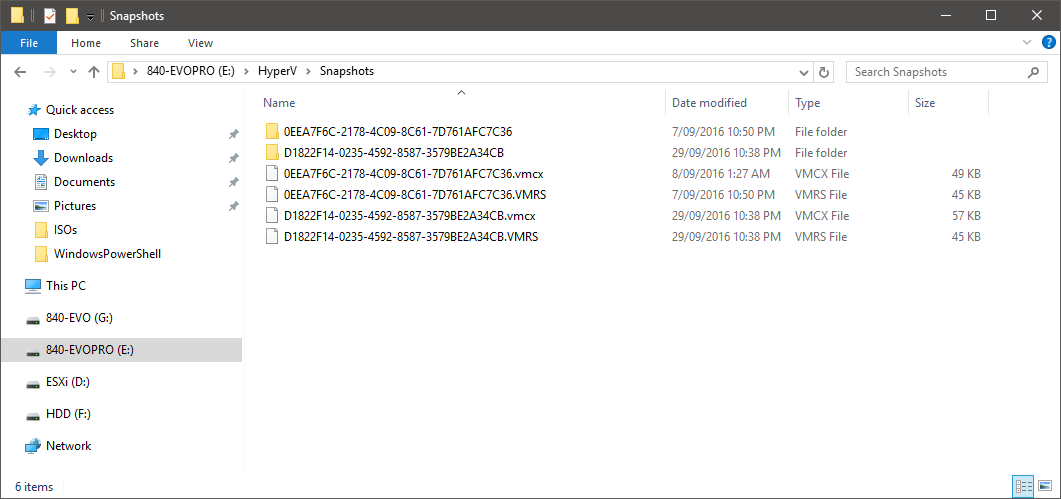
Snapshots folder for the MCS gold image on Hyper-V
How Large is the gold image?
Not all gold images will be the same size due to environmental differences; however, count on a minimum of 14GB for Windows + Office for all current Windows versions. I recommend cleaning up your gold image to reduce the size as much as is possible.
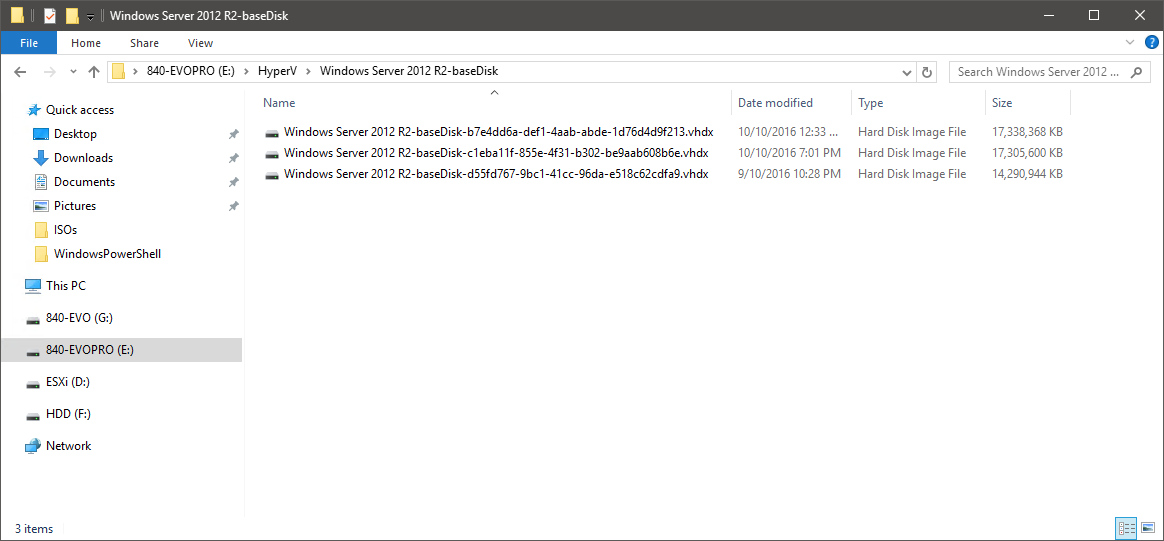
With each update to the gold image, you’ll see snapshots growing. Looking at my test environment after making 3 updates to the image my gold image has grown considerably with what should be relatively small changes (i.e. booting the VM to install applications or updates).

Gold image and snapshots after 3 updates
What started at 14GB has now grown to a total of 31GB with installing VDA updates, the FSLogix agent, Java runtimes and Windows Updates.
MCS Machine Catalogs
The configuration choices made during the creation of a Machine Catalog can impact the way in which virtual machines are configured and the capacity consumed. The following choices will result in slightly different inputs for our sizing:
- Server OS vs. Desktop OS
- Delta clones with Storage Optimisation (cache in RAM with overflow to disk)
- Full Clones
- AppDisks (not compatible with the storage optimisation feature)
- Personal vDisk (not compatible with XenApp deployments)
Temporary Cache Sizes with Default Configurations
The default configuration for XenApp VMs, pooled random and pooled static desktops, since 7.9, is to enable the cache in RAM with a corresponding temporary disk cache as shown in the screenshot below. For both Server and Desktop OS machines, the default RAM cache size is 256Mb; however, the disk cache size default is different:
- For Server OS VMs, the default size will match the size of the virtual disk assigned to the gold image
- With Desktop OS VMs, the default size is 10GB.
You will need to make careful consideration for the amount of RAM assigned to the RAM cache. This cache size is consumed from the RAM assigned to the VM, so the more RAM that you can assign, the larger the RAM cache you can set. With a larger RAM cache, the amount of IO written out to storage will be less, thus capacity consumed will be reduced.
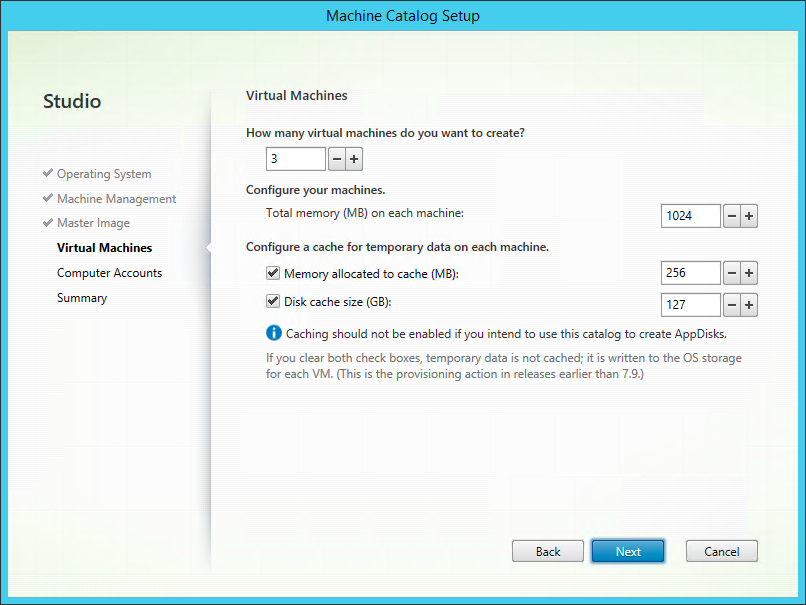
Default virtual machine options for XenApp Machine Catalogs
You can choose to place temporary storage disks on separate data stores to your virtual machines - for example, you could choose shared storage for the virtual machines and local storage (ideally flash-based) for the temporary storage disks.
If you reduce the disk cache size from the default, Studio will warn that reducing the size may impact performance. For Server OS VMs (XenApp), where multiple users on a single machine, a larger disk cache is required.
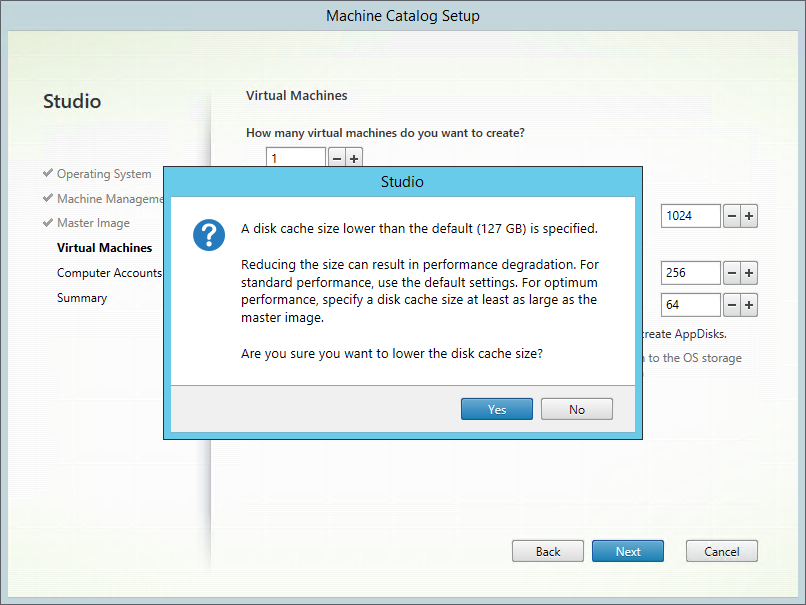
Disk cache size warning for Server OS VMs
Reducing the disk cache size for Desktop OS VMs from the default 10GB, results in the same message, which is potentially confusing.
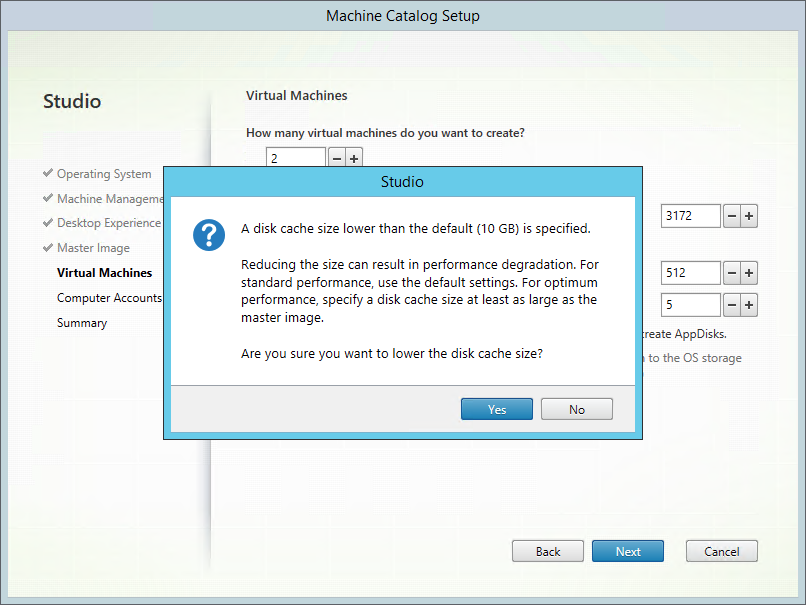
Disk cache size warning for Desktop OS VMs
AppDisks
AppDisks are applicable to specific Machine Catalog configurations and the sizes will vary based on the applications and number of applications in each image. However, AppDisks can potentially assist with reducing the storage capacity consumed, especially if they are shared across multiple catalogues. AppDisks do need to be stored on the same data store as the target MCS virtual machines.
Personal vDisks
Citrix provides some good information on sizing for Personal vDisks and these will have a pre-defined size. Additionally, Personal vDisks can be stored in a data store separate to the virtual machines (e.g on highly available shared storage). If that is the case, we can remove those from our sizing.
Base Disk
MCS requires a copy of the gold image on each target data store. During the creation of the Machine Catalog, the selected gold image is copied to the data store and a temporary “preparation VM” is created to prepare the catalogue for deploying VMs based on the gold image.
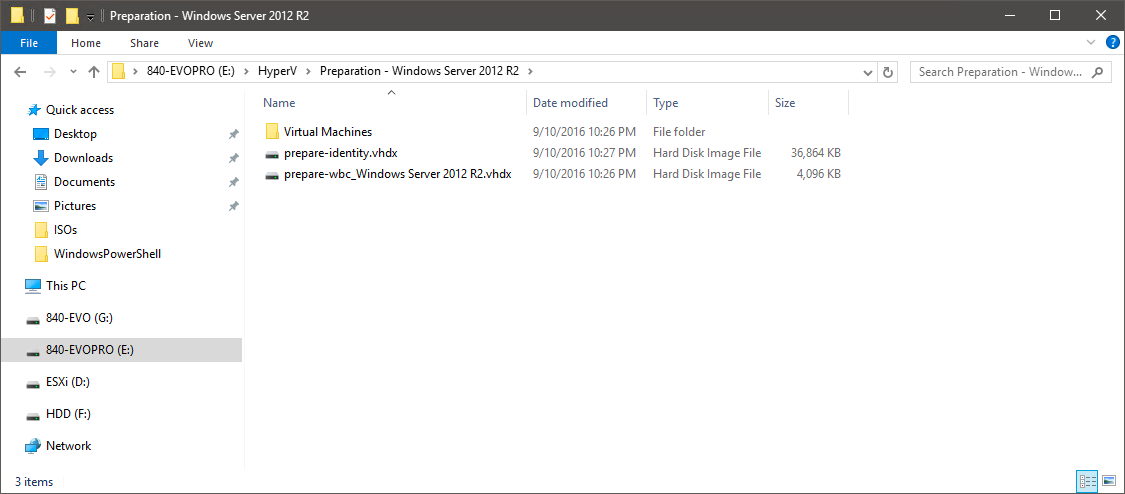
Machine Creation Services preparing the catalogue via a temporary VM
This VM is deleted after use, so we don’t need to include it in our capacity calculations. Once the Machine Catalog is created we have the base image, which is an exact copy of our initial gold image.
MCS Machine Catalog base image after initial deployment
After a number of updates to the gold image and applying them to the catalogue. The base image can contain 3 copies of the gold image - the size of these copies will differ depending on the additional data written to the image after each update. Also, note the sizes of these in relation to the gold image and snapshots above.
MCS Machine Catalog base image after 3 updates
However, this state is transient. Eventually, the number of copies of the gold image maintained on the data store should be 2 - the current and previous versions of the image to enable rollback of the catalogue.
MCS Machine Catalog base image after updates applied
We should still be accounting for the 3 image copies in our sizing to ensure updates to catalogues are possible after the initial deployment.
Virtual Machines
What does a deployed virtual machine look like? In this case, I have a XenApp virtual machine on Windows Server 2012 R2 deployed with cache in RAM enabled. Immediately after deployment and before first boot, the VM looks like this:
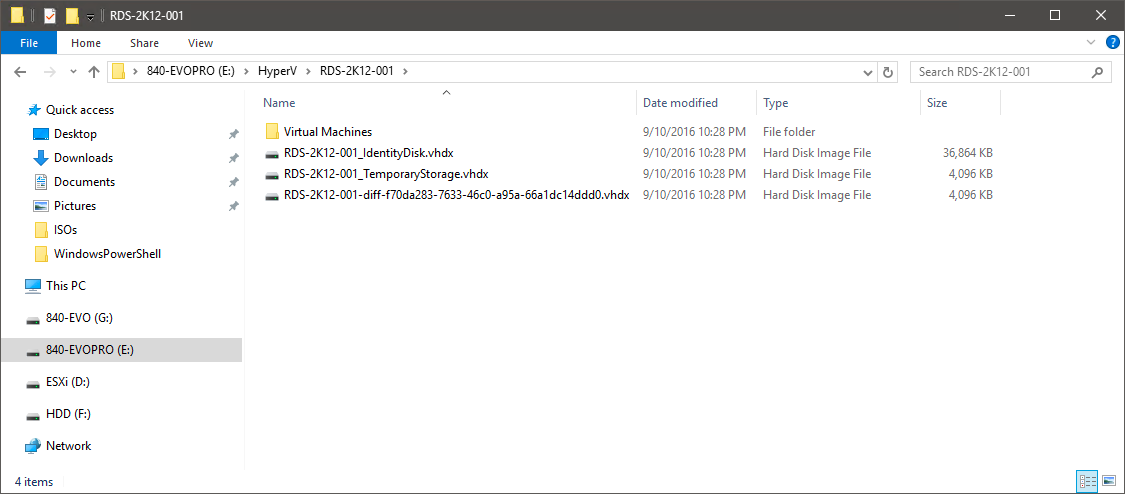
Deployed MCS XenApp virtual machine with cache in RAM enabled that has not yet booted
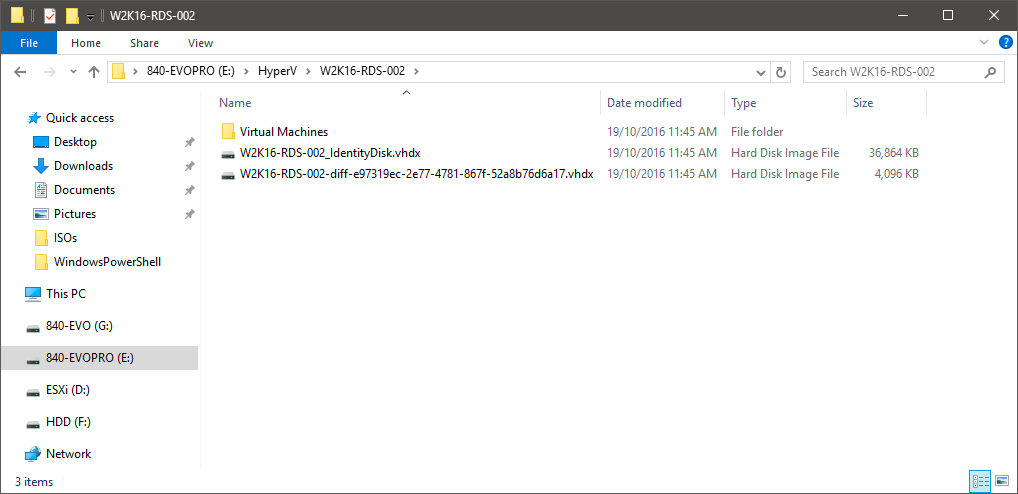
Other than the VM configuration files, the VM consists of the following virtual disks:
- The identity disk that contains the unique identity for the machine
- The TemporaryStorage disk used as the overflow target for the cache in RAM feature
- The differencing (or delta) disk that contains the differences from the gold image when the machine is running
After booting the VM and logging on with a single user session we see the following:
- The identity disk size remains static and it does so for the life of the machine
- The TemporaryStorage disk sizes increases and does not change between reboots or updates
- The differencing (or delta) disk is reset back to the initial 4MB at each reboot and grows to a maximum size of 36MB.

MCS VM with temporary storage growth
Viewing the virtual machine storage details in Virtual Machine Manager, we see details of the virtual disks assigned to the virtual machines deployed via MCS and the gold images. I have two gold images on this data store:
- W2K12-master has no snapshots at this time, so a single Dynamic disk is shown with the default size of 127GB
- W2K16-master has 1 snapshot, so the Differencing disk is shown, again with the default size of 127GB
The MCS virtual machines each have the 3 virtual disks assigned:
- The identity disk is a dynamic disk, yet a maximum size of 0.02GB (approximately 20MB)
- The Temporary Storage disk size is set during creation of the Machine Catalog - in this example, we can see the maximum size of this disk is 64GB. Citrix recommends matching the size of this disk to the size of the virtual disk assigned to the gold image
- The differencing disk maximum size is 127GB, which is the default size of virtual disks in Hyper-V, matching the virtual disk size of the gold image.
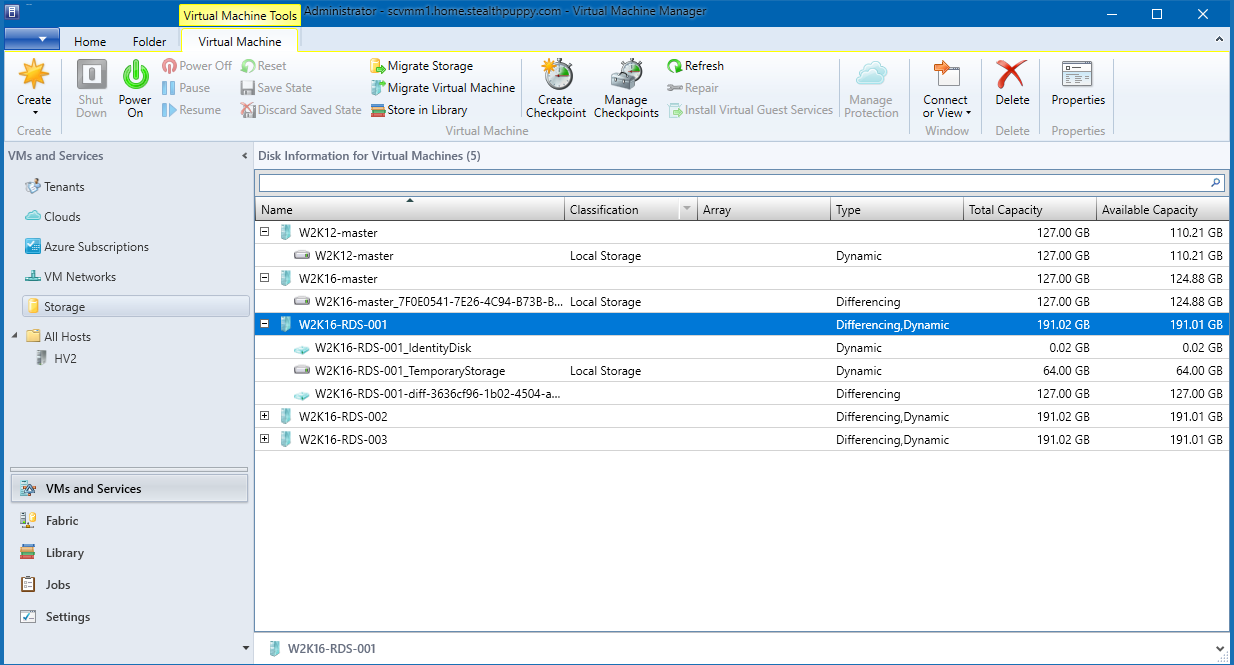
MCS VM storage viewed in Virtual Machine Manager
This specific configuration is unique this deployment type, so if we look at different MCS configurations, we will see different outcomes for virtual disk configurations and sizes.
Clones with Differencing Disks
XenDesktop and XenApp 7.8 and below, used differencing (or delta) disks that contained the changes to the virtual machine from the original base disk. When deploying a virtual machine on these versions or without storage optimisation, a VM then consists of an identity disk and a differencing disk (which as shown previously, starts at 4MB).
MCS Virtual Machines without storage optimisation (as per XenApp/XenDesktop 7.8 and below)
After booting the virtual machine, all changes are written to the differencing disk and you can see the growth in storage capacity consumed. In this example, I’ve booted a non-optimised Windows Server 2016 image and even without user sessions on that VM, the differencing disk size increases pretty readily.

MCS Delta Clones after boot showing growth in the differencing disk
When the virtual machine restarts, the differencing disk is deleted and a new disk, again starting at 4MB, is created. So cycling VM regularly is a good way to keep storage consumed to a minimum.
Full Clones
Deployment of full clones via MCS is now possible in XenDesktop 7.11. Full clones consist of an identity disk and a copy of the base image for each virtual machine.
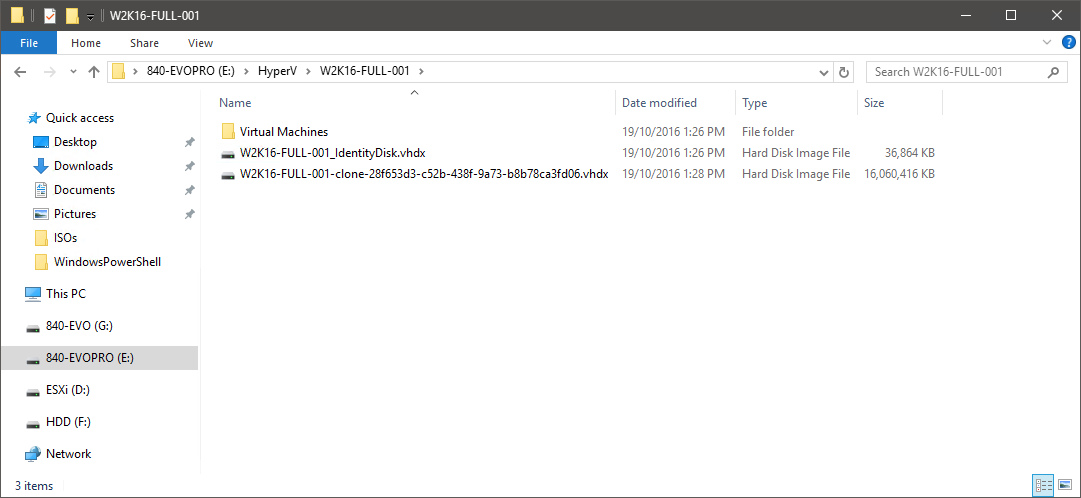
Disk configuration for MCS Full Clones
Once a full clone is deployed, it is persistent while managed and updated through mechanisms outside of XenDesktop. The potential capacity that a full clone can consume will be the full size of the virtual disk as assigned to the gold image.
Virtual Machine Sizing on Hyper-V
To correctly size for Machine Creation Services on Hyper-V, let’s summarise the storage impact that MCS has with Hyper-V deployments:
Common Files
Virtual machine components that are common to all deployment types:
- Virtual machine configuration files - each virtual machine has virtual machine configuration and runtime state files (including versions for snapshots) that are typically very small and should not have an impact on overall sizing
- Smart Paging files - Smart Paging only kicks in during machine boot when the host is under memory pressure. [I actually haven’t been able to get my host to generate these as yet]
- gold images - count on a minimum of 12GB for Windows 7/Windows Server 2008 R2 and above with Office. Create a maximum virtual disk size to fit your requirements - it would be best to reduce the size from the default of 127GB to only what is required. gold images can exist on datastores that are accessible by all hosts, rather than the same datastore as the virtual machines
- gold image snapshots - changes in the gold image can count for several GB even with small changes to the image. Several snapshots can exist as changes are made to the gold image and the amount of change of size between snapshots can vary as well
- Base images - gold image snapshots are merged, so the base image shows the real size of the gold image. Up to 3 copies of the base image can exist in a single datastore and the sizes will vary based on the actual changes to the gold image. That 3rd copy is transient and should be removed after all machines have applied the latest update
- Identity disks - on Hyper-V, these start at 36MB and remain at this size
Delta Clones and Full Clones
Files used by delta clones and full clones include:
- Temporary storage disk - the new storage optimisation feature of MCS is the default configuration for 7.9 and above so this disk is used instead of the differencing disk. The temporary storage disk can grow to the size specified when creating the Machine Catalog. By default, that is the maximum size of the virtual disk assigned to the gold image and Citrix recommends ensuring these sizes match. These disks start at 4MB and persist for the life of the VM.
- Differencing (or Delta) disk - if the storage optimisation feature is not used, the differencing disk is used instead. This can grow to the maximum size of the virtual disk of the gold image. These disks start at 4MB and jump to 36MB at boot (regardless of whether storage optimisation is used or not) and can grow considerably. These are deleted at reboot (not shutdown) of the VM
- Base image - if using full clones, each VM consists of an identity disk and a copy of the base image
Other Files
Other files used in virtual machine deployment include:
- Personal vDisks - the default size is 10GB and is shared between the user profile and user installed apps, but can be placed on separate storage
- AppDisks - the size will vary based on specific applications sizes installed in the disk. AppDisks need to be on the same datastore as the virtual machines.
Recommendations
Sizing storage capacity for Machine Creation Services isn’t something that you’ll do in isolation or perhaps even do once - design, testing, piloting and monitoring in production will be key to a successful deployment. Here are a few recommendations for sizing storage capacity:
- Size the virtual disk assigned to the gold image to be as small as possible; however, don’t undersize the disk. Differencing disks and temporary cache disks sizes will match the size of the gold image virtual disk, therefore they can grow to that maximum size
- Monitor the cache in RAM size to understand when overflow to disk kicks in. Resize the cache in RAM if it is undersized and you have available RAM to assign to VMs
- Boot virtual machines and watch the sizes of temporary cache disks and differencing disks to understand disk growth
- AppDisks or 3rd party layering solutions can enable you to reduce MCS storage capacity by sharing application images across VM instances
Calculating Capacity
Based on the information in this article, to size capacity with Machine Creation Services on Hyper-V, the calculation will require answering a number of questions or inputs. At a high level this involves:
- Is the gold image on the same data store? If so:
- The size of the gold image
- The number and size of the snapshots applied to that gold image
- For each Machine Catalog on the data store:
- Account for a minimum of 2 copies of the base image and up to 3 copies
- Base images may differ in size
- The number of virtual machines deployed in the catalog
- Each virtual machine will have an identity disk of 36MB
- Each virtual machine will have a differencing (or delta disk) that while powered on will be at least 36MB and reset at reboot to 4MB
- If the virtual machine is deployed with storage optimisation:
- It will have a temporary storage disk that is not transient and will grow to several GB to a maximum size as specified when creating the Catalog
- If the virtual machine is deployed without storage optimisation:
- The differencing disk that is transient and can grow to several GB and will be reset at reboot
Calculating storage capacity with this approach should provide you with a reasonably accurate picture of the total capacity to be consumed by MCS on that data store, before storage optimisation solutions such as deduplication and compression.
Conclusion
While MCS itself is simple to design for and implement, recent flexibility and performance improvements introduced with XenDesktop 7.9 and 7.11, requires some additional considerations for storage capacity.
This article has walked through the MCS deployment options on Hyper-V and shown you the various capacity consumption scenarios so that we can go through a sizing exercise. In a future article, I’ll provide to tool to simplify calculating storage capacity.
Thanks to Carl Webster for reviewing this article. Feedback and corrections are welcome.