Deploying Adobe Reader X
- Licensing Your Deployment
- Obtaining the Adobe Customization Wizard
- Downloading the Reader X MSI
- Creating a custom Transform for Reader X
- Disabling Additional Menu Items
- Enforcing Protected Mode
- Finding more Reader Preferences and Policies
- Additional Reading
For a Reader XI version of this document see: Adobe Reader XI Deployment
Adobe Reader X is here and with the new protected mode feature to improve security you should be considering your deployment plans now.
Note: These instructions are based on the US English version of Reader, so you may need to adjust some specifics to suit your environment and language.
Licensing Your Deployment
Although Adobe Reader is free you’ll need to agree to and obtain a license to distribute it in your own environment. Obtaining a license is simple, you’ll just need to answer a few questions such as the number of copies, how you will distribute Reader, which platforms and some information on your company including contact information. The same license can be used for distributing Flash player and Adobe AIR. To apply for the license go to the Adobe Runtimes / Reader Distribution License Agreement.
Obtaining the Adobe Customization Wizard
Unfortunately Adobe doesn’t use the same installer across all of their products - the installers for the Acrobat products are different to the Creative Suite products. For anyone who’s attempted deployment of the CS products would probably consider this a good thing.
To start customising Reader before deploying, you’ll need access to the Adobe Customization Wizard. The Customization Wizard X hasn’t changed much since the Customization Wizard 9, so if you have experience deploying Adobe Reader 8 or Reader 9, you’ll be comfortable customising and deploying the new version.
The Adobe Customization Wizard X should be available from here - Adobe Customization Wizard X. Otherwise you can use this direct download link: Adobe Customization Wizard X. An FTP site is also available - Adobe FTP site.
The Customization Wizard should be installed to an administrative workstation and it will allow you to create a custom Windows Installer transform that can configure the Reader installation, including settings to:
- Optimise the behaviour of the installer by including silent installation, multilingual, and custom setup choices
- Remove previous versions of Acrobat and Reader
- Suppress the EULA, registration prompts, and the Getting Started window
- Customise key application preferences — turn off automatic updates, add and set default job options, and customize collaboration and security settings
- Remove shortcuts from the desktop and the Start menu
- Edit each Adobe Acrobat application’s registry and installer tables
- Customize file attachment handling within PDF files, including specifying which file types you want to block
- Add or edit files that will be installed, including customized JavaScript or plug-ins
- Preconfigure and lock Enhanced Security settings
Downloading the Reader X MSI
When creating a custom installer for Reader, always start with the latest version which you may need to obtain from the Adobe Reader download page. For an installer that you can extract and doesn’t include Google Chrome or Toolbar download the EXE installer from Adobe’s FTP site: ftp://ftp.adobe.com/pub/adobe/reader/win/10.x/10.1.0
Note: if you need to download the latest installer, always grab a copy from the Adobe site to guarantee you have a source you can trust
Once you’ve downloaded the Reader installer, extract the setup files so that you can create a custom transform file. To extract, run the following command line:
AdbeRdr1010\_en\_US.exe.exe -nos\_o"C:\Folder" -nos\_ne
Replace C:\Folder with the path to a local folder. If you don’t specific the -nos_o switch, the files will be extracted here:
- %ProgramData%\Adobe\Setup (Windows Vista and above)
- %ALLUSERSPROFILE%\Application Data\Adobe\Setup (Windows XP / Windows Server 2003)
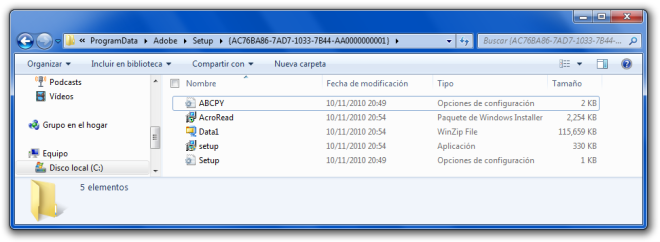
Once extracted, you should have the following files required for Reader deployment:
- ABCPY.INI
- AcroRead.msi
- Data1.cab
- setup.exe
- Setup.ini
Creating a custom Transform for Reader X
Here I’ll step through creating a custom installation for Reader, providing some recommended settings for your deployment and add links to further information that you may need to consider for your specific environment.
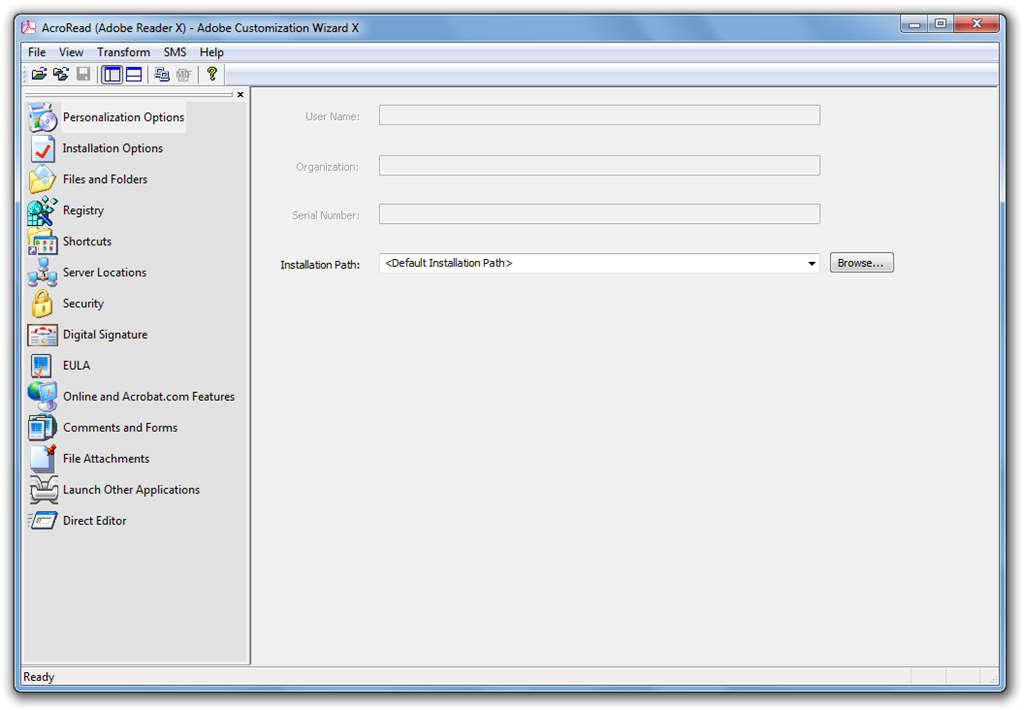
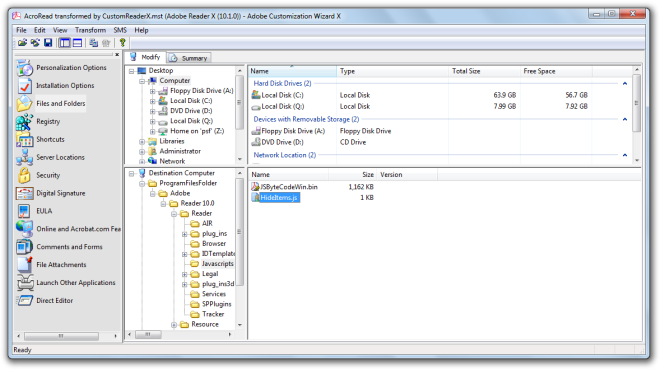
Step 1 Personalisation Options: Open the Customization Wizard, click File / Open Package… and browse to AcroRead.MSI located in the folder that contains the extract Reader setup files. You can change the installation path if required:
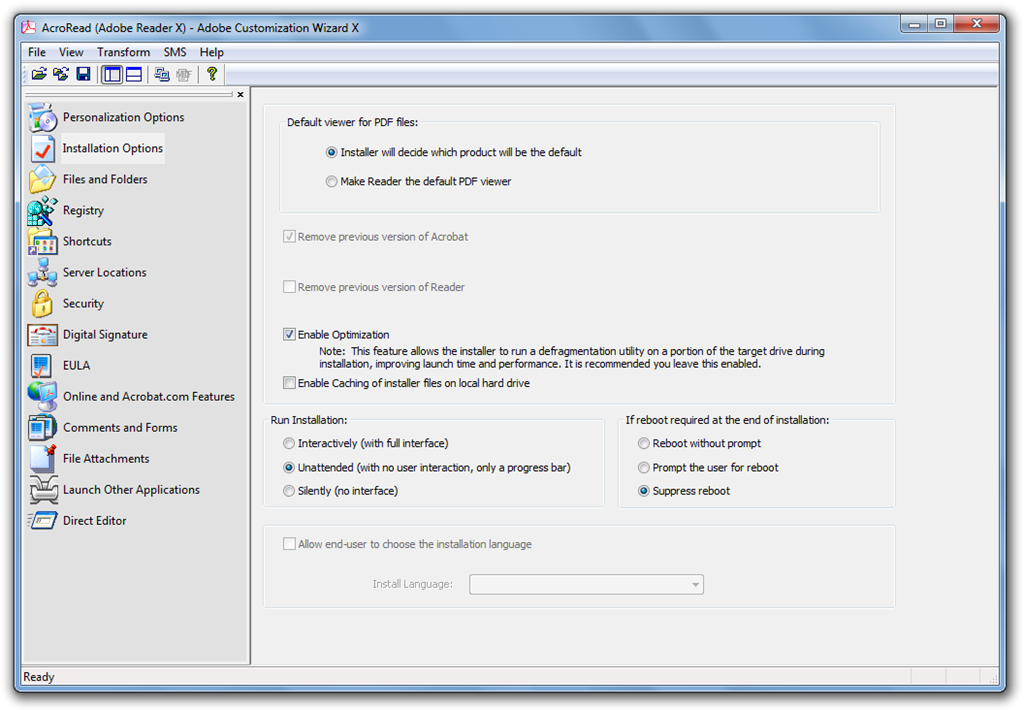
Step 2 Installation Options: there a few options to consider here:
- Default viewer for PDF files – if you are installing both Acrobat and Reader on the same machine, which application do you want to open PDF files by default.
- Enable Optimization – Windows Installer will defrag the installation post install, leave this option enabled. [Windows Installer property: ENABLE_OPTIMIZATION]
- Enable Caching of installer files on local hard drive – a copy of the Reader install files will be stored on the target machine ( in %ProgramFiles%\Adobe\Reader 10.0\Setup Files or %ProgramFiles(x86)%\Adobe\Reader 10.0\Setup Files). If you are deploying Reader with a deployment solution or virtualizing Reader, I recommend disabling this option. [Windows Installer property: ENABLE_CACHE_FILES]
- Run installation – run the installer Unattended by default unless your specific deployment requires the installer to run completely silently (you can control this on the command line as well).
- If reboot required at the end of installation – choose Suppress reboot and control reboots with an external process (such as a script or your deployment solution).
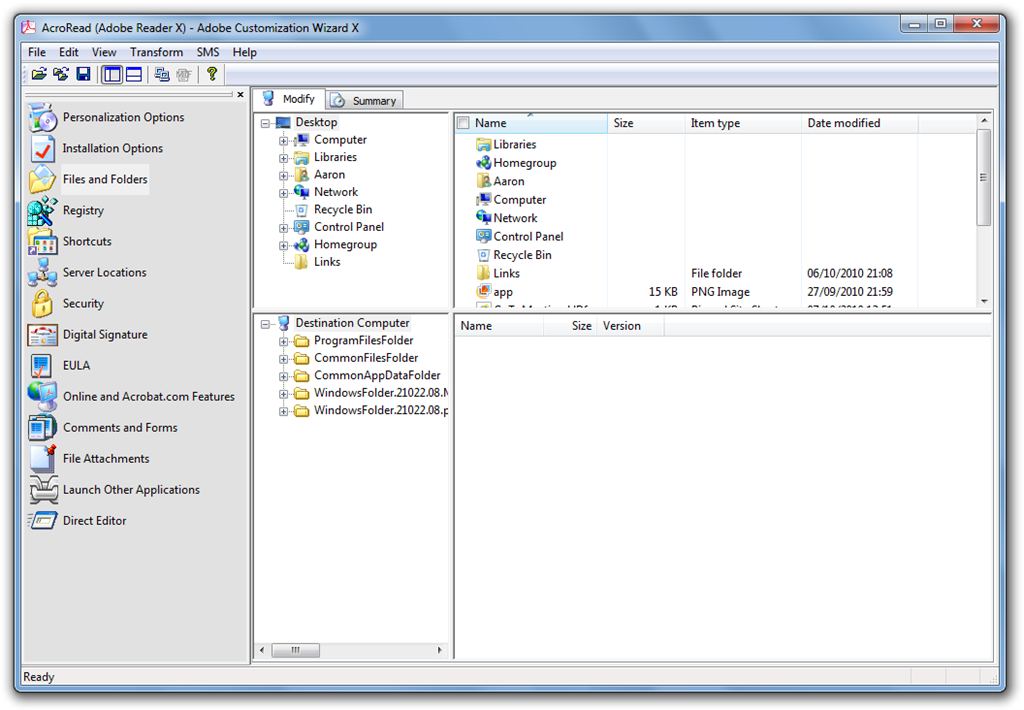
Step 3 Files and Folders: additional files (such as a JavaScript file to restrict menu items) can be added here:
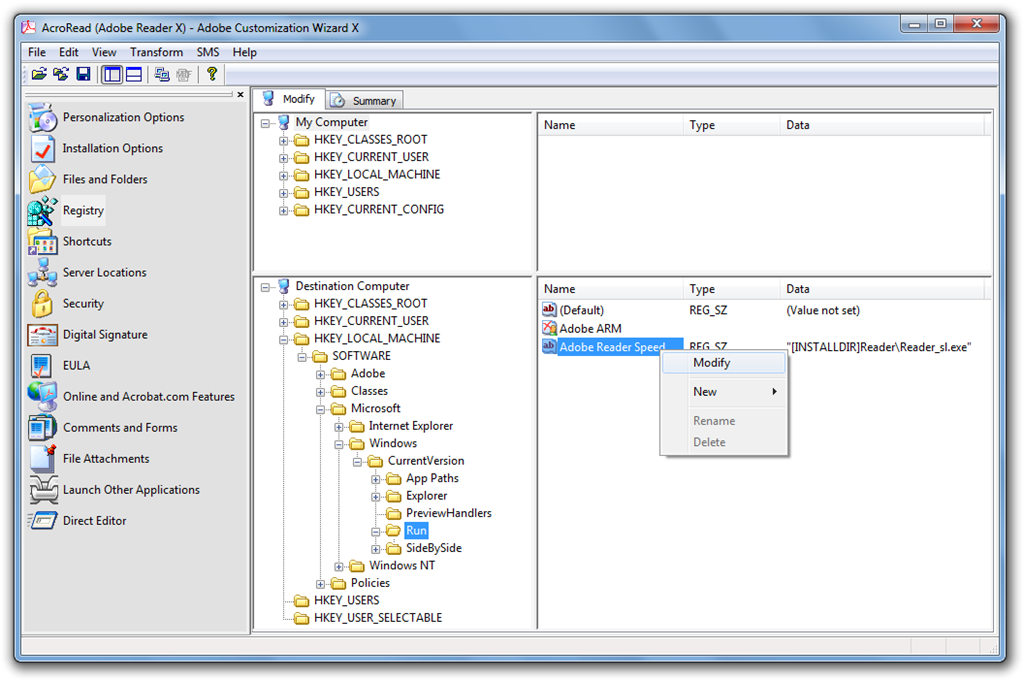
Step 4 Registry: add additional Registry values here to control the Reader installation. You can browse the local computer’s Registry to make adding entries simpler.
There are two edits I recommend making – browse to Destination Computer / HKEY\_LOCAL\_MACHINE\Software\Microsoft\Windows\CurrentVersion\Run and modify these startup items, if they exist:
- Adobe ARM
- Adobe Reader Speed Launcher
Right-click each of these entries and choose Modify. Set Action to Remove value. This will prevent the installer from adding these entries and starting unnecessary processes at user logon. This step is very important for Terminal Server / Remote Desktop Session Host environments to reduce the processes that will run in each user’s session.
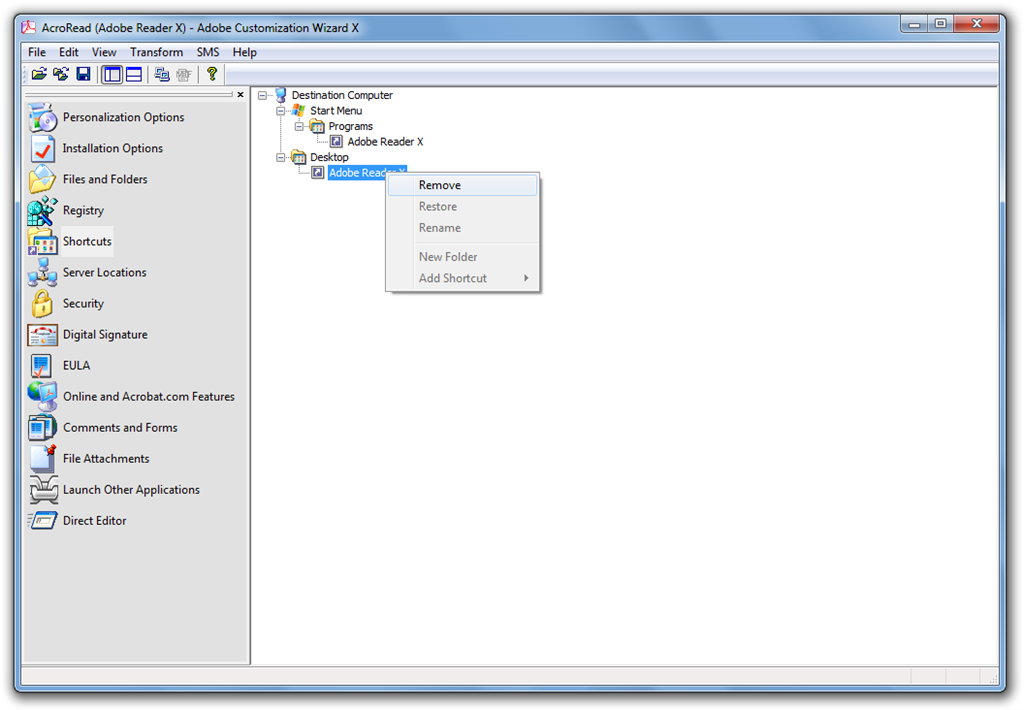
Step 5 Shortcuts: for whatever reason, Adobe deems in necessary to add a superfluous shortcut for Reader to the desktop. Don’t forget to remove that here – if you don’t remove the shortcut in the transform, it will be created when you patch Reader.
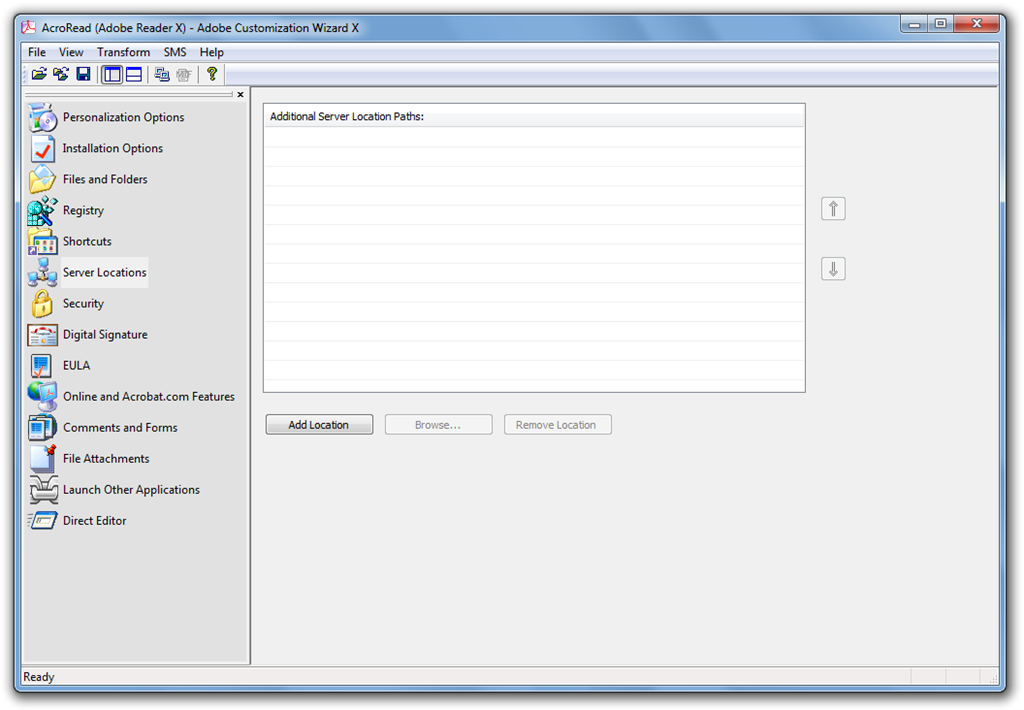
Step 6 Server Locations: the Server Locations settings allow you to configure additional server location paths to ensure source resiliency for the Windows Installer package.
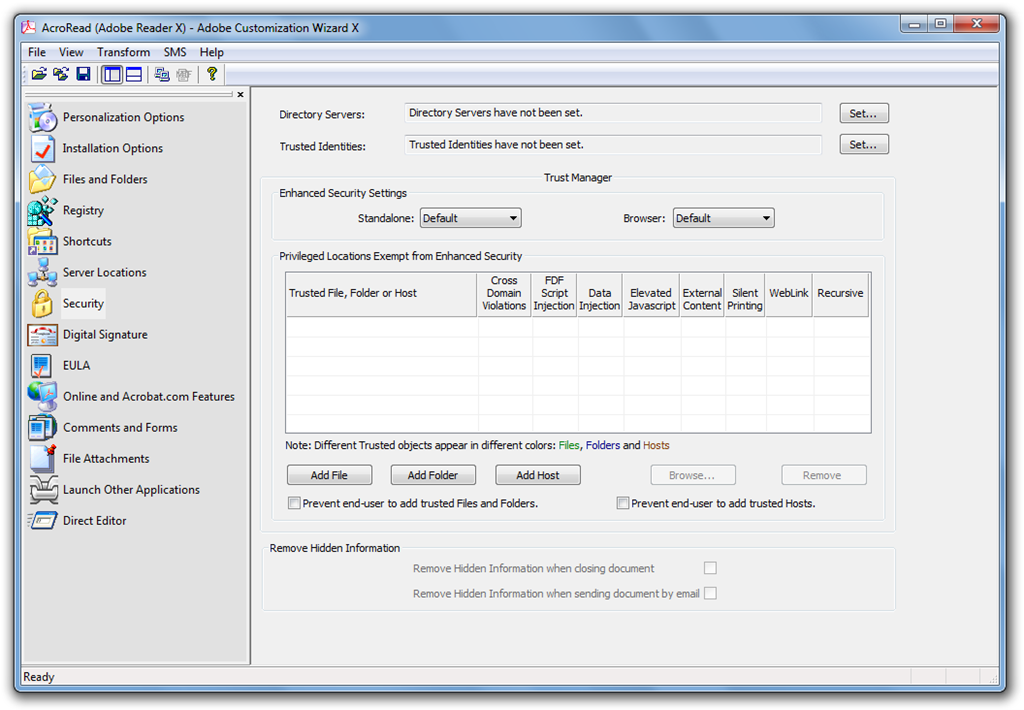
Step 7 Security: further information on Adobe Reader and Acrobat security can be found here: Acrobat 9 Security Administration Guide. Options to consider include:
- Enhanced Security Settings: Standalone and Browser (choose Enable & Lock)
- Prevent end-user to add trusted Files and Folders
- Prevent end-user to add trusted Hosts
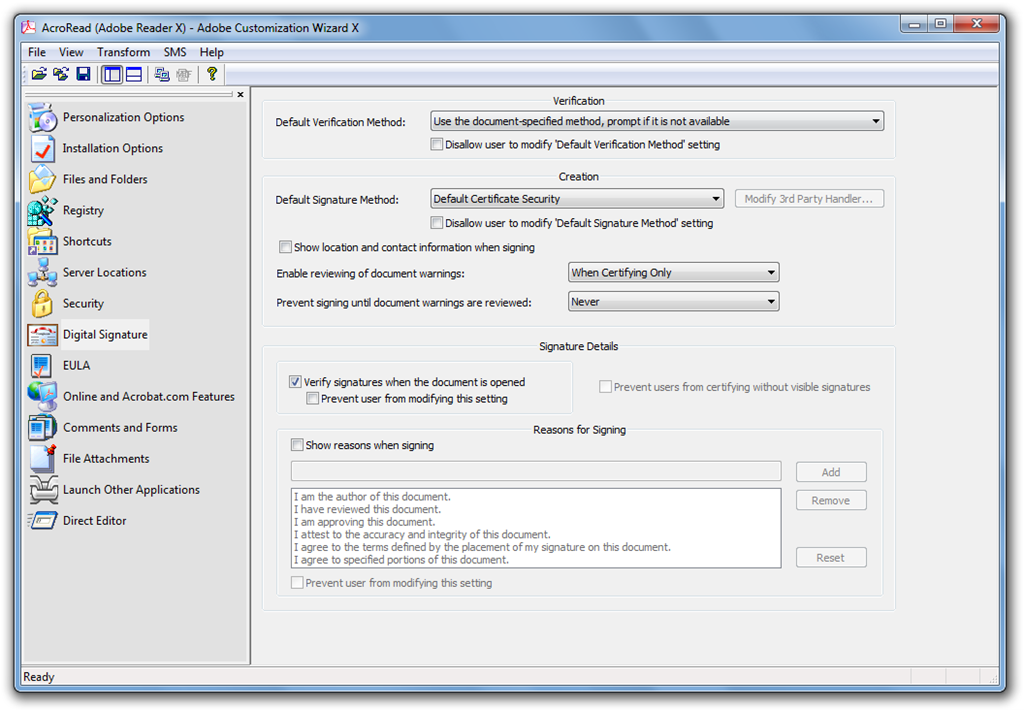
Step 8 Digital Signature: the Digital Signature settings allow you to specify the security options (verification, creation, reasons) for digital signatures. Read more about Digital Signatures in the security guide and this document: Digital Signature Validation Cheat Sheet
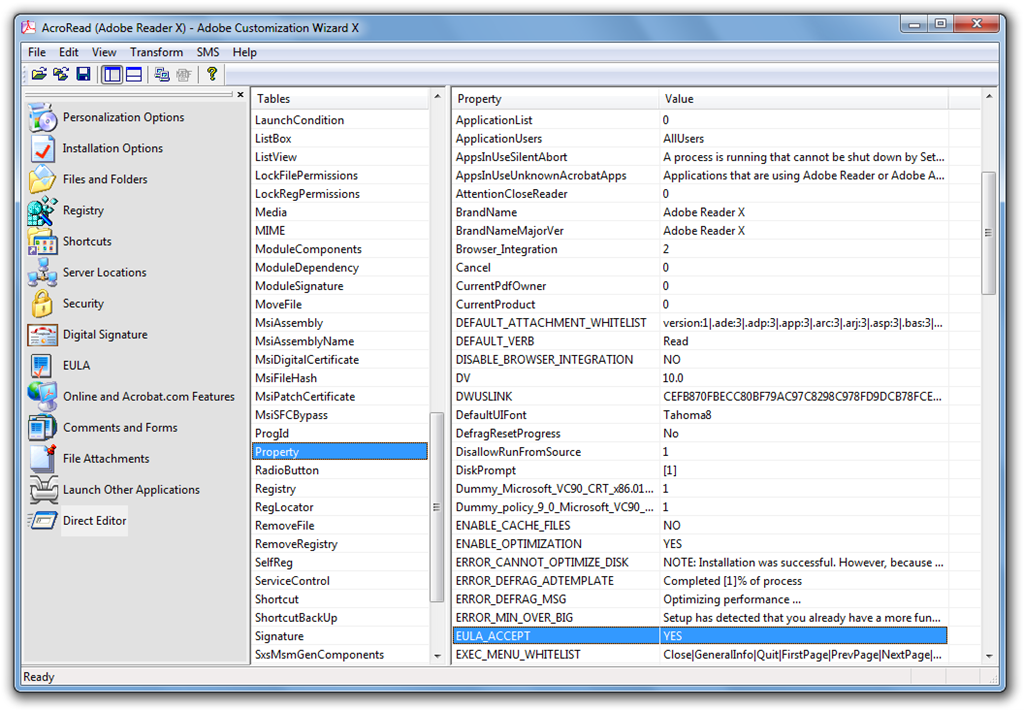
Step 9 EULA: here you can suppress the display of the End User License Agreement when the user first launches Reader. [Windows Installer property: EULA_ACCEPT]

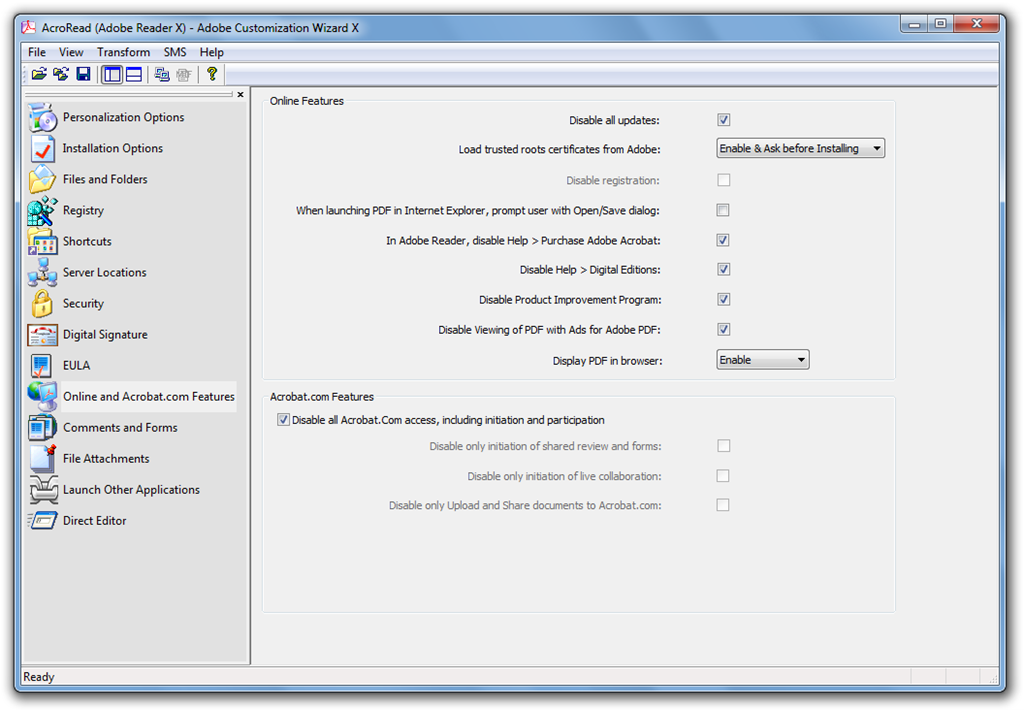
Step 10 Online and Acrobat.com Features: access to several features can be controlled here:
- Disable all updates: this will prevent the Adobe Updater from running automatically (but won’t prevent it from installing). The Check for Updates menu option will also be removed.
Warning: It is extremely important to disable Adobe Updater on shared systems such as Terminal Server/Remote Desktop Servers - a standard user can initiate a reboot of a computer if Updater applies a Reader update. This is because the update is applied using Windows Installer which runs in the System context.
- Browser integration can be controlled here – you can force Reader to open PDFs outside of the browser rather than embedded in the browser window
- Various menu items and features (such as Purchase Adobe Acrobat, Digital Editions) can be disabled
- The Product Improvement Program can be disabled
- The Acrobat.com integration in Reader can be disabled
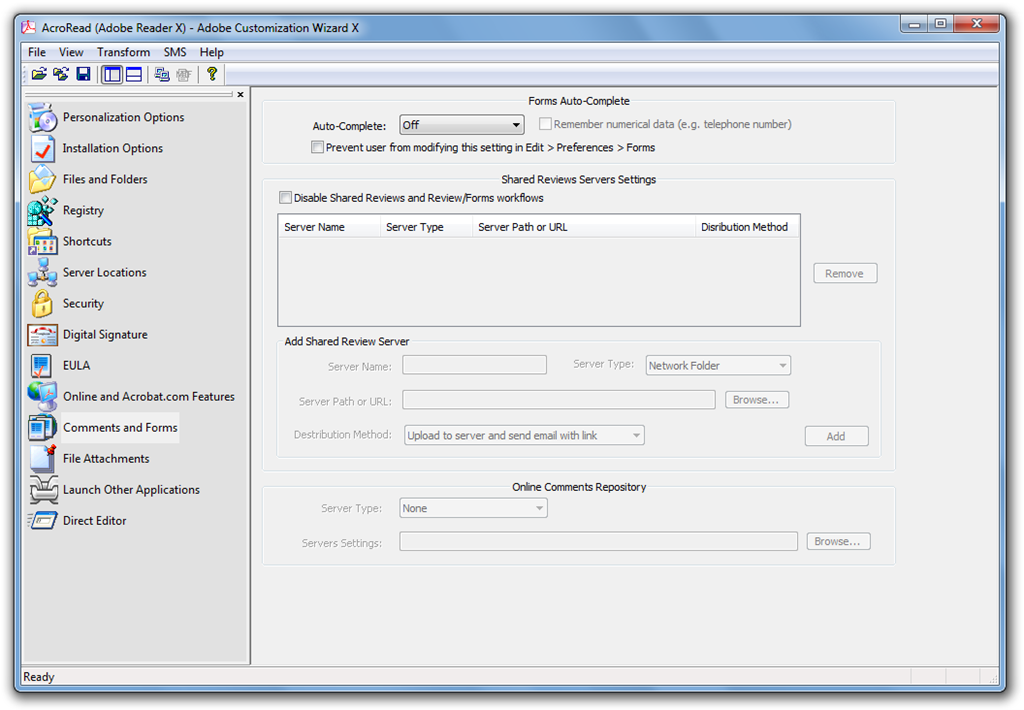
Step 11 Comments and Forms: control and set options for comments in PDFs and forms.
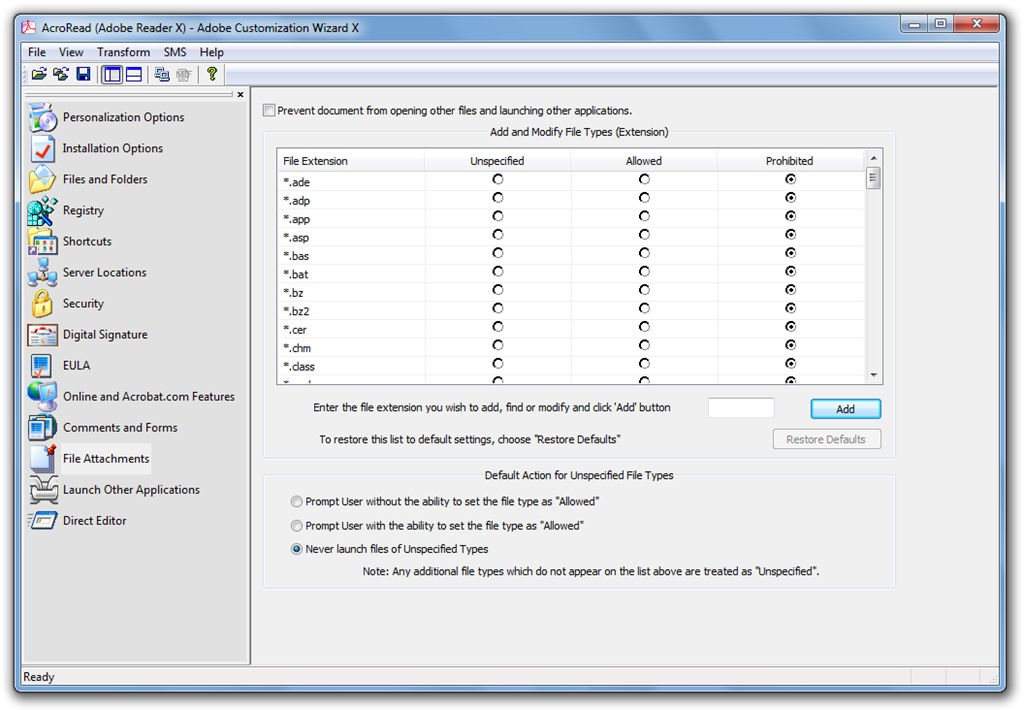
Step 12 File Attachments: control the launching of file types from PDF documents. You may want to set this option:
- Default Action for Unspecified File Types: Never launch files of Unspecified Types
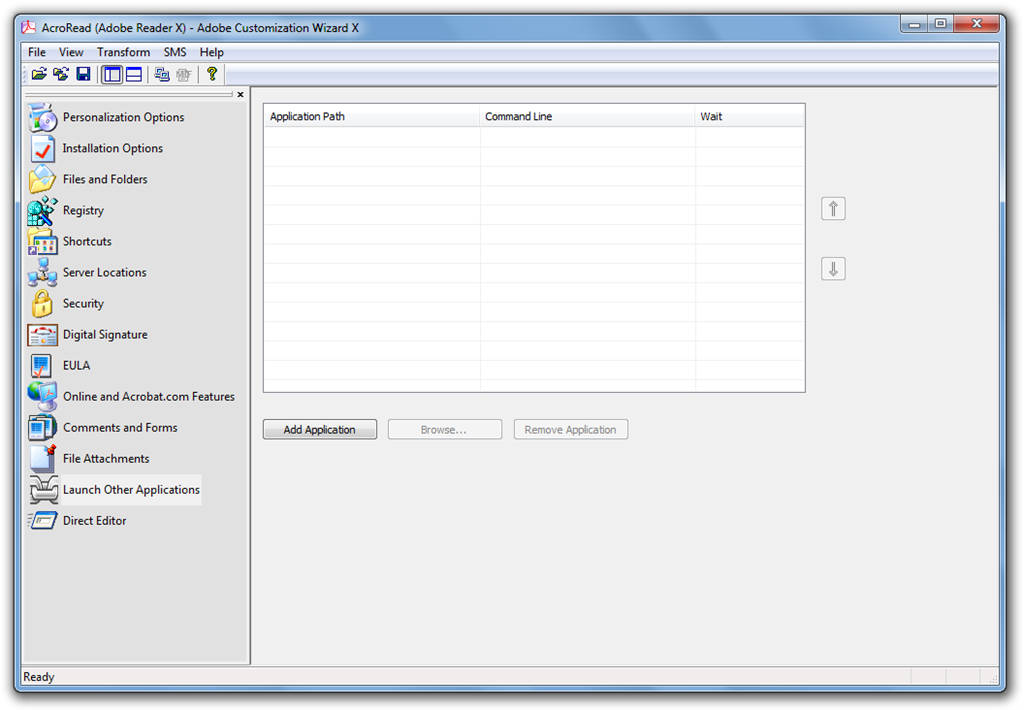
Step 13 Launch Other Applications: the Launch Other Applications settings allow you to specify additional applications to be installed with Reader.
Step 14 Direct Editor: if you want to make further edits to the transform file you can do so here; however I often prefer to save the transform and open it with a 3rd party MSI editor.
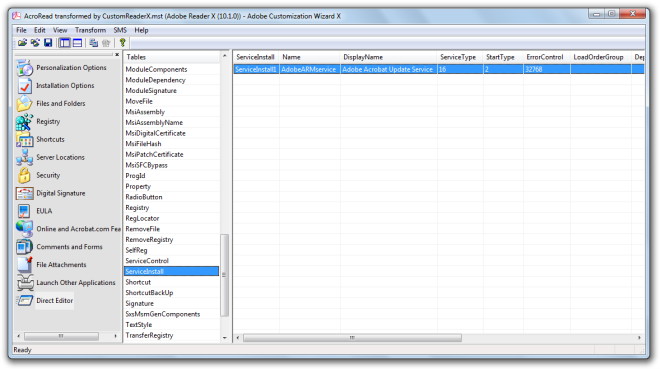
To disable the Adobe Acrobat Update Service introduced with Reader 10.1, navigate to the ServiceInstall table and take one of two actions
- Drop the row ServiceInstall1 to prevent the install of the service
- Change the value of StartType to 3 (manual) or 4 (disabled)
Disabling Additional Menu Items
After creating a custom installation there are a few menu items (less than previous versions) that you may want to remove for end-users:
These menu items are:
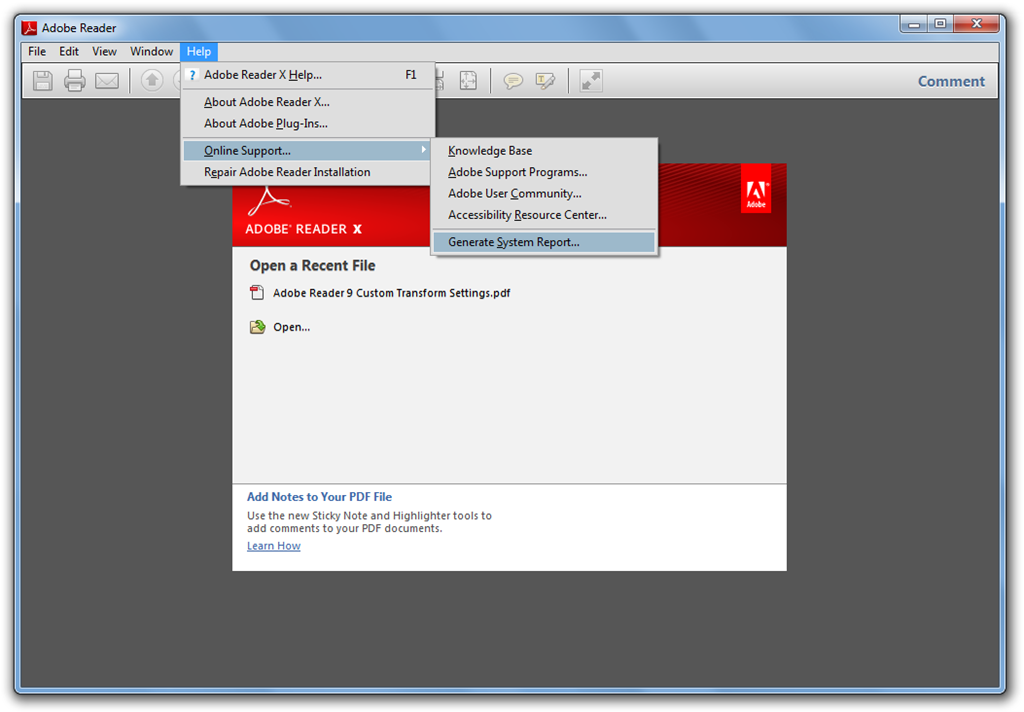
- Help / Online Support… / Knowledge Base
- Help / Online Support… / Adobe Support Programs…
- Help / Online Support… / Adobe User Community…
- Help / Online Support… / Accessibility Resource Center…
- Help / Online Support… / Generate System Report…
- Help / Repair Adobe Reader Installation
Warning: It is extremely important to remove the Repair Adobe Reader Installation menu item on shared systems such as Terminal Server/Remote Desktop Servers - a standard user can initiate a reboot of a computer if the repair kicks in. This is because the repair is applied using Windows Installer which runs in the System context.
Just like previous versions, the only way to disable certain UI elements such as menu items and toolbars is to use JavaScript. This is a two step process – first we need to find out the name of the items we want to disable. To do that you will need to place some JavaScript in a file in the JavaScripts folder where Reader is installed. For example this on x64 Windows, place the file here: %ProgramFiles (x86)%\Adobe\Reader 10.0\Reader\Javascripts. Add the following code into the file and save it as ListItems.js.
//ListItems.js
//Open Javascript Console
console.show();

//List Toolbar Buttons in the Console
var toolbarItems = app.listToolbarButtons()
for( var i in toolbarItems)
console.println(toolbarItems + "\n")

//List Menu Items in the Console
var menuItems = app.listMenuItems()
for( var i in menuItems)
console.println(menuItems + "\n")
When you start Reader a list of the user interface elements will be displayed:
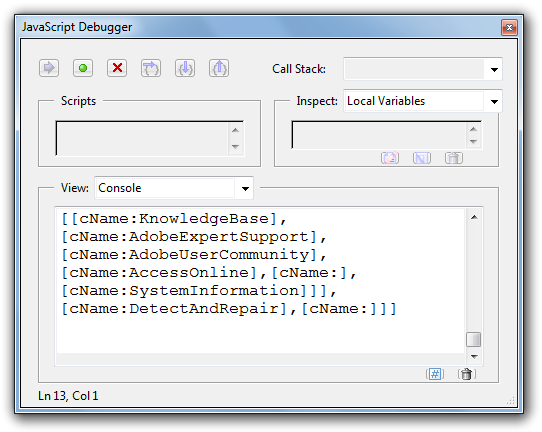
The list is quite long, but you can use it to control the display of both menu items and buttons.
To hide the menu items listed above, save the following code in HideItems.js in the same JavaScripts folder. When Reader is run, the JavaScript will be executed and the items removed.
//HideMenu.js

// [Help - Repair Adobe Reader Installation]
app.hideMenuItem("DetectAndRepair");

// [Help - Online Support]
app.hideMenuItem("OnlineSupport");

// [Help - Online Support - Knowledge Base]
app.hideMenuItem("KnowledgeBase");

// [Help - Online Support - Adobe Support Programs]
app.hideMenuItem("AdobeExpertSupport");

// [Help - Online Support - Adobe User Community]
app.hideMenuItem("AdobeUserCommunity");

// [Help - Online Support - Accessibility Resource Center]
app.hideMenuItem("AccessOnline");

// [Help - Online Support - Generate System Report]
app.hideMenuItem("SystemInformation");
To deliver the script with the Reader package, use the Files and Folders section in the Customization Wizard. Add the files to Destination Computer / ProgramFilesFolder / Adobe / Reader 10.0 / Reader / JavaScripts (see Step 3 above).
Enforcing Protected Mode
Adobe Reader X Protected Mode will assist in reducing the potential security threats when opening or viewing PDF files, so it’s a feature you’ll want to ensure remains enabled on client computers. However, by default, users can turn this feature off - this option is available in the Preferences dialog box under General:
In the user’s context, Protected Mode is controlled with the following Registry value:
- Key: HKCU\Software\Adobe\Acrobat Reader\10.0\Privileged
- Value: bProtectedMode
- Type: REG_DWORD
- Data: 1
Fortunately, Protected Mode can also be enforced per-machine instead by setting this Registry value:
- Key: HKLM\SOFTWARE\Policies\Adobe\Acrobat Reader\10.0\FeatureLockDown
- Value: bProtectedMode
- Type: REG_DWORD
- Data: 1
With this set, users will be unable to disable Protected Mode. Use the Registry option in the Adobe Customization Wizard (covered in step 4 above) to set this value in your deployment package.
With the release of Reader 10.1, Protected Mode is now supported on Terminal Servers/Remote Desktop Servers.
Finding more Reader Preferences and Policies
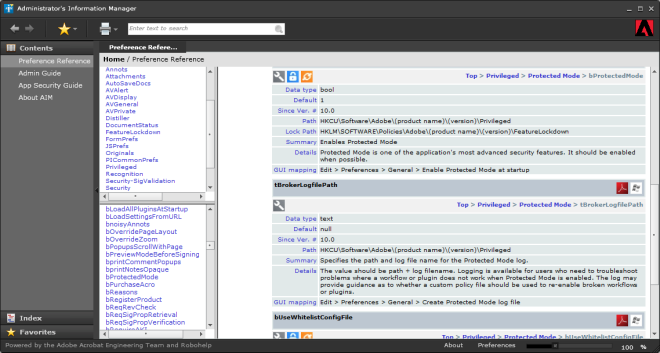
To find the complete list of preferences for Reader and Acrobat you should refer to the Administrator’s Information Manager. This tool also contains the Reader and Acrobat Admin and Security guides.
The Administrator’s Information Manager (AIM) is an auto-updating and customizable AIR application containing the Preference Reference. AIM also includes and a growing list of other resources of interest to administrators in enterprise settings.
Additional Reading
[Enterprise administration Acrobat family of products](http://kb2.adobe.com/cps/837/cpsid_83709.html) - 5 Things to Think About Before Deploying Adobe Reader or Acrobat X
[Protected Mode Troubleshooting Adobe Reader](http://kb2.adobe.com/cps/860/cpsid_86063.html) - Adobe Reader Forums
- Adobe Acrobat and Reader Security
- Adobe Acrobat 9 Deployment on Microsoft Windows Group Policy and the Active Directory Service
- Acrobat 9 Deployment on Microsoft Systems Management Server
- Acrobat 9 Deployment on Microsoft Windows Terminal Services
- Acrobat 9 Deployment on Citrix Presentation Server