Cleaning up and Reducing the Size of your Master Image
There’s typically not too much that you can do to reduce the size of your master image. You might use application virtualization or layering solutions to reduce the number of master images, but once you work out what needs to go into the core image, that’s going to dictate the size of the image.
Reducing the size of your master image can help reduce the capacity required to store master images and virtual machines (dedupe helps, of course) and spend less cycles transmitting an image across the network for physical PCs.
An easy win, is running the Disk Clean-up tool included in Windows (since Windows XP) and fortunately this tool can be automated to run at the end of a build (e.g from MDT or ConfigMgr). For physical PCs or persistent desktops, this tool could even be run as a scheduled task.
Microsoft released an important update for Windows 7 last year that can result in a significant reduction in disk space: Disk Clean-up Wizard addon lets users delete outdated Windows updates on Windows 7 SP1. The same feature was originally delivered with Windows 8. (Windows 8.1 Update 1 is expected to reduce disk space requirements again).
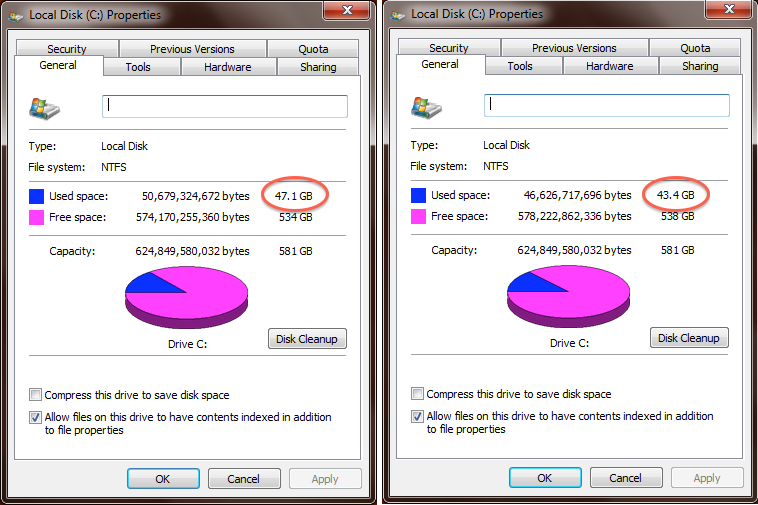
Here’s an example system where I’ve run the Disk Clean-up tool that has resulted in a 3.4 GB reduction in disk usage - on the left is the before image, on the right is after the cleanup. (I’m cheating a bit here, this is a system that has gone from Windows 7 to Windows 7 SP1, hence the reason for such a large change).
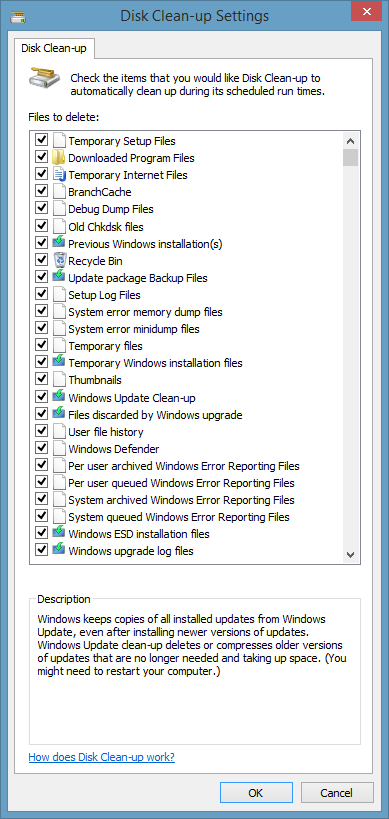
Disk Clean-up can remove a number of interesting items, most of which will actually be applicable for PCs and persistent desktops post-deployment. Here’s the items that Disk Clean-up can manage on Windows 8.1:
To automate Disk Clean-up, use the following steps:
- Elevate a command prompt
- Run
CLEANMGR /SAGESET:<number>(wherenumberis any number between 1 and 65535) - Select each of the items to clean up
- Click OK
To run Disk Clean-up from a script run CLEANMGR /SAGERUN:<number> (where number is the same number use with SAGESET.
To automate the process of running Disk Cleanup, the following script can be used to enable all of the tool’s options in the registry and then execute the cleanup process. This script should work for both Windows 7 and Windows 8 and would be useful to run at the end of a deployment. This example uses 100 as the configuration setting, so you would run CLEANMGR /SAGERUN:100 to run Disk Cleanup with these settings.
@ECHO OFF
REM Enable components to cleanup
REG ADD "HKLM\SOFTWARE\Microsoft\Windows\CurrentVersion\Explorer\VolumeCaches\Active Setup Temp Folders" /v StateFlags0100 /d 2 /t REG_DWORD /f
REG ADD "HKLM\SOFTWARE\Microsoft\Windows\CurrentVersion\Explorer\VolumeCaches\BranchCache" /v StateFlags0100 /d 2 /t REG_DWORD /f
REG ADD "HKLM\SOFTWARE\Microsoft\Windows\CurrentVersion\Explorer\VolumeCaches\Downloaded Program Files" /v StateFlags0100 /d 2 /t REG_DWORD /f
REG ADD "HKLM\SOFTWARE\Microsoft\Windows\CurrentVersion\Explorer\VolumeCaches\GameNewsFiles" /v StateFlags0100 /d 2 /t REG_DWORD /f
REG ADD "HKLM\SOFTWARE\Microsoft\Windows\CurrentVersion\Explorer\VolumeCaches\GameStatisticsFiles" /v StateFlags0100 /d 2 /t REG_DWORD /f
REG ADD "HKLM\SOFTWARE\Microsoft\Windows\CurrentVersion\Explorer\VolumeCaches\GameUpdateFiles" /v StateFlags0100 /d 2 /t REG_DWORD /f
REG ADD "HKLM\SOFTWARE\Microsoft\Windows\CurrentVersion\Explorer\VolumeCaches\Internet Cache Files" /v StateFlags0100 /d 2 /t REG_DWORD /f
REG ADD "HKLM\SOFTWARE\Microsoft\Windows\CurrentVersion\Explorer\VolumeCaches\Memory Dump Files" /v StateFlags0100 /d 2 /t REG_DWORD /f
REG ADD "HKLM\SOFTWARE\Microsoft\Windows\CurrentVersion\Explorer\VolumeCaches\Offline Pages Files" /v StateFlags0100 /d 2 /t REG_DWORD /f
REG ADD "HKLM\SOFTWARE\Microsoft\Windows\CurrentVersion\Explorer\VolumeCaches\Old ChkDsk Files" /v StateFlags0100 /d 2 /t REG_DWORD /f
REG ADD "HKLM\SOFTWARE\Microsoft\Windows\CurrentVersion\Explorer\VolumeCaches\Previous Installations" /v StateFlags0100 /d 2 /t REG_DWORD /f
REG ADD "HKLM\SOFTWARE\Microsoft\Windows\CurrentVersion\Explorer\VolumeCaches\Recycle Bin" /v StateFlags0100 /d 2 /t REG_DWORD /f
REG ADD "HKLM\SOFTWARE\Microsoft\Windows\CurrentVersion\Explorer\VolumeCaches\Service Pack Cleanup" /v StateFlags0100 /d 2 /t REG_DWORD /f
REG ADD "HKLM\SOFTWARE\Microsoft\Windows\CurrentVersion\Explorer\VolumeCaches\Setup Log Files" /v StateFlags0100 /d 2 /t REG_DWORD /f
REG ADD "HKLM\SOFTWARE\Microsoft\Windows\CurrentVersion\Explorer\VolumeCaches\System error memory dump files" /v StateFlags0100 /d 2 /t REG_DWORD /f
REG ADD "HKLM\SOFTWARE\Microsoft\Windows\CurrentVersion\Explorer\VolumeCaches\System error minidump files" /v StateFlags0100 /d 2 /t REG_DWORD /f
REG ADD "HKLM\SOFTWARE\Microsoft\Windows\CurrentVersion\Explorer\VolumeCaches\Temporary Files" /v StateFlags0100 /d 2 /t REG_DWORD /f
REG ADD "HKLM\SOFTWARE\Microsoft\Windows\CurrentVersion\Explorer\VolumeCaches\Temporary Setup Files" /v StateFlags0100 /d 2 /t REG_DWORD /f
REG ADD "HKLM\SOFTWARE\Microsoft\Windows\CurrentVersion\Explorer\VolumeCaches\Temporary Sync Files" /V StateFlags0100 /d 2 /t REG_DWORD /f
REG ADD "HKLM\SOFTWARE\Microsoft\Windows\CurrentVersion\Explorer\VolumeCaches\Thumbnail Cache" /v StateFlags0100 /d 2 /t REG_DWORD /f
REG ADD "HKLM\SOFTWARE\Microsoft\Windows\CurrentVersion\Explorer\VolumeCaches\Update Cleanup" /v StateFlags0100 /d 2 /t REG_DWORD /f
REG ADD "HKLM\SOFTWARE\Microsoft\Windows\CurrentVersion\Explorer\VolumeCaches\Upgrade Discarded Files" /v StateFlags0100 /d 2 /t REG_DWORD /f
REG ADD "HKLM\SOFTWARE\Microsoft\Windows\CurrentVersion\Explorer\VolumeCaches\User file versions" /v StateFlags0100 /d 2 /t REG_DWORD /f
REG ADD "HKLM\SOFTWARE\Microsoft\Windows\CurrentVersion\Explorer\VolumeCaches\Windows Defender" /v StateFlags0100 /d 2 /t REG_DWORD /f
REG ADD "HKLM\SOFTWARE\Microsoft\Windows\CurrentVersion\Explorer\VolumeCaches\Windows Error Reporting Archive Files" /v StateFlags0100 /d 2 /t REG_DWORD /f
REG ADD "HKLM\SOFTWARE\Microsoft\Windows\CurrentVersion\Explorer\VolumeCaches\Windows Error Reporting Queue Files" /v StateFlags0100 /d 2 /t REG_DWORD /f
REG ADD "HKLM\SOFTWARE\Microsoft\Windows\CurrentVersion\Explorer\VolumeCaches\Windows Error Reporting System Archive Files" /v StateFlags0100 /d 2 /t REG_DWORD /f
REG ADD "HKLM\SOFTWARE\Microsoft\Windows\CurrentVersion\Explorer\VolumeCaches\Windows Error Reporting System Queue Files" /v StateFlags0100 /d 2 /t REG_DWORD /f
REG ADD "HKLM\SOFTWARE\Microsoft\Windows\CurrentVersion\Explorer\VolumeCaches\Windows ESD installation files" /v StateFlags0100 /d 2 /t REG_DWORD /f
REG ADD "HKLM\SOFTWARE\Microsoft\Windows\CurrentVersion\Explorer\VolumeCaches\Windows Upgrade Log Files" /v StateFlags0100 /d 2 /t REG_DWORD /f

REM Run cleanup
IF EXIST %SystemRoot%\SYSTEM32\cleanmgr.exe START /WAIT cleanmgr /sagerun:100
It’s important to note that while Disk Clean-up exists on Windows 7 and Windows 8, it does not exist on Windows Server unless the Desktop Experience feature is installed (i.e. a Remote Desktop Session Host).
If your image is Windows 8.1 or Windows Server 2012 R2, then the following command is available to perform an even more in depth cleanup of the WinSXS folder, making some additional space available:
Dism.exe /online /Cleanup-Image /StartComponentCleanup /ResetBase
Running Disk Clean-up and the above DISM command in a script to clean up your master image should result in a smaller image. Don’t forget that this approach is also useful for persistent desktops - unless you’re using some type of dedupe solution, then there’s potentially gigabytes per desktop that can be removed.
There is one more method worth for reducing space worth mentioning - the Uninstall-WindowsFeature PowerShell cmdlet in Windows Server 2012 and Windows Server 2012 R2. This can go a long way too to reducing the disk footprint by completely removing features from Windows (making them unavailable for install).
For instance, if you’re deploying a Remote Desktop Session Host, there’s no need for IIS or Hyper-V to be in the component store. See this blog post article for full details: How to Reduce the Size of the Winsxs directory and Free Up Disk Space on Windows Server 2012 Using Features on Demand
[May 14 2014] Microsoft has released this update for Windows Server 2008 R2, which can be on the original KB article here: Disk Cleanup Wizard add-on lets users delete outdated Windows updates on Windows 7 SP1 or Windows Server 2008 R2 SP1. The update is available from Windows Update and WSUS.