Adding Shell Extensions to App-V Packages
Inspired by a post on the ThinApp blog on Adding Shell Extensions to ThinApp Packages, I’ve documented here how to add Shell Extensions to an App-V package using the Windows Installer file generated by the App-V Sequencer.
Caveats
There are several caveats to keep in mind:
- By default, App-V only adds file type associations so that you can double click on a file to open it in a virtual package. This approach is not changing that behaviour
- This will only work for file or folder right-click menu options, it won’t get other shell integration working
- As we are editing the package Windows Installer file, your App-V deployment must use the MSI file to install the package. You could use an OSD script to integrate these changes, but the user would need to run the package at least once for the script to execute
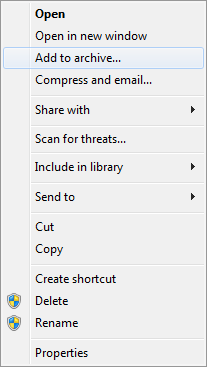
Right-click Items for WinRAR
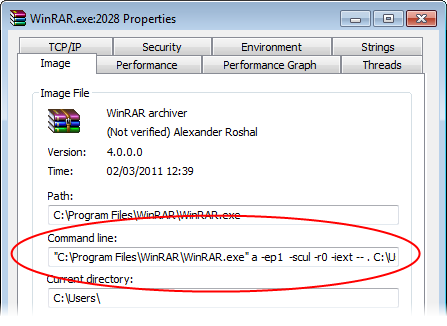
In this example, I’m using WinRAR (just like the ThinApp example), so I’ve had to determine the command line passed to WinRAR by each right-click item. To do that I’ve used Process Explorer with an installed version of WinRAR.
In this example, I will add the following right-click options:
- Add to archive… to folders
- Compress and email… to folders
- Extract files… to .RAR files
Viewing the properties of the WINRAR.EXE process displays the command line used for each item:
Editing the MSI
To add these right-click items, I’m using my favourite MSI editor InstEd to open the MSI that the App-V Sequencer generated when I sequenced WinRAR. Making these edits was a manual process for me, but depending on which MSI editor you use there are probably simpler ways of achieving the same thing.
There are four tables in the MSI where I need to make changes:
- Component
- Registry
- FeatureComponents
- InstallExecuteSequence
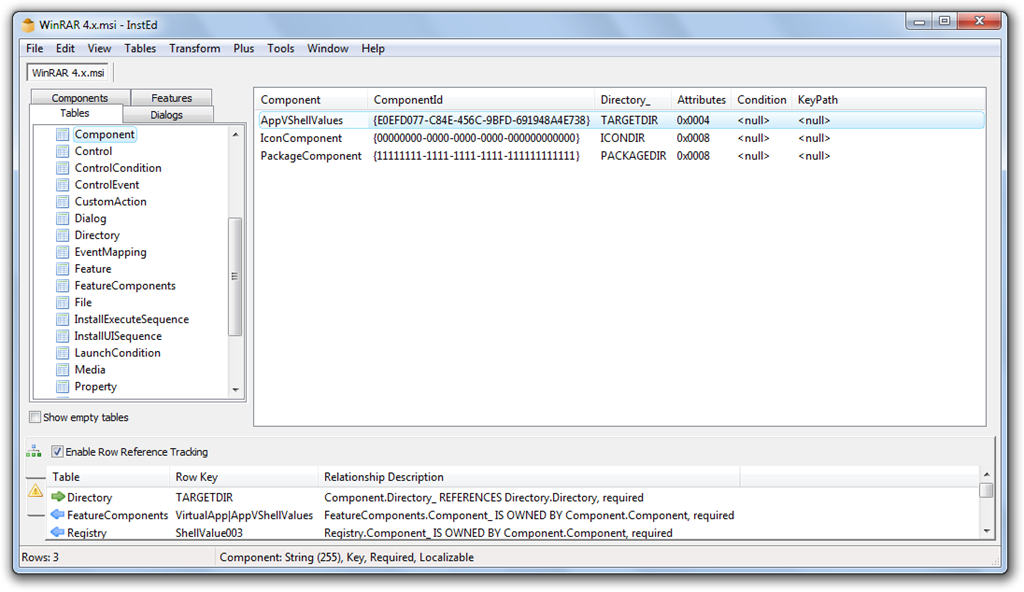
Component Table
Go to the Component table and create a new entry. This will require a unique name (I’ve used AppVShellValues) and GUID - your MSI editor should be able to generate the GUID for you.
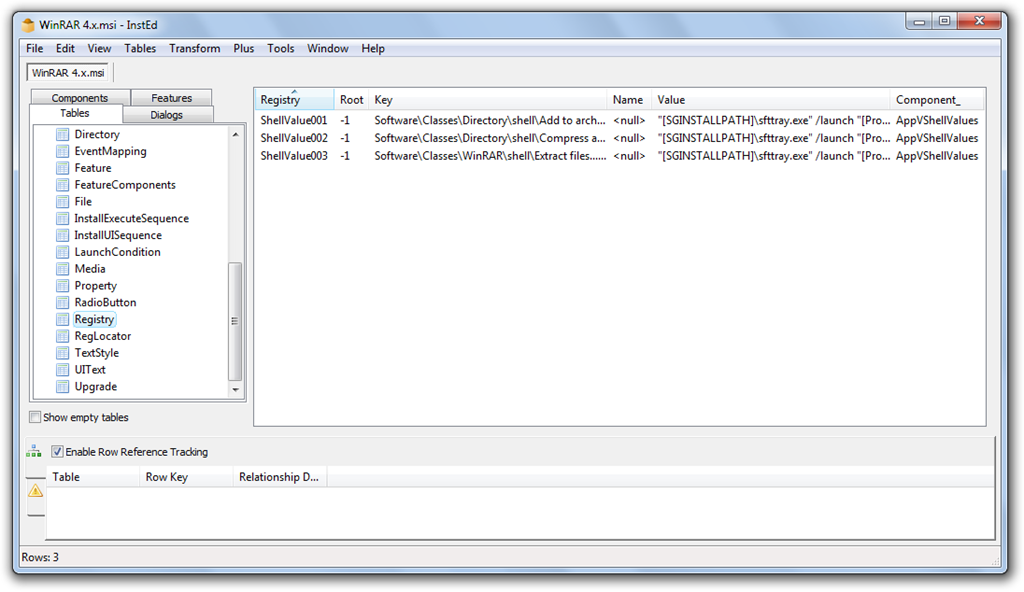
Registry Table
The Registry table, which is empty by default, will require one entry per addition to the Registry. In this example I have three entries:
| Registry | Root | Key | Name | Value | Component_ |
|---|---|---|---|---|---|
| ShellValue001 | -1 | Software\Classes\Directory\shell\Add to archive…\Command | null | "[SGINSTALLPATH]\sfttray.exe" /launch "[ProductName]" a -ep1 -scul -r0 -iext -- . "%1" | AppVShellValues |
| ShellValue002 | -1 | Software\Classes\Directory\shell\Compress and email…\Command | null | "[SGINSTALLPATH]\sfttray.exe" /launch "[ProductName]" a -ieml. -ep1 -scul -r0 -iext -- . "%1" | AppVShellValues |
| ShellValue003 | -1 | Software\Classes\WinRAR\shell\Extract files…\Command | null | "[SGINSTALLPATH]\sfttray.exe" /launch "[ProductName]" x -iext -ow -ver -- "%1" "?" | AppVShellValues |
The entries will each need to use the following items:
Registry: this requires a unique valueRoot: the value corresponds to HKLMKey: the key path will be dependent on the menu item; however each key will require the \Command pathName: this is the Registry value being added, in this example we are editing the default value, so leave this as nullValue: the command that the item will run. This passes command line arguments toSFTTRAYwhich will launch the application and then pass the command line to WinRAR.Component_: use the component name created in the previous step
The command stored in the Value column must launch the application via the App-V Client and pass parameters to that application:
- I can reference the App-V Client install folder as
[SGINSTALLPATH]as this is a property in the MSI - I need to use the application name as listed in the App-V shortcut. In my example I can use
[ProductName]because the App-V package name and the application name are the same; however this may not be the case for all packages. The application name may need to be hard coded into the MSI here. You could create a new entry in the Property table for the application name and reference it here - The rest of the command is what is passed to the application by
SFTTRAY.EXE
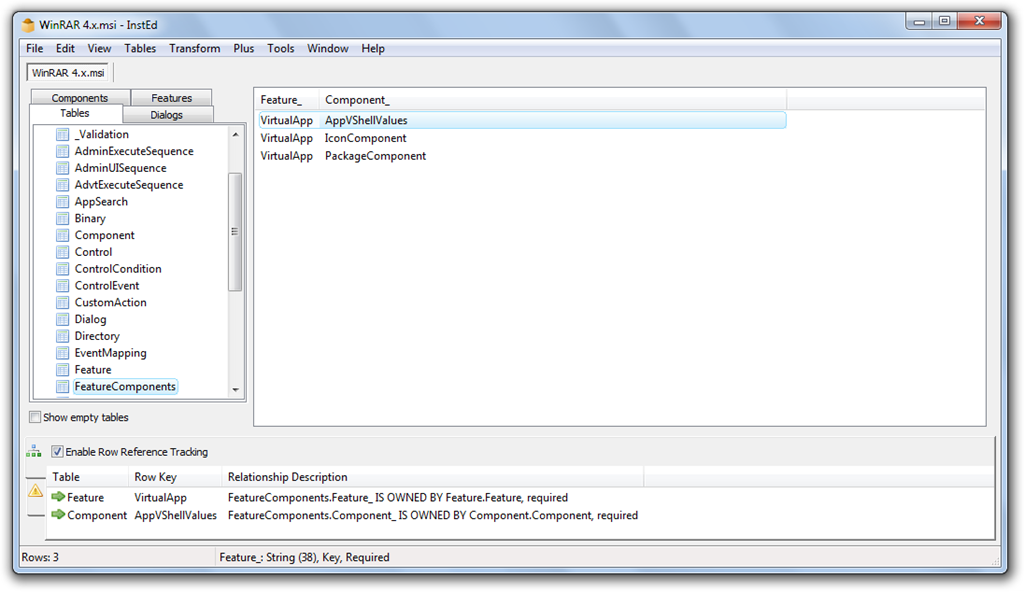
FeatureComponents Table
Add a new entry to the FeatureComponents table - use VirtualApp in the Feature_ column and select the same component used in the previous tables in the Component_ column
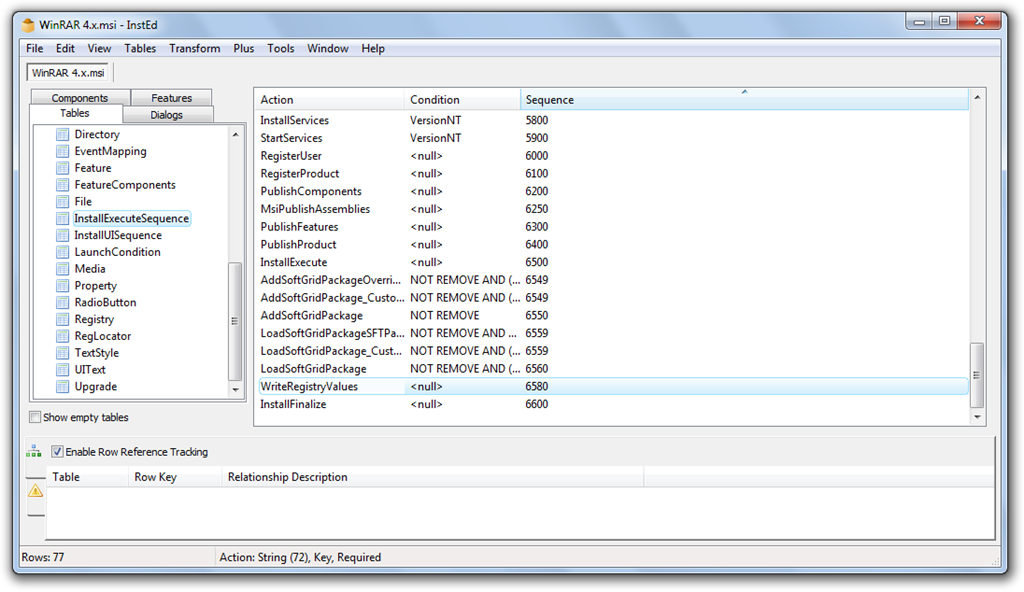
InstallExecuteSequence Table
The last step is to ensure that the Registry entries added to the MSI are installed in the correct order. As the MSI file is really just a wrapper for the SFTMIME command, the Registry entries could be overwritten when the SFTMIME command adds the package.
To change the sequence find the WriteRegistryValues entry which will have a Sequence value of 5000. Change this value to 6580 which will ensure that our custom Registry entries are added after the package is added and loaded but before the installer completes its finalize tasks.
Install the Package
If the modifications to the MSI have been completed correctly, you should see your right-click menu options from within Windows Explorer: